Error Code 0x80070035 is usually accompanied by the message “The Network Path Was Not Found”.
How to solve the 0x80070035 error is quite complex because there are many settings that we have to look at.
Users affected by this problem are usually those using a local network such as a Homegroup who is sharing the hard drive using a LAN.

This error results in other computers using the same network unable to access the file even though they are already on the same network.
Table of Contents
Causes of Error 0x80070035 “The Network Path Was Not Found”
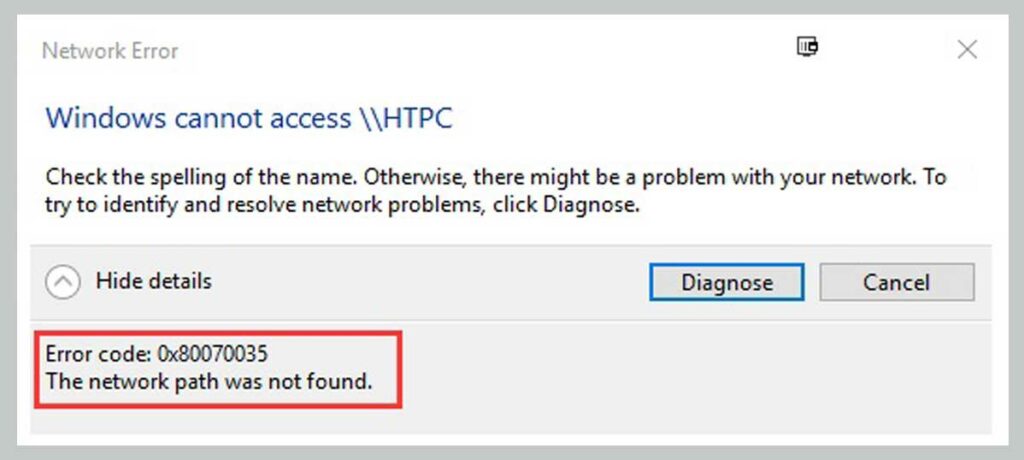
This error can be caused by many things, but generally, it is caused by a firewall or antivirus setting trying to “protect” the user from malicious files originating from other computers, or maybe you are the one who got into trouble after the KB4480970 update ?.
The Microsoft (Windows) operating system can be used to share and retrieve files, pictures, and other data from and to other computers.
You can recognize this error if when you connect and access files from another computer via the network a message appears that says Error code 0x80070035. The network path was not found.
Also Fix:
How to Fix Error 0x80070035 “The Network Path Was Not Found” 2025
From the above explanation, you can try some of these network solutions to solve the 0x80070035 problem. Do this if you can’t access files from another computer:
1. Turn Off The Firewall Temporarily
First, open the control panel first and change the View by in the top right corner to Category.
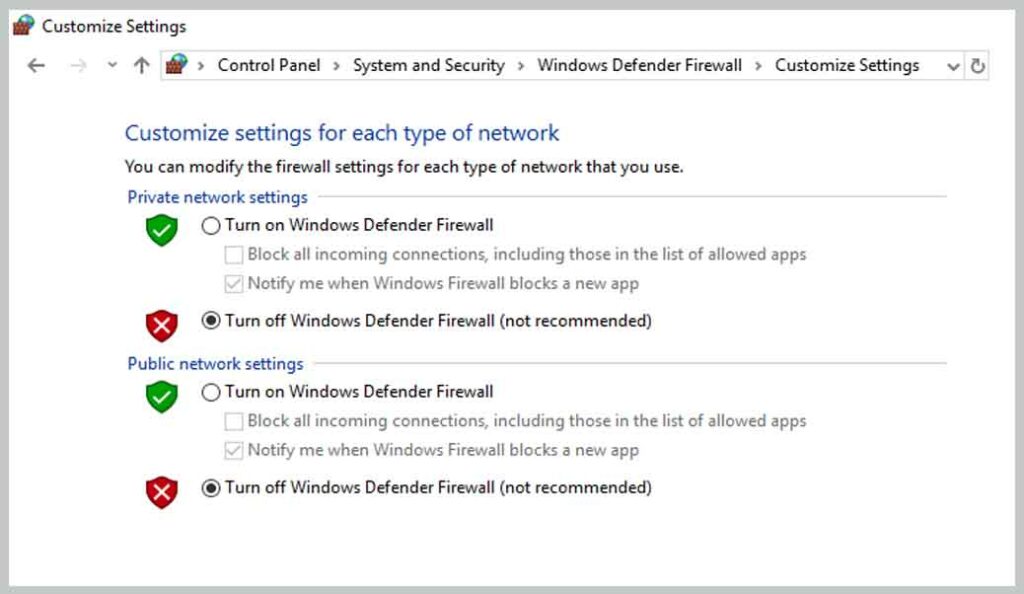
To temporarily turn off the Firewall:
- Open the Control Panel.
- Click System and Security.
- Select Windows Firewall / Windows Defender Firewall.
- Click Turn Windows Firewall on or off in the left-hand panel.
- Turn off the Firewall for private networks.
- Turn off the Firewall for the Public network.
- Click OK.
2. Turn off Antivirus Temporarily
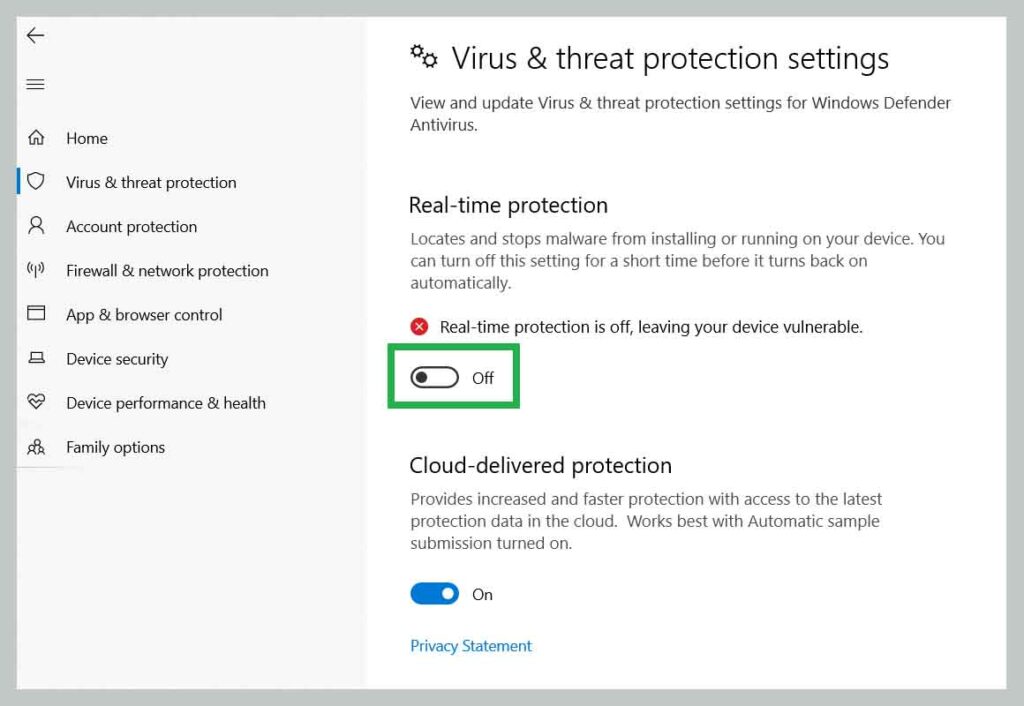
This section is intended to turn off the default antivirus Windows 10, namely Windows Defender.
For 3rd party antivirus application users such as Avast, Avira, Kaspersky, and others, you can turn it off through related applications.
To turn off Windows Defender:
- Open the Start Menu.
- Click Settings ➡ Update & Security .
- Click Windows Security in the left-hand panel.
- Click Open Windows Security.
- Click Virus & Thread Protection.
- Click Manage Settings.
- Turn off Real-time protection.
- Turn off cloud-delivered protection.
- Turn off Tamper Protection.
Note: It is not recommended to turn off Antivirus when you open, access, download, or do Internet-related activities.
3. Reinstall The Network Adapter Driver
Device manager is a Control Panel provided in Windows to help users view and manage hardware connected to the computer.
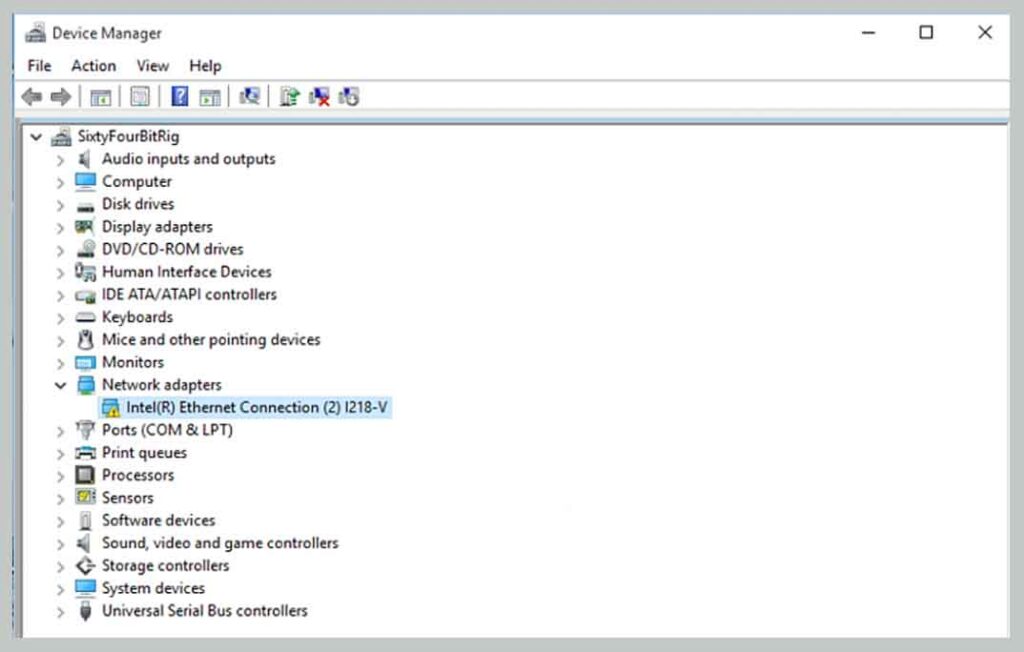
This is how to reinstall the Network Adapter driver:
- Prepare a new network driver.
- Open the Device Manager.
- Double click on Network Adapters.
- Right-click the device you are using.
- Click Uninstall ➡ reinstall the driver, or.
- Press the Action menu ➡ Scan for hardware changes.
4. Enable WiFI Sharing
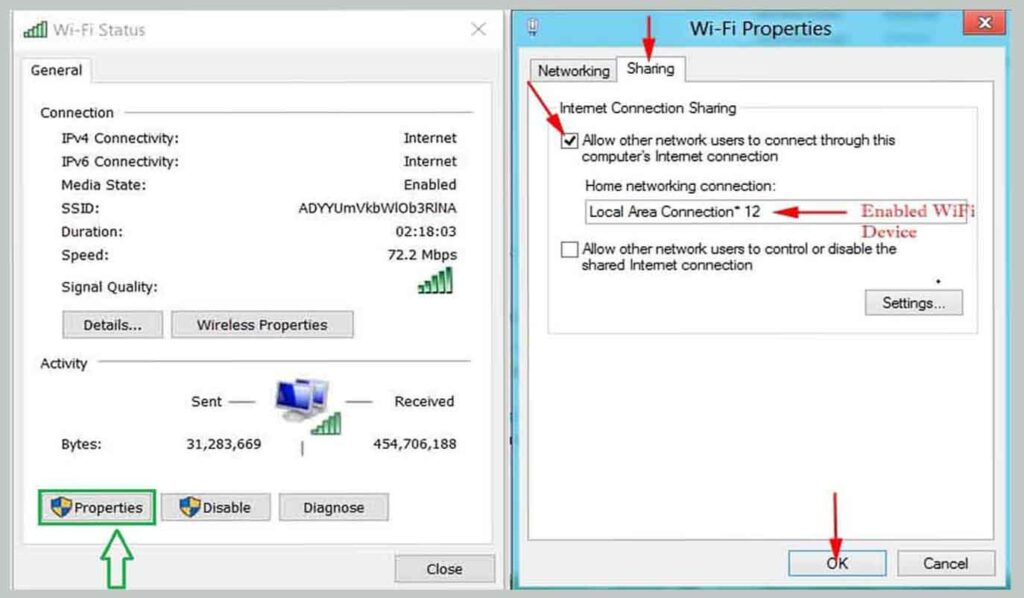
The 4th solution from our team is to activate the NetBIOS feature via TCP / IP.
Here’s how:
- Open Run ➡ then type ncpa.Cpl .
- Right-click on the network device ➡ click Properties.
- Click Properties again ➡ click the Sharing tab at the top.
- Check to Allow other network users to connect.
- Click OK.
Read Also:
- How to Fix the Error 0x800701E3 on Windows
- Fix: Error Code 0x80070035 “The Network Path Was Not Found”
5. Re-Share The Problematic Driver Partition
First, you have to access File Explorer first, maybe it’s more convenient to call it My Computer or This PC in Windows 10, press Windows key + E for a shortcut.

To redistribute the partition to other computers:
- Open My Computer / This-PC.
- Right-click on the partition you want to share.
- Click Properties ➡ click the Sharing tab.
- Click Advanced Sharing ➡ check Share this Folder.
- Name the file location to access.
- Click Apply & OK.
6. Change The Network Security Settings
You can change the Security level or LAN security (authentication) via this setting. But first, you have to activate this feature first.
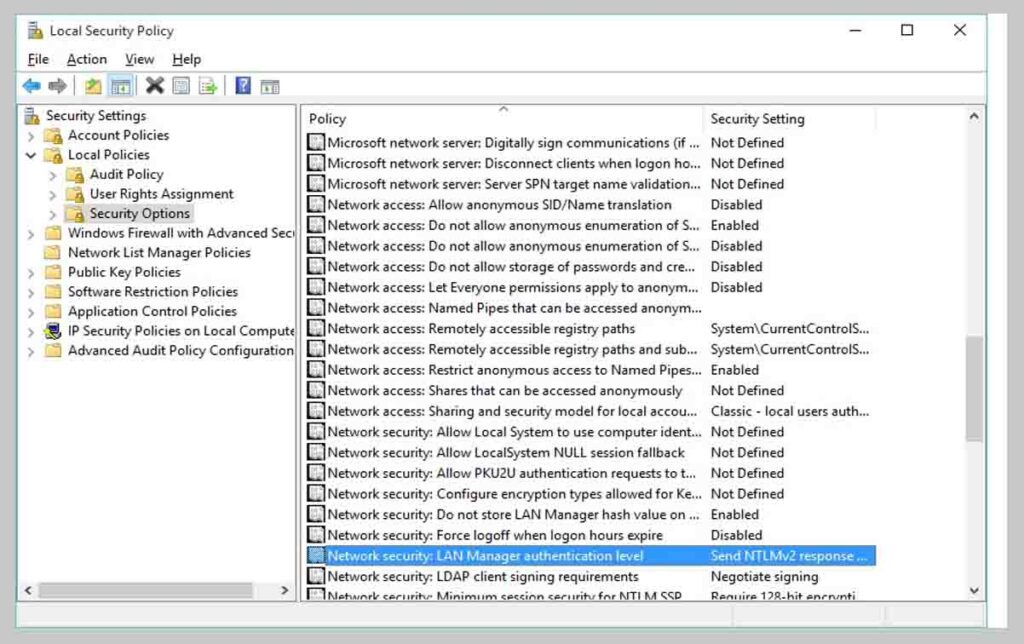
Follow the steps below:
- Open Run ➡ type secpol.MSc .
- In the left panel, go to Local Policies ➡ Security Options.
- Double click on Network Security: LAN Manager authentication level.
- Click the dropdown, select Send LM & NTLM-use NTLMv2 session security if negotiated.
- Click Apply & OK.
7. Reset Network Protocol TCP / IP
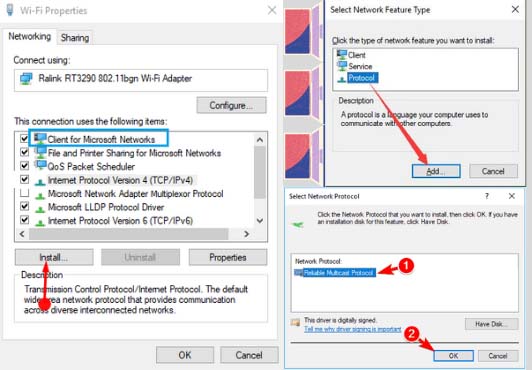
Reset the Network Protocol settings you are using:
- Open Run ➡ then type ncpa.cpl .
- Double click on the network you are using ➡ Properties.
- Select Client for Microsoft Network.
- Click the Install button ➡ select Protocol ➡ Add.
- Select Reliable Multicast Protocol
8. Changing Settings Via Regedit
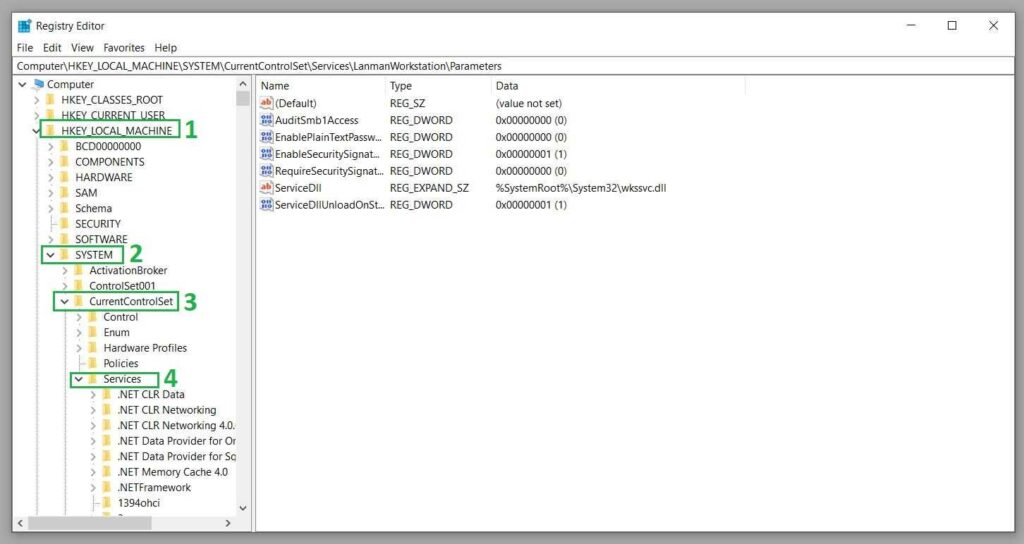
To do this, open the registry editor, either by typing Regedit in run, or searching in the Start Menu.
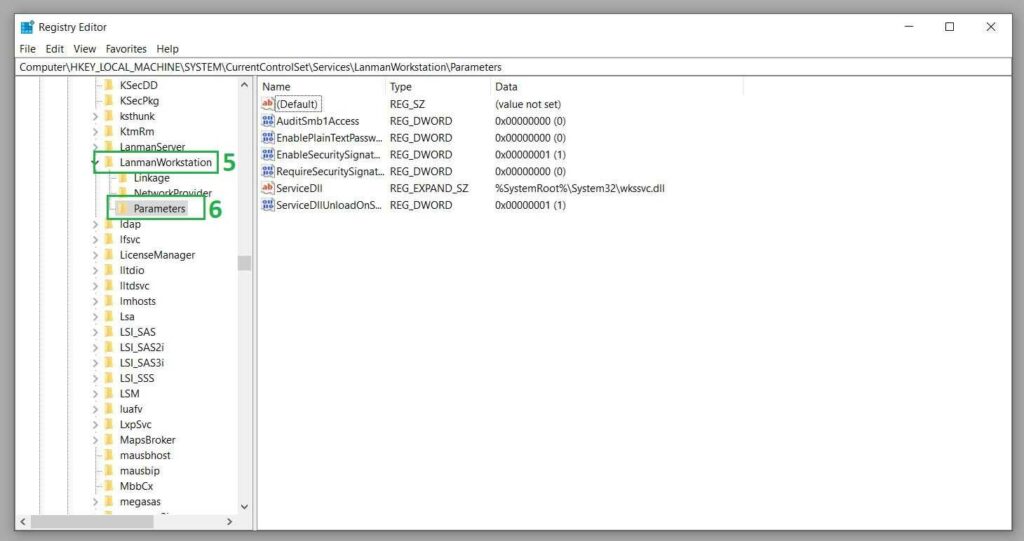
The location of the key is in HKLM \ SYSTEM \ CurrentControlSet \ Services \ LanmanWorkstation \ Parameters ➡ after entering the folder, look for AllowInsecureGuestAuth and make sure the number is 1.
Note: modifying the registry without expert help can result in fatal crashes and chain errors. Don’t do this if you hesitate to do it.
9. Enable SMB File Sharing Support
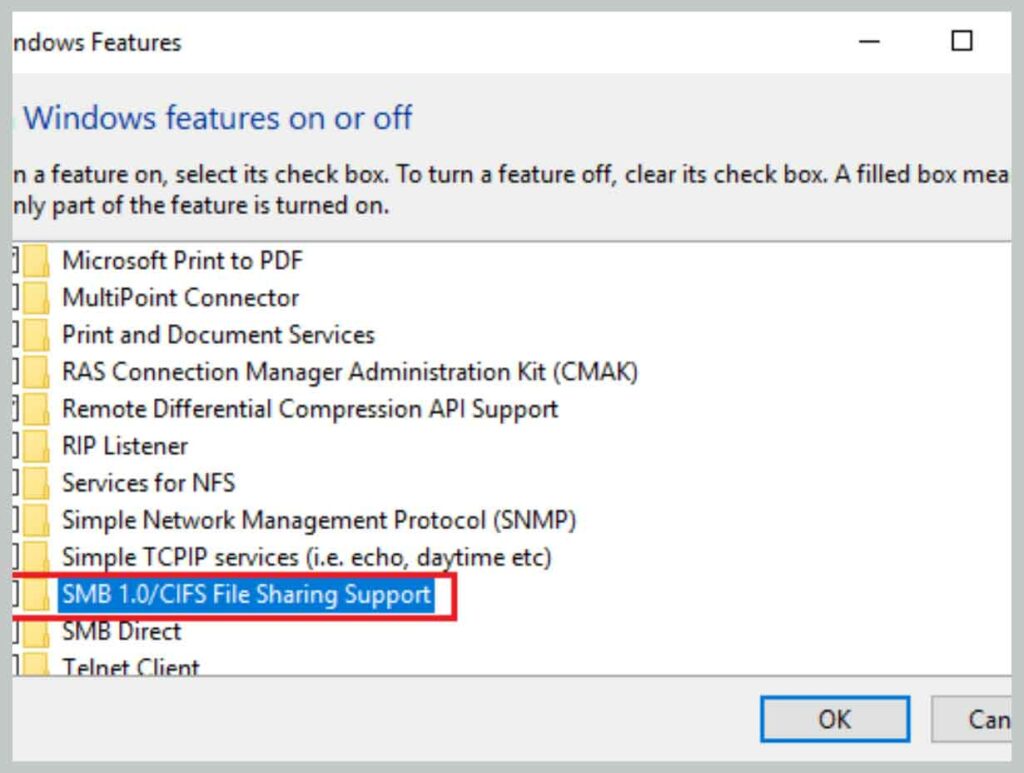
For older Windows users, you can activate the SMB v1.0 feature via the Control Panel.
- Open Control Panel ➡ click Programs.
- In the Programs and features section ➡ click Turn Windows features on or off.
- Scroll down, then find & check SMB 1.0 / CIFS File Sharing Support.
- Click OK then restart the computer.
10. Perform FlushDNS With Command Prompt
DNS Flush is a mechanism by which the user can invalid all cache entries so that the computer will fetch again the new combinations needed and store them in the local cache.
- Open a command prompt (as administrator).
- Type the command ipconfig / flushdns ➡ ipconfig / release ➡ ipconfig / renew
- Close cmd, then check whether the problem is solved or not.
- If not, open Run ➡ then type ncpa.cpl.
- Right-click on the device used ➡ click Disable.
- Then, click enable again after a few moments.
11. Enable the TCP / IP NetBIOS Service
Services are often needed by Windows programs to run normally, so if you are using an application for a booster, this service may be temporarily disabled.
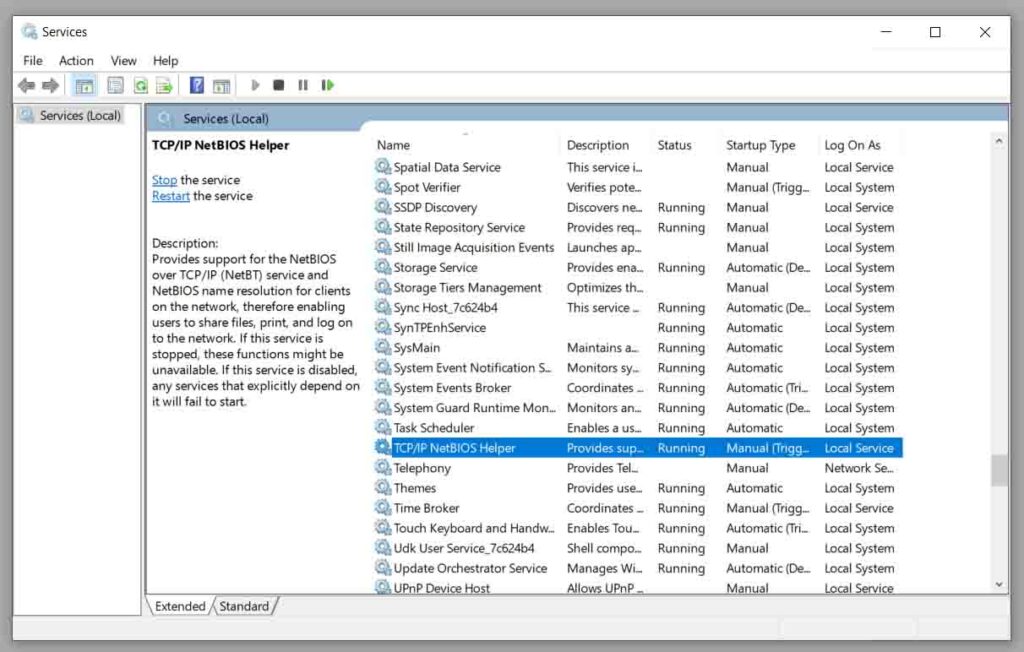
Activate the NetBIOS service in this way:
- Open Run ➡ then type services.msc, then click enter.
- After the service panel opens, look for TCP / IP NetBIOS Helper.
- Right-click ➡ Properties ➡ change Startup Type to Automatic.
- Then, click Start ➡ Apply & OK.
Conclusion
Done, I hope the method above can solve your problem. For other Windows-related errors, check each one on this page:


![How To Fix: Avast VPN Not Working Error On Windows [2025] Best Methods To Fix Avast VPN Not Working On Windows](https://techmaina.com/wp-content/uploads/2021/04/Best-Methods-To-Fix-Avast-VPN-Not-Working-On-Windows-218x150.png)


![How To Fix: Avast VPN Not Working Error On Windows [2025] Best Methods To Fix Avast VPN Not Working On Windows](https://techmaina.com/wp-content/uploads/2021/04/Best-Methods-To-Fix-Avast-VPN-Not-Working-On-Windows-100x70.png)

![Latest Free IPVanish Premium Accounts List [2025] Latest Free IPVanish Premium Accounts List](https://techmaina.com/wp-content/uploads/2021/09/Latest-Free-IPVanish-Premium-Accounts-List-100x70.png)