Howdy tech geeks! In this article, we will share with you how to enable virtualization in bios on your computer.
What is VT? And how the heck do I enable VT in Windows?
Previously, if I may be honest, you could say that I personally have been familiar with this VT feature for quite a long time.

VT itself is an abbreviation of Virtualization Technology, where if explained briefly, this feature has a function to make a processor work like multiple processors.
At first, this feature was relatively rarely used (except for certain circles). But since the emergence of Android emulators such as Nox, Bluestack, and others, VT has become known.
Because of what? This is what we will discuss here, as well as how to enable this Virtualization feature in Windows.
Table of Contents
What is Virtualization Feature?

Let’s start all over again, shall we? VT stands for Virtualization, which functions to make one processor work like multiple processors.
What is it used for? Miscellaneous. But the main goal is to run a virtual machine on a computer with only one hardware system so that it can run optimally.
Initially, this VT was used for the purposes of application developers, which basically did need an additional system (for testing purposes).
However, after the popular Android emulator, this feature began to be widely used by the general public.
Famous emulator names like Bluestack, Leapdroid, Nox, Tencent, Gameloop, and others, all use the VT feature.
The reason is, besides being useful in optimizing, VT also plays an important role in improving the performance of the emulator.
How to Enable Virtualization in Bios on Windows
Next, how do I activate VT? Turns out it’s not hard.
This virtualization has different terms if we talk from the processor vendor’s point of view, namely:
| Intel Virtualization | For the processor version from Intel. |
| AMD-V | For the processor version from AMD. |
As for activating it yourself, there are also different ways, yes. This depends on the factors:
- The type of motherboard used.
- Motherboard chipset used.
- And the BIOS version used.
However, we can still take the outline really. This is roughly what it looks like:
Read Also:
#1. How to Enable Intel Virtualization Technology
For Intel processors, the setting to enable it, you can usually find in the CPU Configuration BIOS.
Broadly speaking, the steps are not much different. Whether it’s for the old processor, as well as the latest.
How to Turn on Intel Virtualization Technology :
- First, please turn on your computer or laptop first.
- Click the F11, F2, or ESC key, to enter the BIOS.
- If so, find and open the Advanced / CPU Configuration menu.
- Then, find and enable the Intel Virtualization Technology feature (change the mode to Enabled ).
- Go to the Exit tab, then select Save Changes and Exit.
Oh yes, this Intel has a hyperthreading feature too. So please enable it as well to improve performance.
#2. How to Enable AMD Virtualization Technology
Besides Intel, I’ve also used AMD processors, from low-end to high-end ones.
Usually, there is a difference in the mention of the term in the BIOS for certain versions of AMD processors. But broadly speaking, the steps are more or less like this:
How to Turn on AMD Virtualization Technology
- As usual, turn on your computer or laptop first.
- Press the F2, F11, ESC (or other) keys to enter the BIOS.
- Next, go to the CPU Configuration menu.
- Then, please search for SVM mode settings.
- Set it to Enabled so that VT is active.
- Finally, please select Save and Changes to save the BIOS settings.
In general, the name is SVM mode. However, sometimes the name can also be:
- AMD Virtualization.
- AMD-V.
- AMD-VT.
And others. Usually, on the right, there is a description column. Well, you can see it there.
#3. If Without Entering the BIOS? Can it?
Some of us have asked, here. If you don’t enter the BIOS, can you do it or not?
The answer is, maybe you can. But at least only for certain versions of the processor.
Why? Because this VT setting can generally only be used when the computer finishes restarting so that the features can run stably.
Anyway, that’s it, hehe. So it doesn’t matter, you want to use Windows 7, Windows 8, or Windows 10.
How to Find Out if the Processor Supports VT or Not
So, what if the VT setting doesn’t exist? Or is there a certain notification that VT can’t be activated?
If you find this condition, then the cause is one, namely the possibility that your processor does not support the feature.
If I have a separate way to check it:
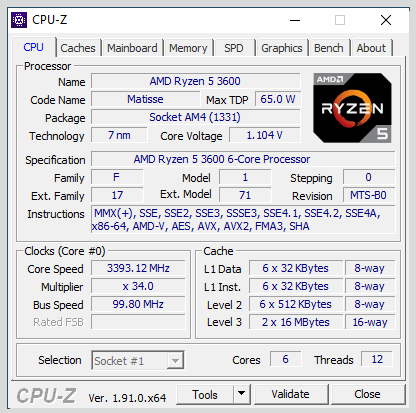
1. Use CPU-Z

I usually use CPU-Z to check the processor specs.
Well, the information displayed here is very complete, so we can know whether a processor already supports the VT feature or not.
To use it like this:
- Please download the CPU-Z application first at https://www.cpuid.com/softwares/cpu-z.html.
- If so, please install as usual.
- After that, open the application.
- Then check the Instruction column, make sure there is AMD-V or Intel-V.
If there is, it means that the processor already supports the virtualization feature.
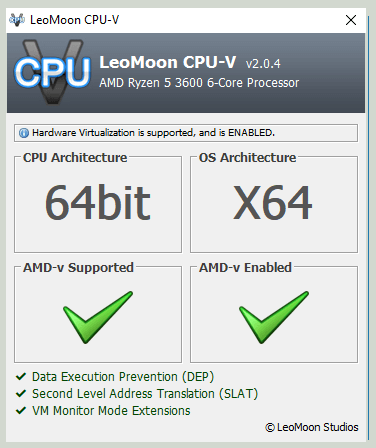
2. Use LeoMoon CPU-V

Next, use LeoMoon CPU-V.
For this application, the specific use is only to find out if a processor has support for virtualization or not.
How to use it like this:
- Please download the LeoMoon CPU-V application.
- Extract using WinRAR.
- Open the app.
- Check the Supported column. There will be a checkmark there.
The checkmark means that the processor already supports the virtualization feature.
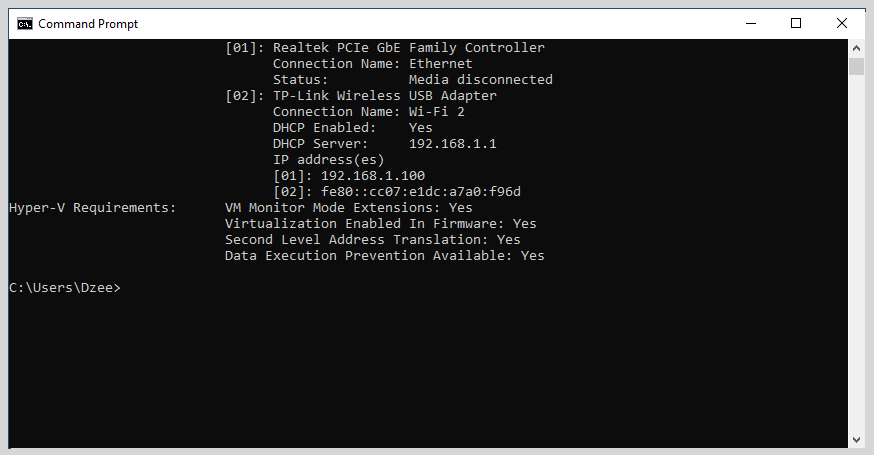
3. Using CMD

Can also use CMD. The method is very simple:
- Please open CMD first.
- Then type systeminfo.
- Press Enter.
Later, just check it in the Virtualization Enabled in Firmware section.
How to Know Virtualization is Active or Not
For myself, frankly, when I activate the virtualization feature in the BIOS, I rarely check again whether the feature is running or not.
But yeah, if you’re curious, you can also find out. Use this method:
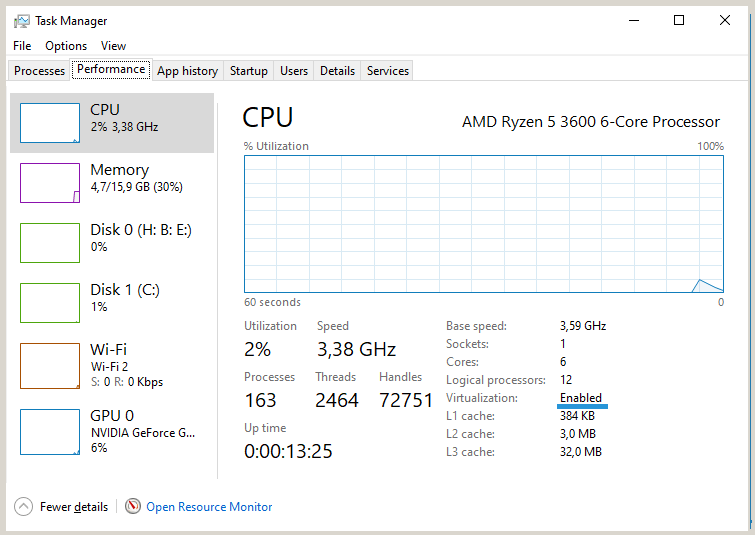
- Click the Ctrl + Alt + Del key .
- Then, select Task Manager.
- After that, open the Performance column.
- Check the Virtualization column.
- If Enabled, it means that the VT feature is already active.

It’s easy?
Note: If VT is already active, try checking the settings in the emulator you are using. Sometimes it has to be activated there too.
The Final Word
That’s a little discussion about how to activate the virtualization feature in Windows.
Actually, it doesn’t have to be Windows, other operating systems such as macOS or Linux can also do it.
I think this discussion is quite complete. But if anyone is still curious, or wants to share about this topic, you can discuss it through the comments column below.
Hope it is useful.

![How To Fix: ALT GR Not Working On Windows 10 [2025] How To Fix ALT GR Not Working On Windows 10](https://techmaina.com/wp-content/uploads/2021/04/How-To-Fix-ALT-GR-Not-Working-On-Windows-10-218x150.png)
![Hard Drive Repair – How to Repair a Damaged Hard Drive [2025] Hard Drive Repair - How to Repair a Damaged Hard Drive](https://techmaina.com/wp-content/uploads/2020/12/Hard-Drive-Repair-How-to-Repair-a-Damaged-Hard-Drive.jpg)
![How to Check What Graphics Card You Have [2025] How to Check What Graphics Card You Have](https://techmaina.com/wp-content/uploads/2021/09/How-to-Check-What-Graphics-Card-You-Have-218x150.png)


![How To Fix: Avast VPN Not Working Error On Windows [2025] Best Methods To Fix Avast VPN Not Working On Windows](https://techmaina.com/wp-content/uploads/2021/04/Best-Methods-To-Fix-Avast-VPN-Not-Working-On-Windows-100x70.png)

![Latest Free IPVanish Premium Accounts List [2025] Latest Free IPVanish Premium Accounts List](https://techmaina.com/wp-content/uploads/2021/09/Latest-Free-IPVanish-Premium-Accounts-List-100x70.png)