NSIS Error: On Windows systems, we can install applications more easily than other OS. This is because Windows has installer software called NSIS.
But it should be noted, NSIS can have problems so that the desired application cannot be installed.
So, if you are experiencing an error in NSIS, you can check the solution here.
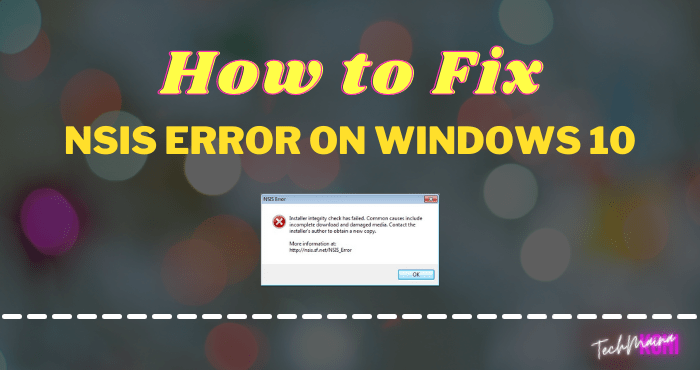
Table of Contents
Know the NSIS and the Causes of the Error
NSIS ( Nullsoft Scriptable Install System ) is the default installer program on Windows.
NSIS has a role to make it easier for us when installing software and games. So that all package data from software and games can be extracted directly to a folder directory.
Generally, there are several causes for errors in NSIS:
- File software or game is corrupt
- Software or game not compatible with your PC
- Admin permissions issues
- There is a virus
- There is a bug in NSIS
Oh yeah, this NSIS error problem can also occur in all versions of the Windows OS. Especially on Windows 7, Windows 8, and Windows 10.
How to Solve NSIS Error on Windows [2025]
Here are some ways to deal with NSIS errors when installing an application on Windows. Please try one by one.
1. Through Windows Run
This method is intended to install applications with special commands, namely through the default Windows Run program.
Here are the steps:
- Press Windows key + R on your keyboard.
- Then open Windows Explorer and locate the software you want to install.
- Drag and drop the software file into Windows Run
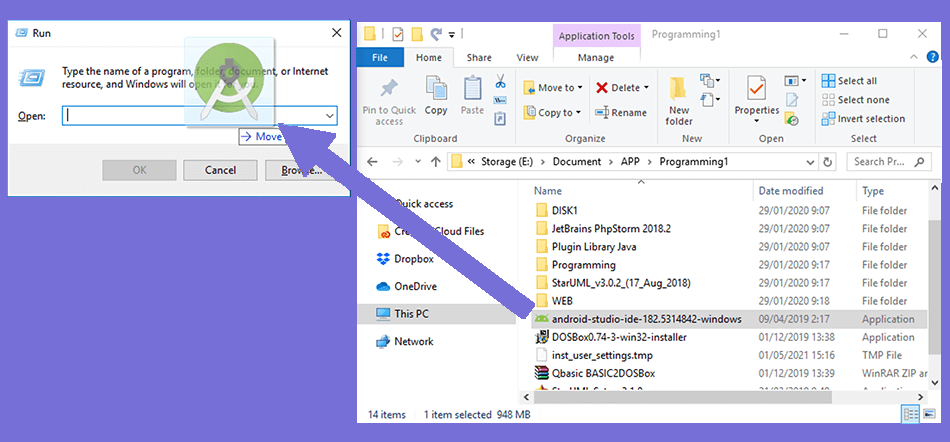
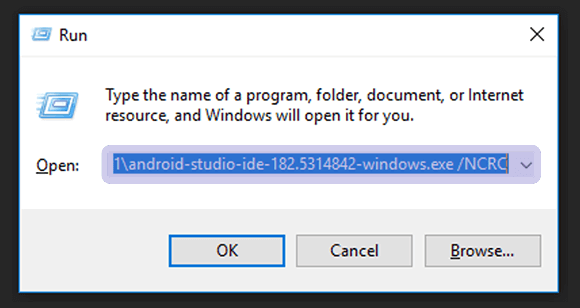
- If so, add the command “/ NCRC” in the Windows Run column.
- Press the Enter key.
- Wait for a moment.
- Then the installer dialog box of the software will appear.
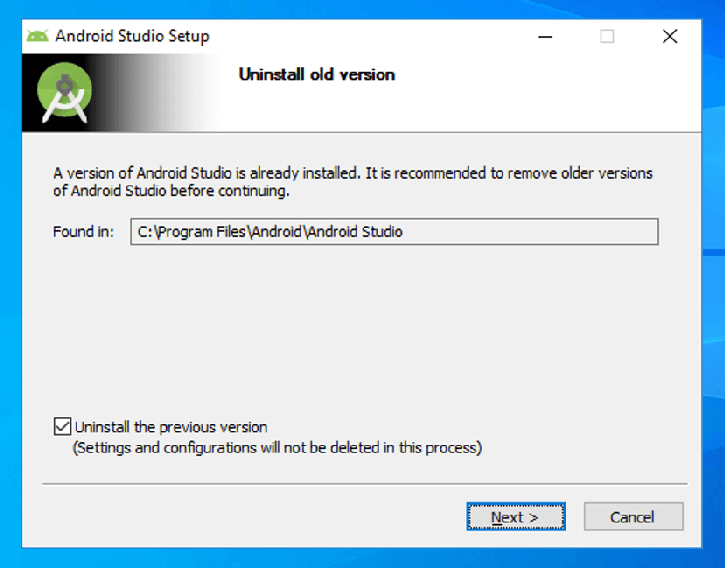
- Done.
PS: When typing the NCRC command, make sure you put a space (/ NCRC)
2. Turn off Antivirus
For some applications, some cannot be installed if the antivirus is still active. For that, you should try to turn off the antivirus first.
This is how:
- Press Windows key + I to open Windows Settings.
- Then select Update & Security settings.
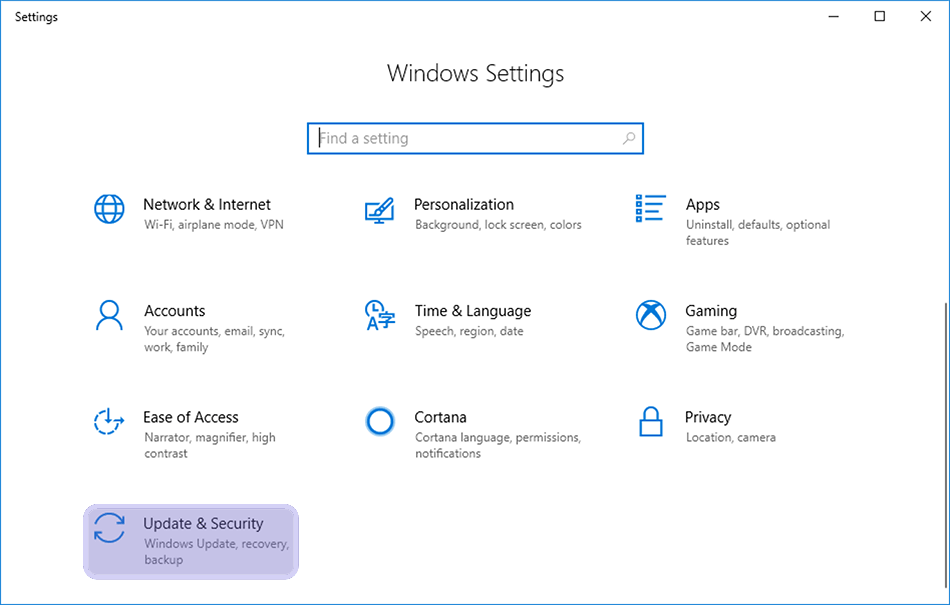
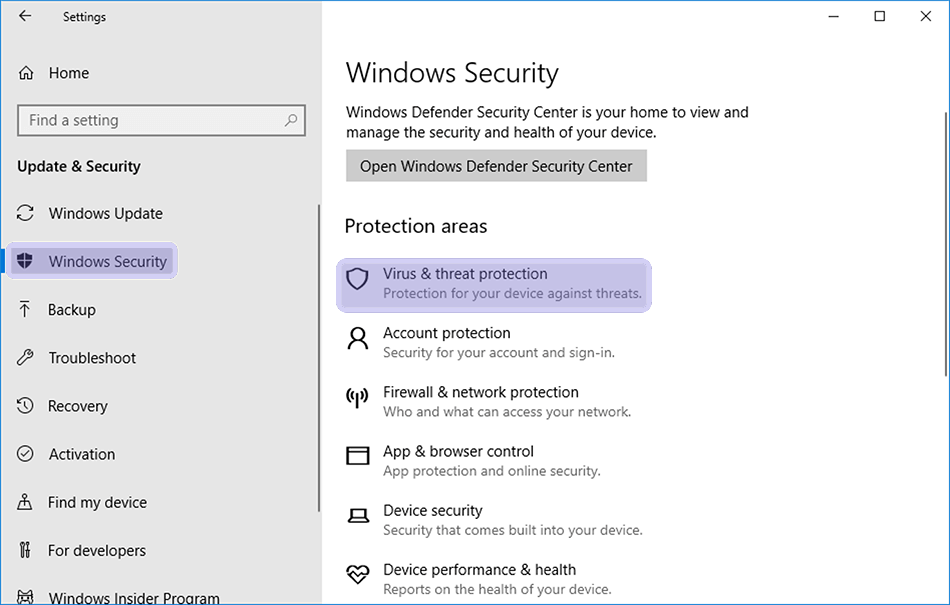
- Select the Windows Security tab in the sidebar.
- In the Protection areas, select the Virus & threat protection menu.
- Turn off the Real-time protection option by sliding it to the left.
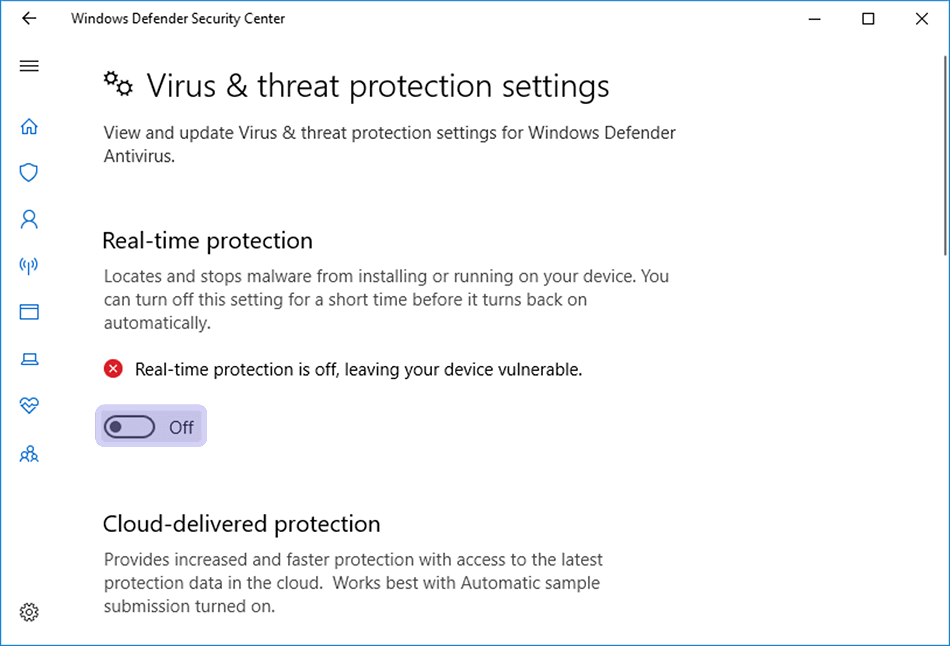
- After the antivirus dies, try installing the software again.
- Done.
This method is specifically for Windows Security (Windows Defender). If you are using another antivirus, it must also be turned off.
3. Using the Command Prompt
This method is similar to the first point, only the steps are slightly different. Can be used as an alternative.
- Open CMD.
- Also, open Windows Explorer and find the desired application installer.
- Continue to drag and drop the application installer to CMD.
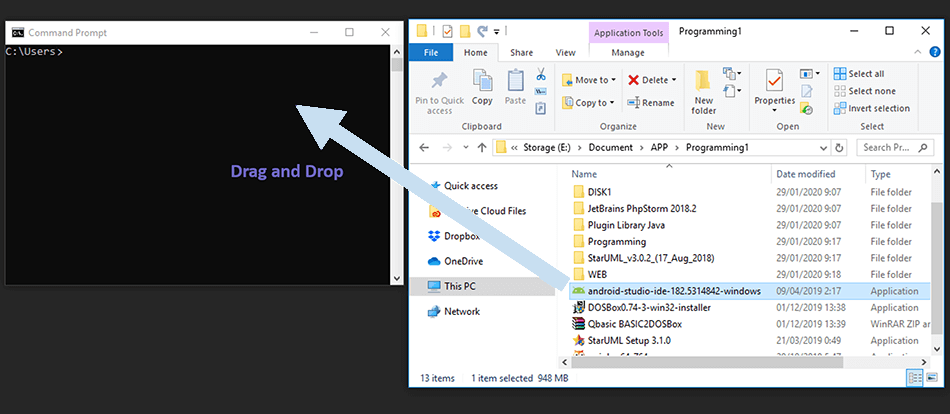
- Type the command “/ NCRC” next to the software root.
- Press Enter.
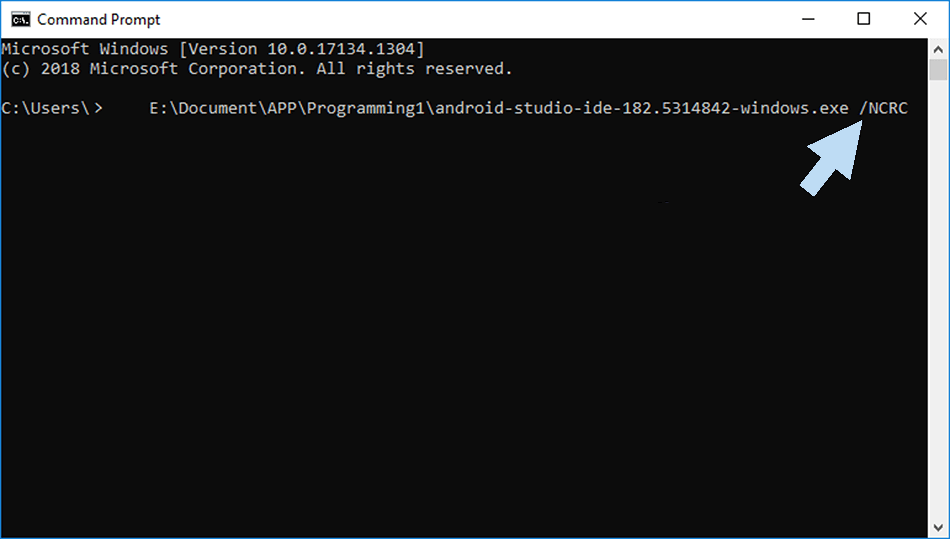
- Then the installer dialog box will appear.
- Done.
4. Run as Administrator
There are several software that must obtain admin rights permission in order to be installed on the system.
This permission should appear automatically in the UAC ( User Account Control ) feature.
But due to certain problems, the UAC feature may not appear. Well, for the solution, namely by using Run as Administrator:
- Open Windows Explorer.
- Find the storage location of the software or game you want to install.
- If so, right-click on the software file and select the Properties men
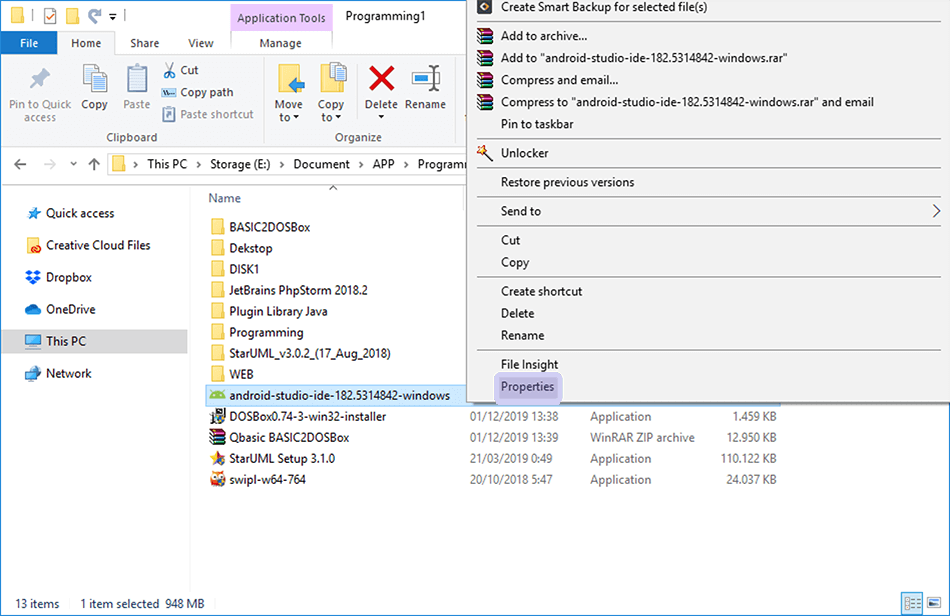
- In the Properties dialog box, select the Compatibility tab.
- See the Settings column, please check the Run this program as an administrator option.
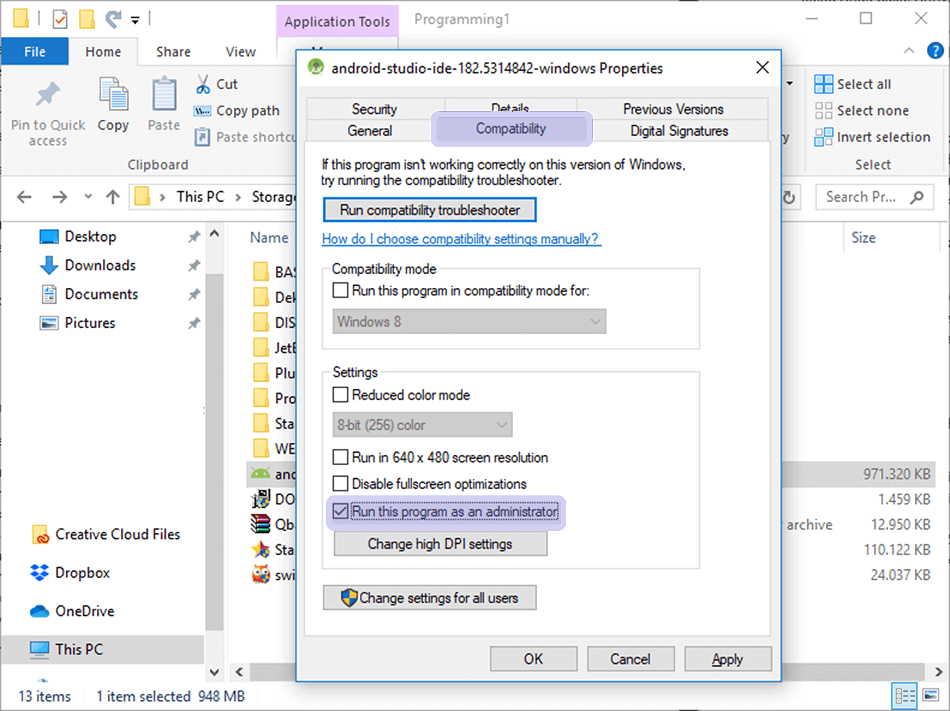
- Click Apply and OK to save the changes.
- Done.
5. Use Compatibility Mode
Compatibility is a standard Windows feature that is often used to deal with applications that cannot be installed.
Usually, this problem is caused by the application that you want to install is not suitable or too low for the operating system.
Following are the steps to resolve NSIS Error with compatibility features:
- Please right-click the application to be installed.
- Select the properties menu.
- Then move to the Compatibility tab and then tick Run this program in compatibility mode.
- For compatibility mode, you are free to choose any version of Windows, the most important version is lower than the current Windows.
- If you have directly click Apply and Ok.
The Final Word
NSIS problems should be solved in the 4 ways above. Keep in mind, that the installer that runs must be in good data (not corrupted ).
If it’s corrupted, then you can’t help but have to replace the installer with a new one.
Any question? Just send it via the comments column that I have provided below.
May be useful.


![How To Fix: Avast VPN Not Working Error On Windows [2025] Best Methods To Fix Avast VPN Not Working On Windows](https://techmaina.com/wp-content/uploads/2021/04/Best-Methods-To-Fix-Avast-VPN-Not-Working-On-Windows-218x150.png)


![How To Fix: Avast VPN Not Working Error On Windows [2025] Best Methods To Fix Avast VPN Not Working On Windows](https://techmaina.com/wp-content/uploads/2021/04/Best-Methods-To-Fix-Avast-VPN-Not-Working-On-Windows-100x70.png)

![Latest Free IPVanish Premium Accounts List [2025] Latest Free IPVanish Premium Accounts List](https://techmaina.com/wp-content/uploads/2021/09/Latest-Free-IPVanish-Premium-Accounts-List-100x70.png)