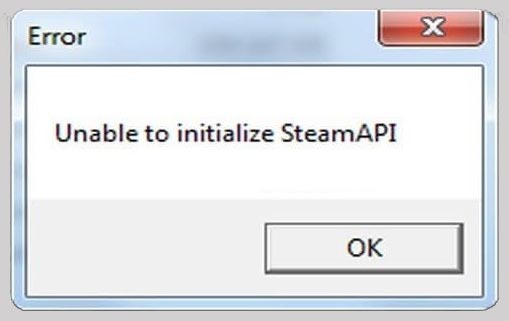
According to several users, a problem arises right after launching a game. If you are facing the same “ Unable to Initialize Steam API ” error after launching a game from your Steam library, you have come to the right place.
In our guide, we will look at the reasons for this error and determine the possible solutions to resolve it. Let’s start…
Table of Contents
How To Fix The “Unable to Initialize Steam API” Error [2025]
To resolve it, use the following solutions:
Solution 1. Disable Your Game’s Executable Program In The Firewall
This method has solved the problem, according to many users. A third-party firewall or even your “ Windows Defender ” can block your game’s executable.
The first solution is to make an exception for your game to run in the firewall.
- Go to the Windows search bar and type Control Panel
- Select the control panel to open it.
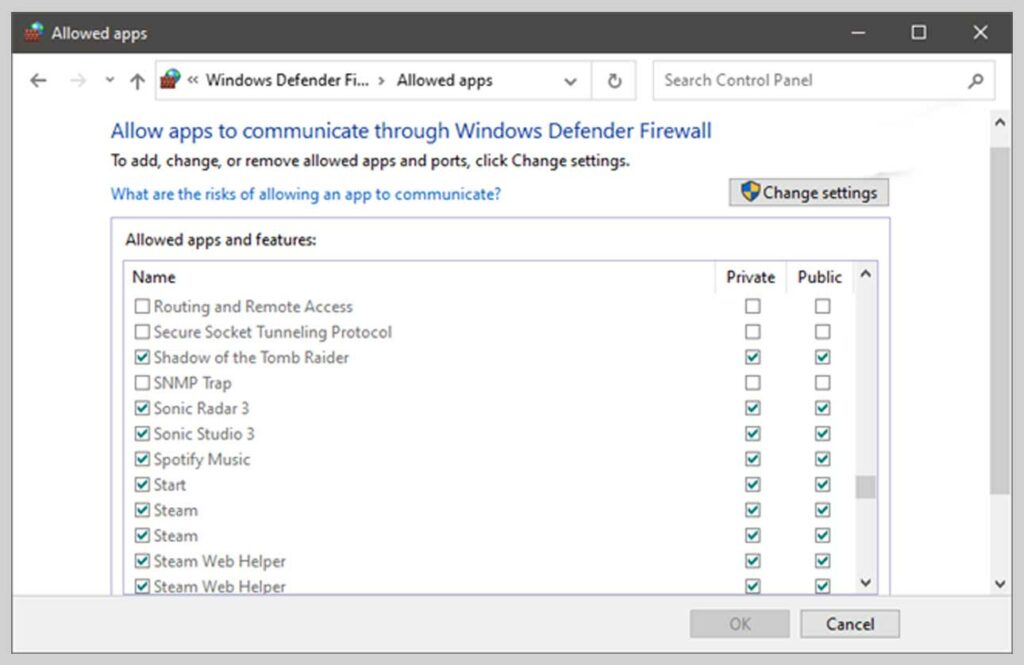
- Change the display to large icons and scroll down and select Windows Defender Firewall
- Click on the option ” Allow an application or feature through Windows Defender Firewall ” (left) to display the list of applications
- Go to the in-game app that is having issues with your firewall and check the boxes next to public and private networks
- Click on the Ok icon to apply the changes
- Once you are done, restart your PC and launch the game to see if it works without showing the “ Unable to Initialize Steam API ” error.
This solution worked for most of the users who had issues launching their Steam games.
Read Also:
Solution 2: Force Restart The Program
The main reason for the “ Unable to Initialize Steam API ” error while accessing the game is due to issues with the steam client.
To resolve this problem, it is mandatory to force restart the client.
Steps to force restart:
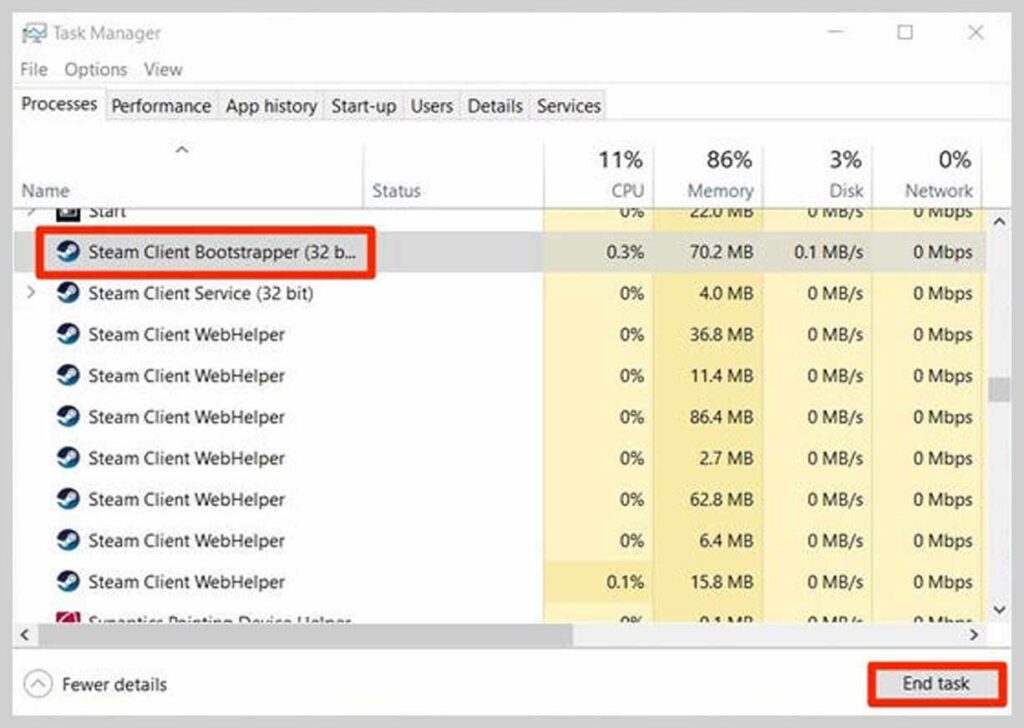
- Start the task manager by simultaneously pressing the ctrl, shift, and Esc keys.
- Select the ” Processes ” and make a click right on the application Steam to select the ” End Task “.
Solution 3: Run The Game As Administrator
Since “Unable to Initialize Steam API” mainly occurs due to issues with the client, it can be avoided by running the application as an administrator.
- Go to the start menu and open My Computer or This Pc. Choose the location on the drive where the Steam is installed.
- Locate the game executable file
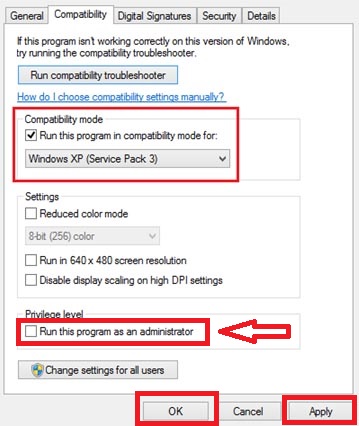
- Click with the mouse right-click on the .exe file of the game and go to the file properties.
- Use the Compatibility tab to allow administrator privileges to the app
Solution 4: Disable Automatic Retain On Comodo Internet Security
If you are using the Comodo antivirus program on your computer, you may have noticed that sometimes the program blocks programs completely using its automatic containment options which are activated automatically.
You should either disable this option or simply remove the game executable from the blocked programs list in order to resolve the issue immediately.
- Open the Comodo Internet Security user interface by double-clicking on its icon on the desktop or in the system tray (lower right part of the screen).
- Open the Settings window by clicking on the Settings button from the Home screen and make sure you navigate to the Containment tab.
- Under this tab, you must click on the Automatic containment subsection.
- After clicking on the automatic containment section, you should see a checkbox at the top of the window that says Enable automatic containment.
- You can simply uncheck it in order to no longer use this function which automatically blocks the execution of certain programs.
- You can also locate the game executable in the list that will appear below and simply disable the slider under the Enable automatic containment option in order to stop blocking the affected application.
- Confirm the changes and relaunch the game to see if the problem still appears.
Read Also:
- Fixed: Steam Friends Network Unreachable Error
- Fix: Steam Is Having Trouble Connecting To The Steam Servers
Solution 5: Remove Beta Programs And Relaunch
If you do not know, Steam Beta sends you the latest update but also faulty or incomplete programs.
Follow the steps mentioned below to opt out of all Steam beta projects and resolve the issue.
Let’s go:
- Launch the Steam PC client
- Tap the “icon (in the menu at the top of the customer’s screen).
- Choose Settings
- Now, in the settings window, in the ” Account ” tab and click on the ” Edit ” button (under the ” Beta participation “ section)
- A new window will open, under Join Beta, and click to open the drop-down list. Select the option ” Unsubscribe from all beta programs.”
- Apply the changes you made
- To kill all Steam related programs, press Ctrl + Shift + Esc to open the Task Manager utility
- Click on the More details icon (bottom left of the window) to expand your task manager
- Now search for all related programs.
- For example Steam.exe, Bootstrapper, etc. Make sure that these Steam-related programs are in the base processes.
- Choose them all one by one and select the option ” Complete task ” (in the lower right part).
- Or you can just restart your pc.
- Click the Yes button to confirm
Restart your client and check if the error persists during startup. However, if you are still facing the error on your PC, make sure to disable all beta programs.
Solution 6: Reinstallation
Reinstalling Steam is one of the less popular methods, and it’s not for nothing that it’s placed as last on our list.
This method has solved the problem for many users, but it should be used as a last resort as there are many easier methods that you should try before doing so.
It is true that the uninstall deletes your game files that need to be reloaded later, but by following the steps below, you should be able to back up these files easily.
- Open your client by double-clicking on the Desktop or by searching for it in the Start menu and clicking on the first available result.
- After opening, click the Steam button at the top right of the window and choose Settings from the drop-down menu.
- Navigate to the Downloads tab in the Settings window and click on Library Folders.
- Here you should see the complete list of all the libraries you are currently using and the folders you should look for when saving.
- Since the default folder is C >> Program Files (x86) >> Steam >> steamapps , let’s see how to back it up.
- Navigate to the location above clicking to open any folder or Explorer files and clicking This PC or Computer in the right pane.
- Then open the location above and find the “steamapps” folder.
- Click with the right mouse on the file and choose Copy from the context menu.
- Navigate to any location outside of the “ steamapps ” folder on your computer and paste the folder by right-clicking and choosing “ Paste ”.
- The best location would be your office.
- Repeat the same process for all folders in the library.
- After uninstalling it, you will have to add the folders again as Steam Library folders like you did the first time.
After backing up your gaming installations, the next step is to uninstall from your computer. This can be done easily using the Settings app or the Control Panel.
To Uninstall Follow The Steps Below:
- First, make sure that you are logged in with an administrator account as you will not be able to uninstall programs using the privileges of another account.
- Make sure you have completed the above steps for each library folder you are using on your computer and take note of their correct location so that you can add them again once it is reinstalled.
- Click on the Start menu and open the Control Panel by searching for it.
- You can also click the gear icon to open Settings if you are using Windows 10.
- In Control Panel, select View As Category in the upper right corner and click Uninstall a program in the Programs section.
- If you’re using the Settings app, clicking on Apps should immediately open a list of all the programs installed on your PC.
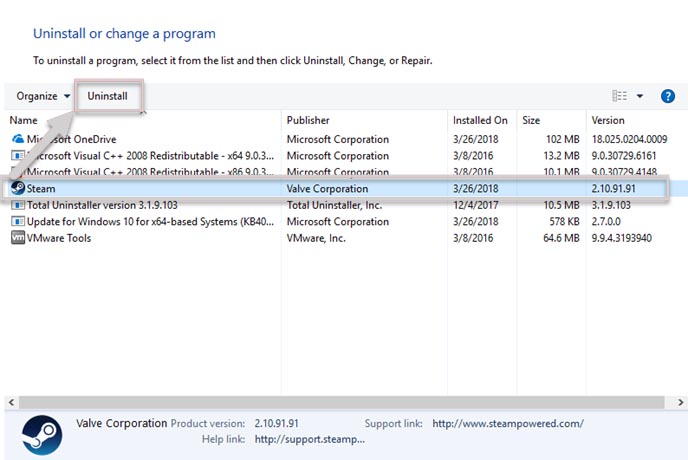
- Locate the Steam entry in the list and click on it.
- Click the Uninstall button above the list and confirm any dialogs that may appear.
- Follow the on-screen instructions to uninstall and restart your computer later.
Conclusion: Unable to Initialize Steam API
By following the instructions mentioned above, we can easily fix “Unable to Initialize Steam API”.
Although errors are common in the systems world, there are a few solutions that we can use to fix the problem permanently.

![How to Permanently Delete Instagram Account [2025] How to Permanently Delete Instagram Account](https://techmaina.com/wp-content/uploads/2021/11/How-to-Permanently-Delete-Instagram-Account-218x150.png)
![How To Fix: Steam Content File Locked Error [2025] How To Fix Steam Content File Locked Error](https://techmaina.com/wp-content/uploads/2020/09/How-To-Fix-Steam-Content-File-Locked-Error.jpg)
![How To Fix: Steam Not Opening Error In Windows [2025] How To Easily Fix Steam Not Opening Error In Windows 10](https://techmaina.com/wp-content/uploads/2021/02/How-To-Easily-Fix-Steam-Not-Opening-Error-In-Windows-10-218x150.jpg)
![How to Permanently Delete Instagram Account [2025] How to Permanently Delete Instagram Account](https://techmaina.com/wp-content/uploads/2021/11/How-to-Permanently-Delete-Instagram-Account-100x70.png)
![How To Fix: Steam Not Opening Error In Windows [2025] How To Easily Fix Steam Not Opening Error In Windows 10](https://techmaina.com/wp-content/uploads/2021/02/How-To-Easily-Fix-Steam-Not-Opening-Error-In-Windows-10-100x70.jpg)
![How to Easily Fix Origin Won’t Open or Not Respond [2025] How to Easily Fix Origin Won’t Open or Respond](https://techmaina.com/wp-content/uploads/2020/07/How-to-Easily-Fix-Origin-Won’t-Open-or-Respond.jpg)
![How to Activate Cortana In Windows 10 [2025] How to Activate Cortana In Windows 10](https://techmaina.com/wp-content/uploads/2021/01/How-to-Activate-Cortana-In-Windows-10.jpg)