How to Make a Bootable Flashdisk: Do you want to install Windows but the laptop doesn’t have a DVD ROM?
I have a solution, you can read the tutorial on how to make Windows bootable on a flash disk in this article.
But for this flash, we have to make it bootable first. For how to take it easy, because in this article I will provide complete information, such as:
- How to download an ISO file from the Microsoft website
- How to make a bootable flash
- How to check the type of hard drive on a PC / laptop
We will discuss it one by one.
Table of Contents
How To Download ISO Files From Microsoft
The first time you have to do that download the ISO file from the operating system that will be used. In this practical, I will create an example to download a Windows 10 ISO file.
But before that, you should know the bits of the PC / laptop that are used. The reason is, if you don’t adjust the bits of the PC / Laptop, the results will not be optimal.
After knowing the number of bits to be used, then consider how to download the ISO file from Microsoft below:
- The first step, if you want to use Windows 10 as well then click Download ISO.
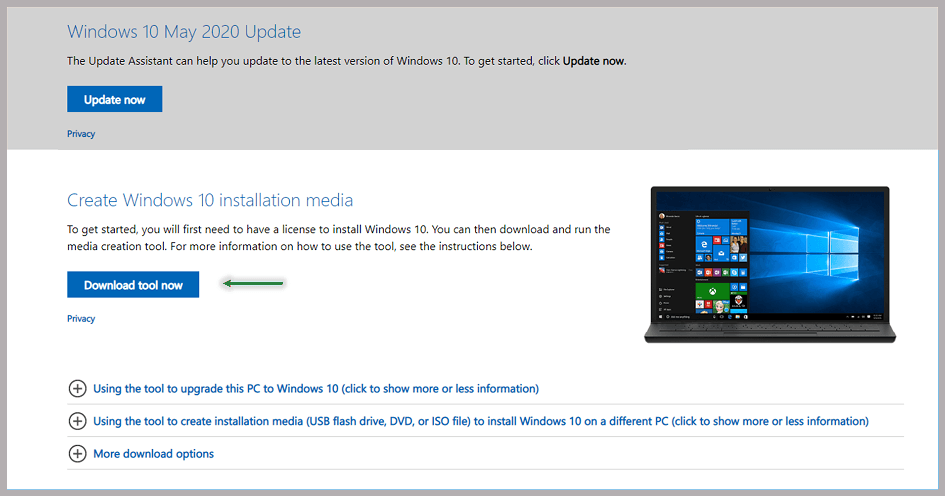
- Then you click the Download tool now menu. Then it will automatically download the Media Creation Tool file.
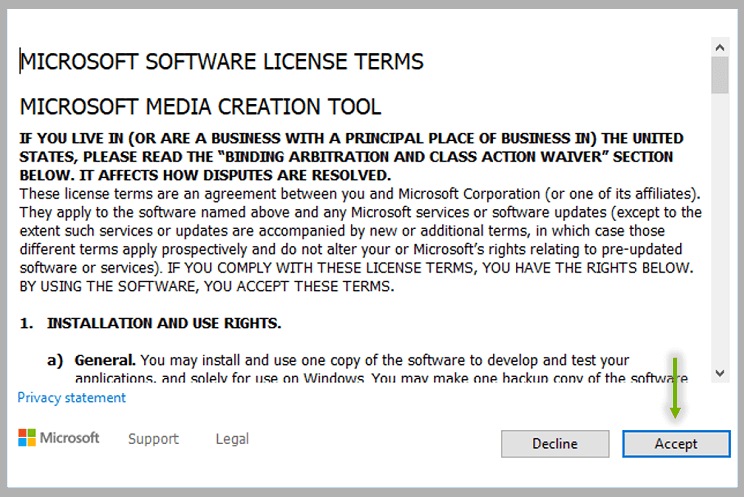
- After that open the Media Creation Tool application> Click Accept.
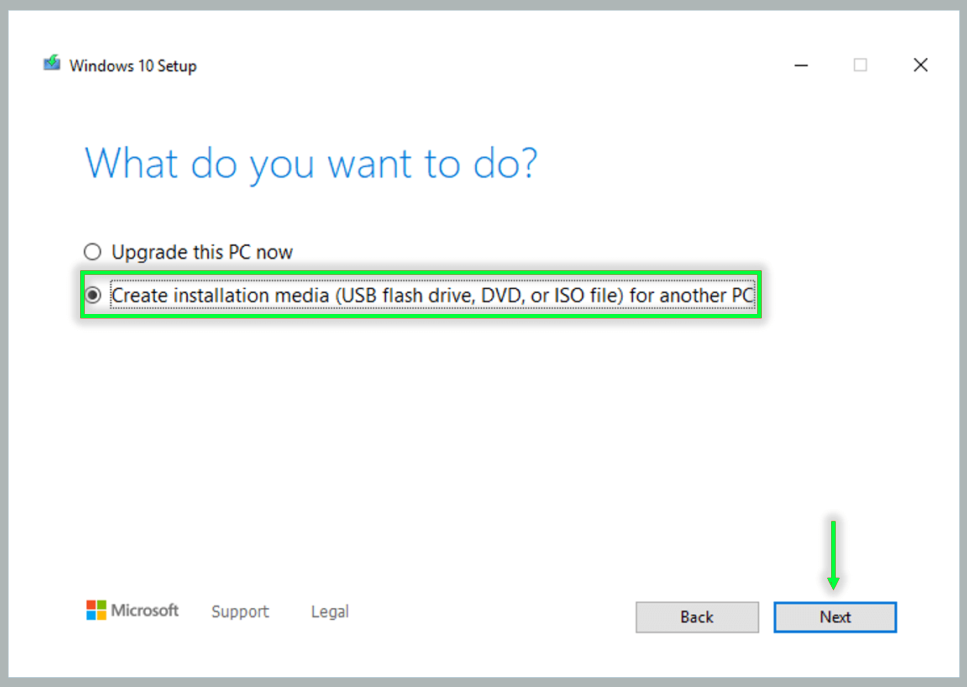
- You will now be redirected to the What do you want to do window. In the next step you have to select the option Create installation media (USB flash drive, DVD, or ISO file ) for another PC > Click Next.
- Then now you select the number of bits on the PC / laptop that will be used to install Windows 10.
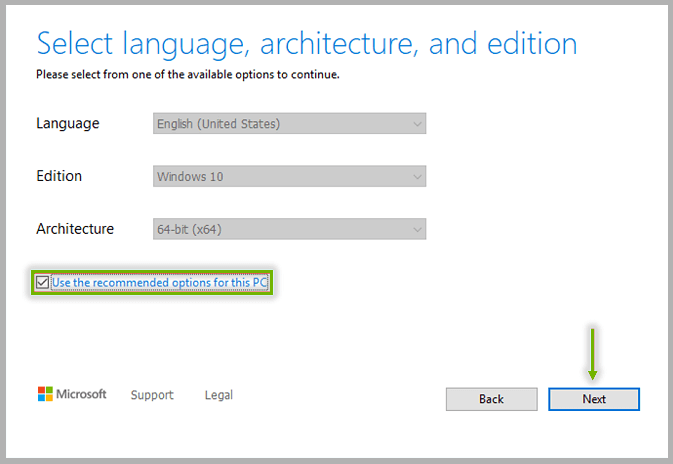
Note:
If it is to be installed on the PC / laptop used to download the file earlier, you can check Use the recommended options for this PC> Click Next.
- After that you select the ISO file option > Click Next> Select a storage place.

- Finally, you have to wait for the Windows 10 ISO download to complete.
So it’s easy to download an ISO file from Microsoft, right?
If you want to download a Windows 7 or Windows 8 ISO file then you can visit the sites I have provided.
Then click the Windows menu and select what operating system you want to use.
Read Also:
How to Create a Bootable Windows Using a Flashdisk
Furthermore, after you have prepared the ISO file, it is time to practice making a bootable flash disk.
Then to make it very flexible, because you can use additional software or with the default features of the PC / Laptop used.
I will also practice several methods that you can choose later, so watch carefully.
# 1. Make Bootable With Rufus
In making a bootable flash disk, I highly recommend you to use the Rufus application.
Why? Because this application can be downloaded for free and is certainly very easy to use even for laymen.
Follow these steps to use the Rufus application to create a bootable flash disk :
- The first step you have to download Rufus first.
- After successfully downloading, now you open the Rufus application and connect the flash disk that will be made bootable.
Note:
If the flash has been detected, then you can see it in the Device menu.
- Then select the ISO to be used by clicking the Boot selection menu > Click Select. Make sure the Partition scheme menu and the Target system are appropriate.
- Now you Click Start. If you are confused, please look at the image below and adjust it to the points I have given.
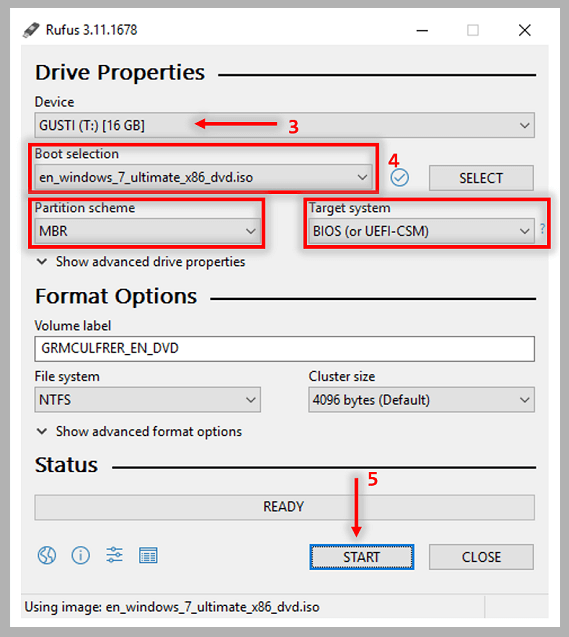
- After that, there will be a notification that this bootable process will erase your data, now select OK. Then the Rufus application will process to create a bootable flash disk.
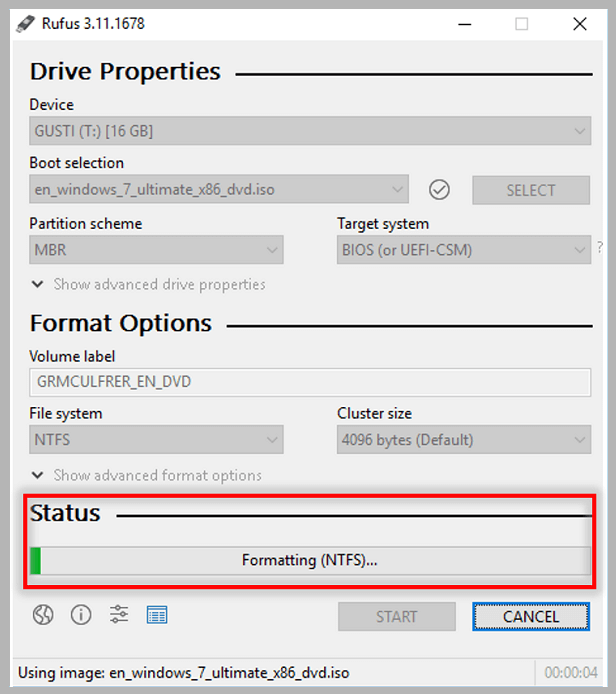
- If previously the format of your flash was FAT32, the Rufus application will convert it to NTFS first.

- After changing it, the Rufus application will boot into your flash disk.
- When it’s finished, it will look like this.
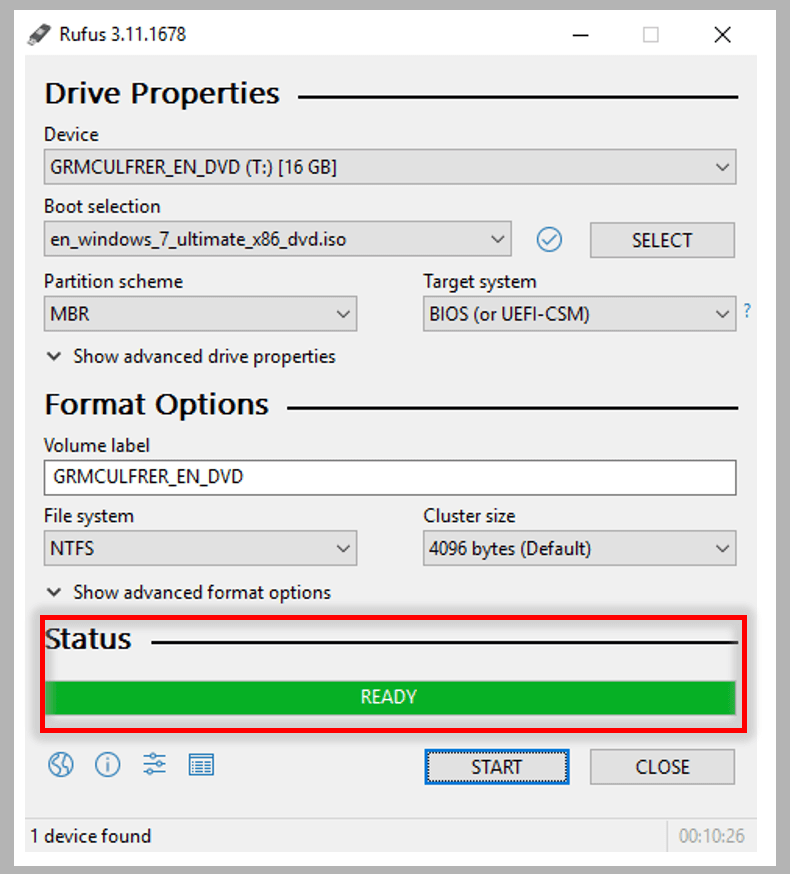
Well, now you can install Windows or other operating systems to the PC / Laptop that you want to repair.
Very easy, right? The size of the application is not large so it is really recommended to make a bootable flash disk.
Read Also:
# 2. Make a Bootable Flashdisk With Command Prompt
If you want to make a bootable flash disk without additional applications, then I recommend using the Command Prompt (CMD).
Even though the process takes a little longer than using Rufus, it’s just as easy. The difference is that with CMD you have to use certain commands.
If you want to know how, please follow these steps:
- First, you have to open Windows then Type CMD or Command Prompt.
- After CMD opens, Type Diskpart. Then the system will ask for Administrator access, you can click Yes. Then you will be redirected to the diskpart.exe window.

- Next, type list disk> Enter. This command is used to display all available disks on your PC / Laptop.
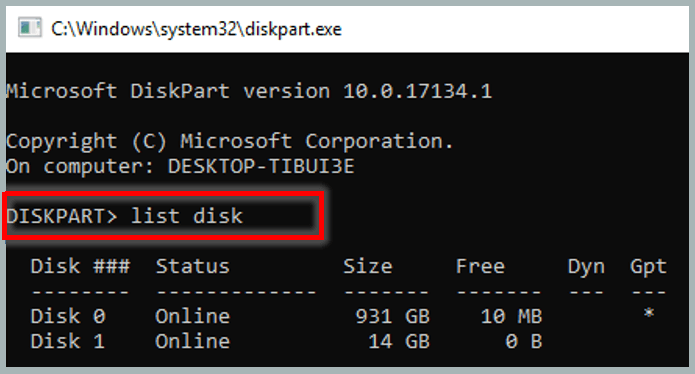
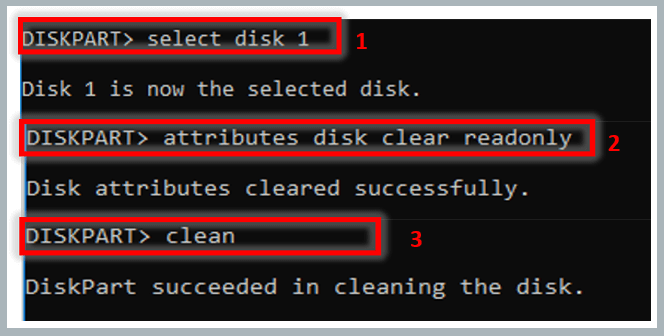
- Use the select disk command to select the flash disk to use. In this example, my flashdisk is on disk 1, so the command type select disk 1. After the flash is selected, now you type attributes disk clear readonly and clean .
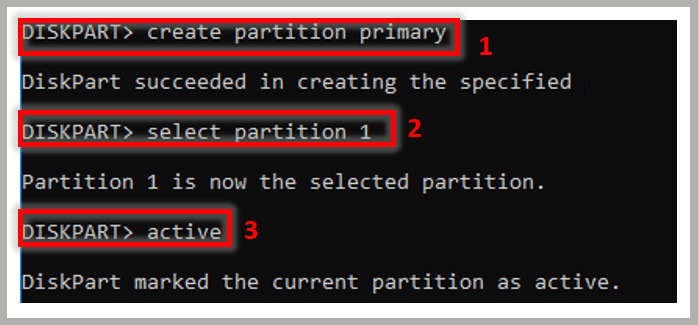
- The next step is to create a partition from the cleaned disk. The trick, type create partition primary> select partition 1> active .
- Now type the command format fs = fat32. In addition, you can also use the NTFS format by typing the format fs = NTFS.
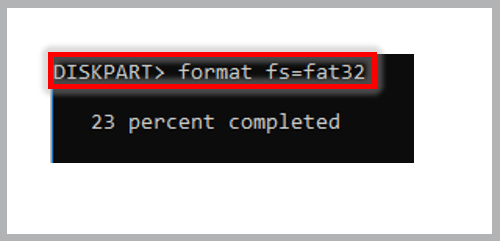
- Next, please wait until the formatting is complete, it usually takes more than 10 minutes.
- When finished, you type Exit> Press Enter. Finally, you only have to copy the ISO file that was downloaded earlier into the flash.
Note:
Also, make sure all ISO files have been copied correctly so that there are no errors during the installation process.
Now you can try to install Windows or other operating systems onto your PC / laptop.
# 3. Using WinToFlash
Apart from using the Rufus application, you can also try WinToFlash to create a bootable flash disk. This application is also free, the size is a little bigger but really practical.
If you want to know, follow the step by step which I will give the following:
- First, you have to download WinToFlash first then connect the flash you want to use.
- Then open the file and install the WinToFlash application.
- After the WinToFlash application is successfully installed, select the Windows Setup Bootable USB Wizard menu.
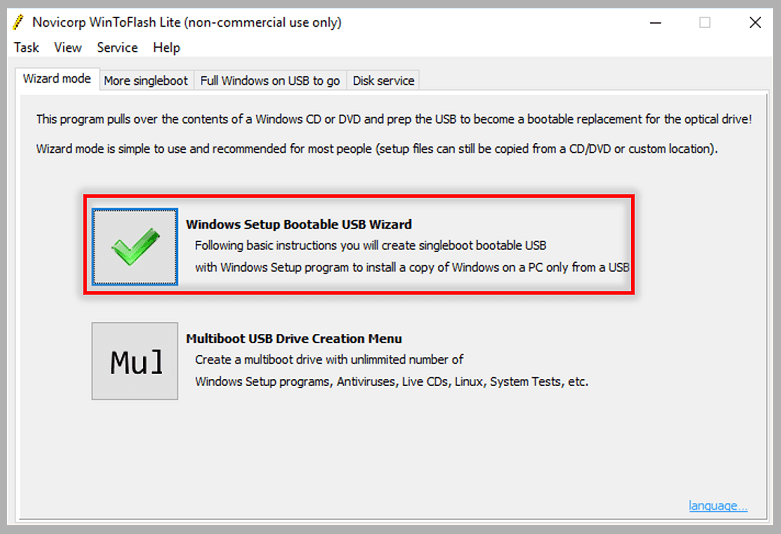
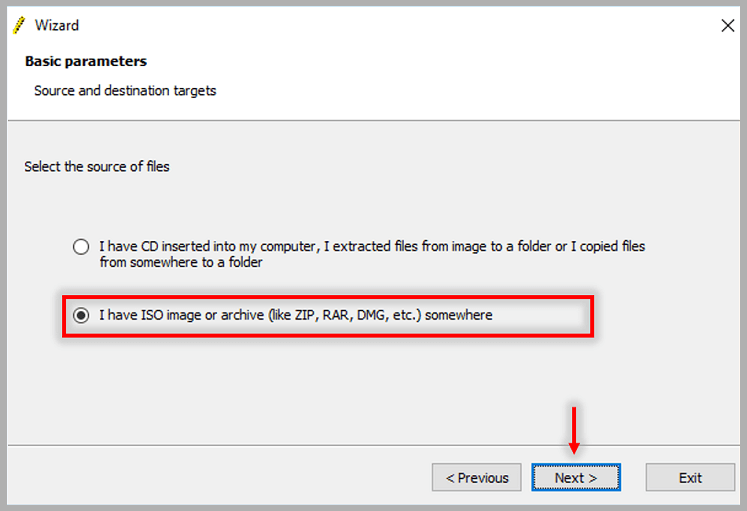
- After that you select the option I Have image or archive (like ZIP, RAR, DMG, etc.) somewhere > Click Next. This option indicates that the source file to be used is in ISO format.
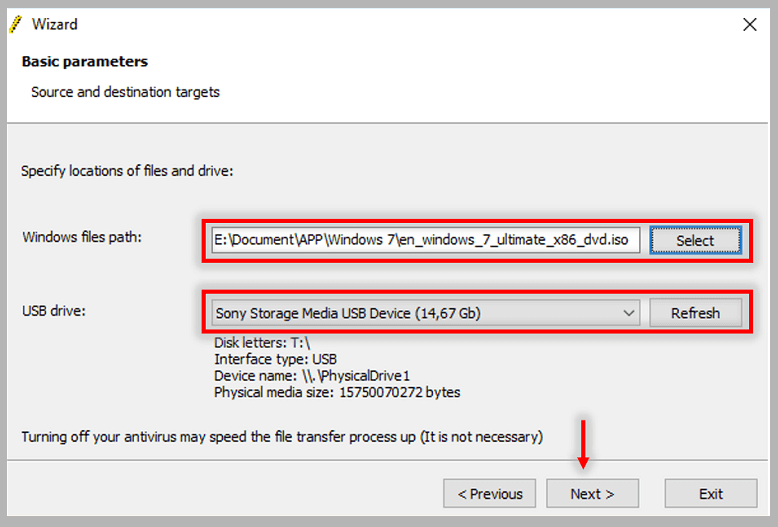
- In the Basic parameters window, there are 2 menus for you to fill. Fill in the Windows files path menu with the ISO that will be used. Then for the USB drive, select the flash drive that you want to make bootable.
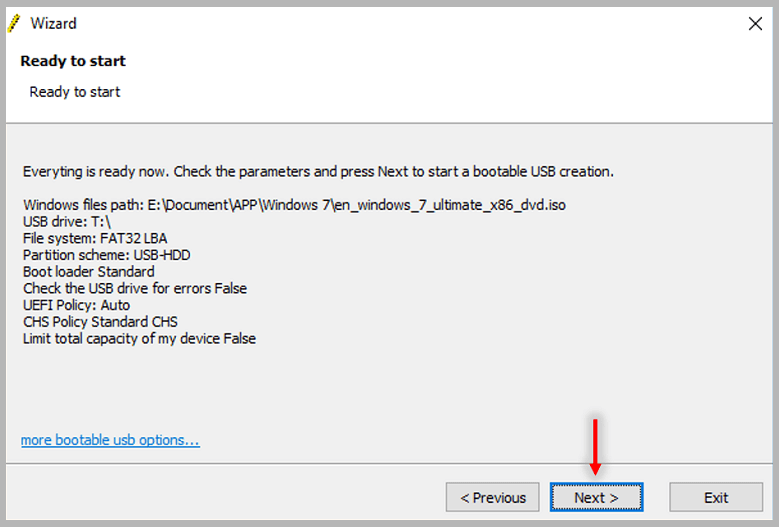
- In the Ready to Start window, you can directly click Next.
- Next, in the Windows License Agreement, you must select the option I do accept the terms of the license agreement> Click Continue. Then the bootable process will take place.
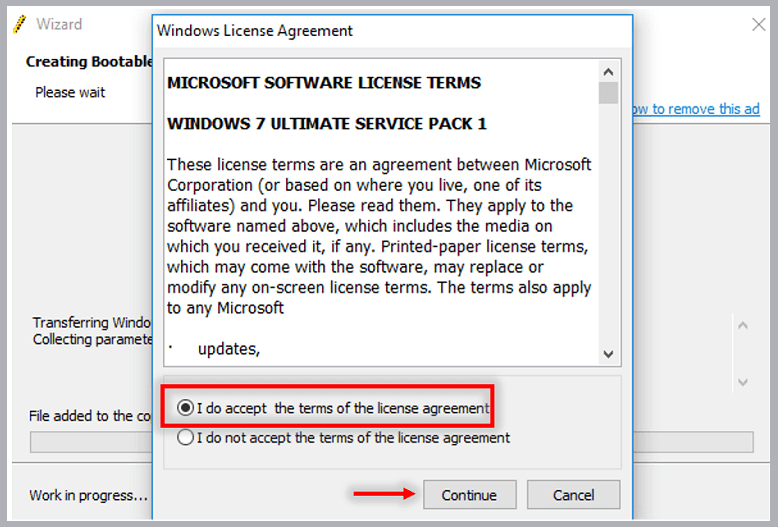
- Finally, you wait until the process is complete. If so, now your flashdisk can be used to install Windows on a PC / Laptop.
# 4. Using UNetbootin
There are many ways to make a bootable flash disk, including using the UNetbootin application.
In this application, you can not only make a bootable flash disk for the Windows Operating System. You can also create a bootable flash disk for other operating systems such as Linux and macOS.
If you want to know how, please pay attention to the following steps:
- The first step, please download UNetbootin first. You have to choose by adjusting the operating system of the PC / Laptop used.
- After it has been downloaded, open the application and connect your flash drive.
- If you have entered the UNetbootin application, now select the Diskimage option and you are looking for the ISO file of the operating system to use.
- On the Type menu, you can choose the letter flash that will be used then click OK.
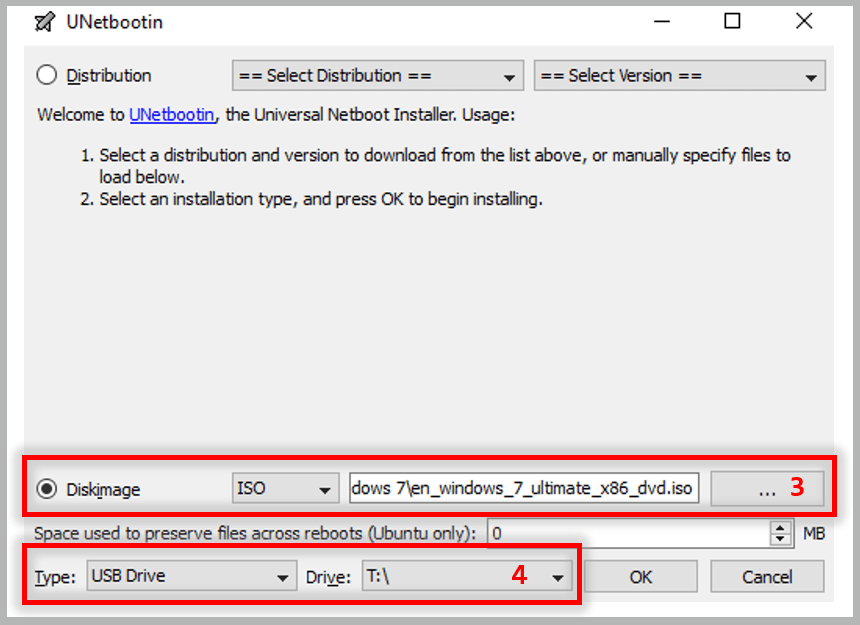
Now, wait until the install process is complete.
# 5. Make Bootable With Yumi Application
Furthermore, you can use the Yumi application as well to create a bootable flash disk. Uniquely, the Yumi application allows you to create Multi Bootables.
To find out how you can follow the following methods:
- Your first step should be to download the Yumi application. You can choose to use the Yumi application or the Yumi EUFI. For this practice, I use Yumi.
- Open the Yumi application and connect your flashdisk to the PC / laptop in use.
- Next, on the Step 1 menu, you have to choose the flash disk that you want to use for the bootable process later.
- Then in Step 2, you choose what operating system to use. In this tutorial, I use the operating system from Linux, namely Ubuntu.
- In Step 3, you click Browse and then find the ISO file you want to use to boot from the flash disk.
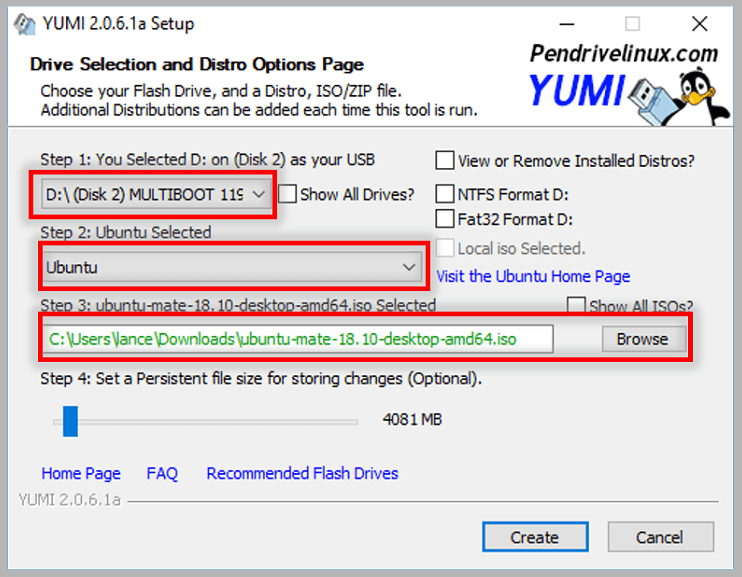
Finally, click Create to start the bootable process and wait for it to finish.
# 6. WinToBootic
Finally, there is the WinToBootic application which can be used to help you create a bootable flash disk.
The method is very easy, the size is small so it is suitable for those of you who want to be completely practical.
If you want to use this application, please follow how to make bootable windows on a flash drive which I will provide the following:
- First, you have to download the WinToBootic application first. You do this by clicking Download now.
- If so, please open the WinToBootic application and connect the flash you want to use.
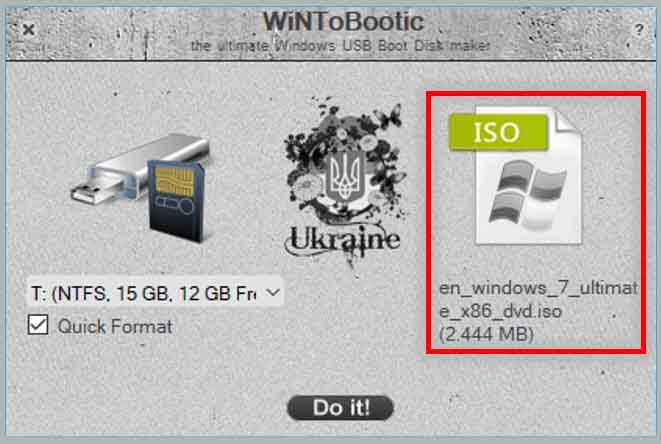
- Furthermore, this application will automatically read your flash. Now you have to select the ISO file to use by selecting the download icon.
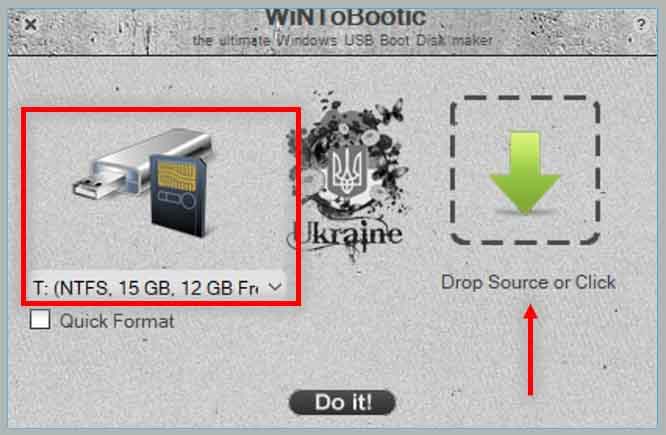
- If so, the download icon will change to match the ISO file you selected.
- After that click Do it! Then WinToBootic will perform a bootable installation process to your flash disk.
Other Application Recommendations To Make Bootable on Flashdisk
Actually, there are still many other application recommendations that can be used to make a bootable flash disk.
If you want to know what the application is, please see some of the recommendations below:
- WinSetupFromUSB
- Lili
- RMPrepUSB
- Universal USB Installer
Check Hard Disk Type (MBR or GPT) To Install Bootable
After making a bootable flash drive, you should also know the type of hard drive partition of the PC / laptop used.
The reason is, if you choose the wrong hard drive partition during the process, there is a possibility that the bootable that has been made can’t be used.
Now the type of hard drive itself is divided into 2, namely:
- MBR ( Master Boot Record )
- GPT ( GUID Partition Table )
A little discussion, yes, the type of MBR hard drive is a component of legacy devices, while GPT is used on the latest PC / Laptop releases.
Then for the characteristics, usually PCs / Laptops that use the MBR hard drive type have storage, not more than 2GB. For the type of GPT hard drive, there is no storage limit.
To find out the type of hard disk partition on your PC / Laptop, please follow the following tutorial:
- The first step, you have to open a Command Prompt. The trick is to click Windows> Type Command Prompt.
- Next, you type diskpart> Enter. Then there will be a notification from the system warning that the order must be with Administrator permission. You click Yes, the diskpart.exe window will open.
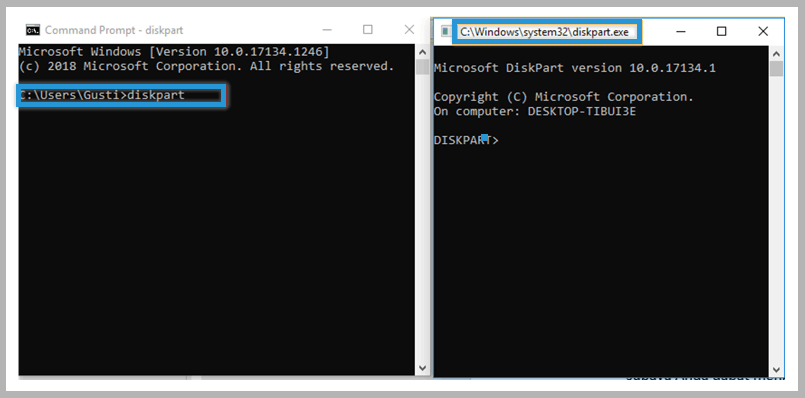
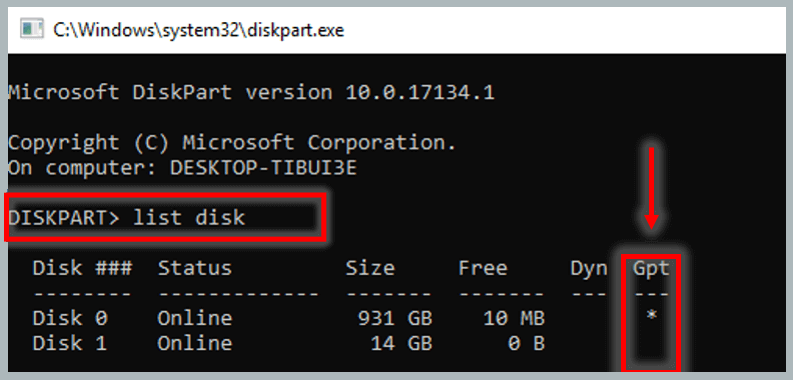
- After that you type list disk> Enter, using this command you can see all the disks that the PC / Laptop is currently using.
- Now to find out the type you can see the arrows I pointed out. So if your hard drive is a GPT ( GUID Partition Table ) type, there will be a star in the column.
The Final Word
Well, now you can practice how to make Windows bootable on a flashdisk.
Then you can install it to a PC / laptop via the bootable flash disk.
I think that’s enough tutorial that I can provide, I hope this information is useful. Thanks.

![How To Fix: ALT GR Not Working On Windows 10 [2025] How To Fix ALT GR Not Working On Windows 10](https://techmaina.com/wp-content/uploads/2021/04/How-To-Fix-ALT-GR-Not-Working-On-Windows-10-218x150.png)
![Hard Drive Repair – How to Repair a Damaged Hard Drive [2025] Hard Drive Repair - How to Repair a Damaged Hard Drive](https://techmaina.com/wp-content/uploads/2020/12/Hard-Drive-Repair-How-to-Repair-a-Damaged-Hard-Drive.jpg)
![How to Check What Graphics Card You Have [2025] How to Check What Graphics Card You Have](https://techmaina.com/wp-content/uploads/2021/09/How-to-Check-What-Graphics-Card-You-Have-218x150.png)


![How To Fix: Avast VPN Not Working Error On Windows [2025] Best Methods To Fix Avast VPN Not Working On Windows](https://techmaina.com/wp-content/uploads/2021/04/Best-Methods-To-Fix-Avast-VPN-Not-Working-On-Windows-100x70.png)

![Latest Free IPVanish Premium Accounts List [2025] Latest Free IPVanish Premium Accounts List](https://techmaina.com/wp-content/uploads/2021/09/Latest-Free-IPVanish-Premium-Accounts-List-100x70.png)