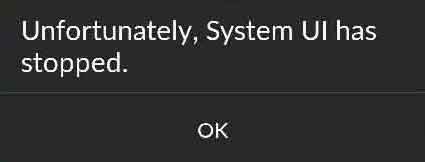
Lately, my cellphone keeps getting the message “Unfortunately, the System UI Has Stopped”.
For me, this problem is very disturbing. Why? Because if I’m using a cellphone, then the message appears, so I can’t help but press the OK button before the cellphone can be used again.
Okay, if only once. But the trouble is, this message appears over and over again.

In addition, it is better if the cellphone can be used immediately afterward. Sometimes the cellphone likes to hang for a while.
Table of Contents
What is System UI?
Previously, some of us may have been wondering, what is the UI system?
If explained briefly, the system UI is the Android display design interface. Whether it’s icons, menu buttons, and so on, which run in the form of programs (applications).
This UI system is a package with Android. So, it includes an important part that if damaged can cause your cellphone to not run normally.
Now back to the topic again, huh. Why did the UI system stop?
Causes the System UI Has Stopped
Bug Android System: Android system that has a bug, usually caused by usage. This can have an impact on the system UI.
Full RAM: System UI works by taking up a portion of RAM capacity. If it’s too full, it will stop working.
Unstable System: System stability can make the UI system stop. This happens quite often.
System Update Failed: System updates from developers don’t always go smoothly. Sometimes there are also problems that make the cellphone become an error, including the UI system.
Launcher Error: Android system is also connected to the launcher. If the launcher is an error, the impact can display a stopped message like that.
Effects of Root: Root on a cellphone can make the system unstable, and can make an Android process stop. This includes the UI system.
How to Fix the Error “Unfortunately the System UI Has Stopped” So Normal Again
To overcome the message “system UI has stopped” is actually not that difficult, because it can be concluded that this problem mostly comes from a system perspective.
To be honest, I myself have experienced this kind of error a lot. Moreover, I am very fond of checking Phone.
As a result, I have always managed to fix this UI system problem.
Then, what do I do? If you’re curious, let’s, please look at the solutions:
1. Clear System UI Cache
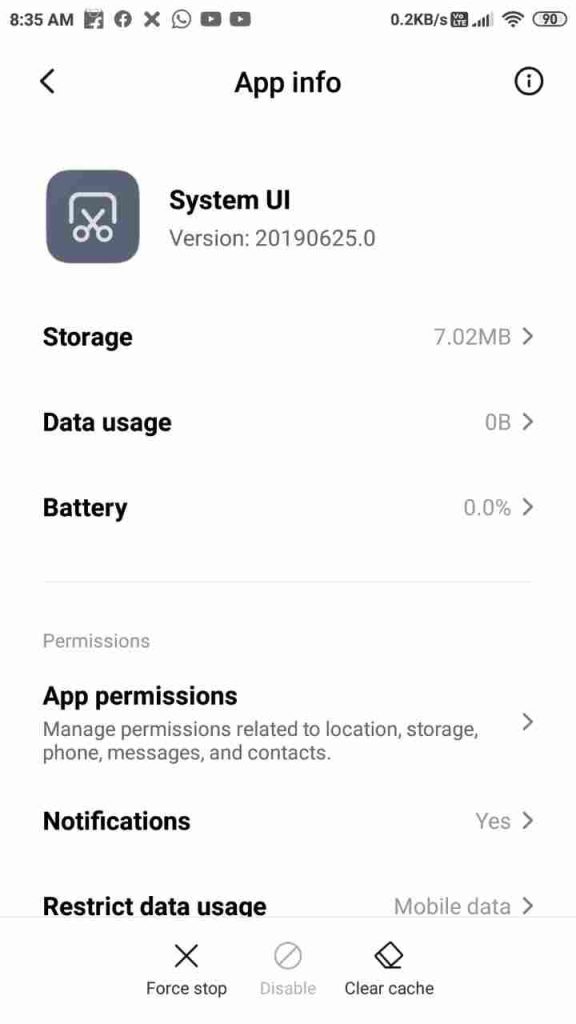
The Android UI system stores temporary data called cache data every day. This cache data, if it has accumulated, could create certain problems.
It is highly recommended to clear this cached data because sometimes it is very effective to solve the stop message on the system UI.
Here’s how:
- Open your Android Mobile Settings.
- Next, open the Applications menu.
- Then swipe down and look for System UI.
- Open the Storage menu.
- Then tap on Clear Data / Cache.
Next, please restart your cellphone. Usually, in this way, the stop message can be resolved.
2. Update Your Android
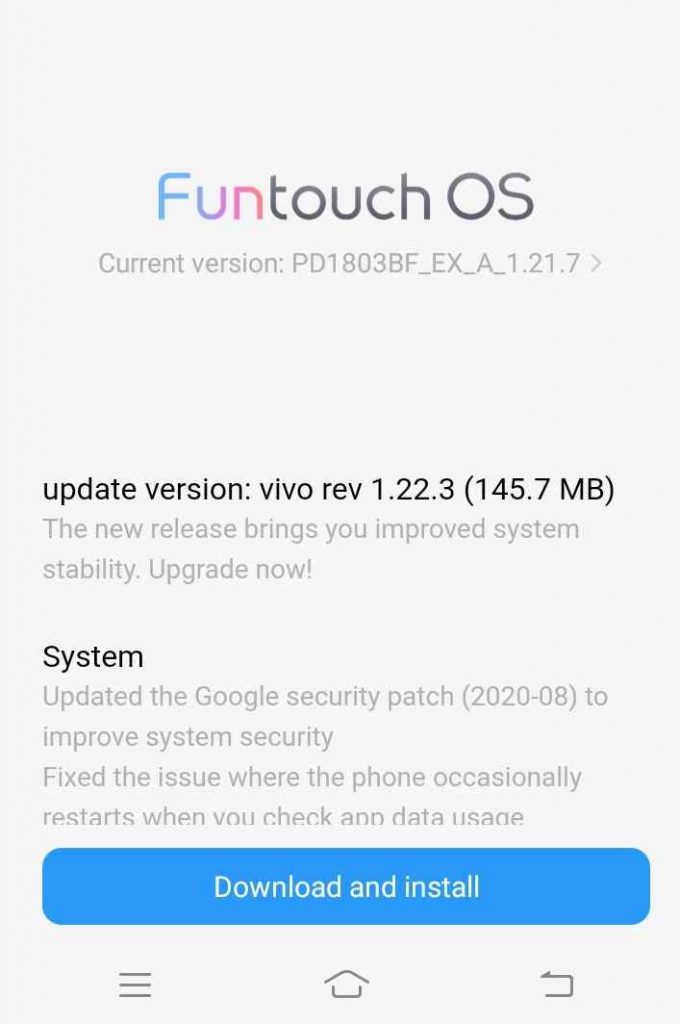
I had said, that updating could indeed be one of the reasons why the UI system likes to stop.
But not always. Because on the other hand, updating can actually help to overcome certain errors. So, there’s no harm in trying first:
- Open Android Mobile Settings.
- Then open the About Phone menu.
- After that tap the Update menu.
- Then Update if the option is available.
The update itself sometimes takes a long time, and sometimes the process is fast. Depending on the size of the file that must be downloaded.
Don’t forget, to prepare enough quota, if you use cellular data to download it.
However, if you have previously updated it and it still doesn’t work, or maybe it’s the cause from here, feel free to try other solutions next.
Read Also:
3. Clear Dalvik Cache + Cache Partition Phone
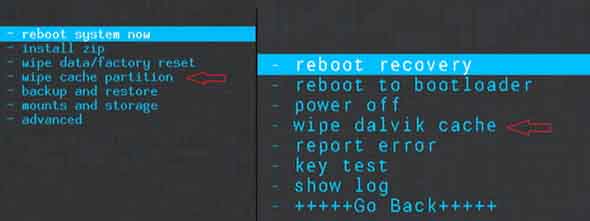
It’s still a matter of clearing the cache as in the first point but in a different way.
Where is the difference? The difference is, in number one, we only delete the cache in the UI system application.
Meanwhile, Cache Partition + Dalvik Cache is a direct part of the system.
The method is like this:
- Turn off your cellphone.
- Enter recovery by pressing the Power + Volume Up + Volume Down buttons (simultaneously).
- Then enter the Wipe menu.
- Then select Wipe Cache Partition and Wipe Dalvik Cache.
If so, you can restart your cellphone as usual.
By the way, the button to enter recovery is just an example. If you are unsuccessful, maybe a different button should be used.
Please search on Google for more details.
4. Make Sure Phone RAM is Not Full
When running, the UI system of course also requires some memory (RAM). What you need to know is, if this RAM is fully charged, the effect can make the application stop on its own.
That’s why it’s important for us to check and optimize RAM so that there is always free space. For me, the way is like this:
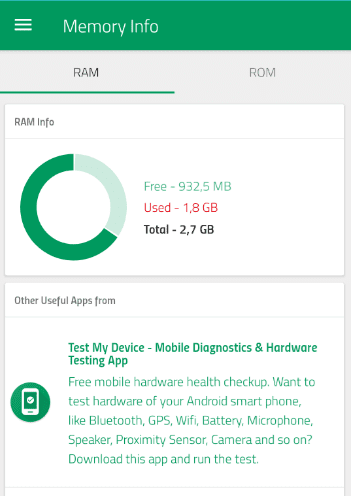
- Please install the Memory Info application from Google Playstore.
- Open the application> Then on the RAM tab > You will see the available memory capacity.
- If RAM is too full, do optimization. Go to Settings > Apps > Then Force Stop unnecessary running apps there.
This method is highly recommended to be applied to cellphones with 2GB of RAM memory and below, as well as cellphones with many applications or games installed.
Read Also:
- How to Fix: Android.Process.Media Has Stopped Error
- How To Fix “Mobile Network Not Available” Error On Android
5. Uninstall Update Playstore
When the automatic application update process is running, RAM usage will usually increase and will cause some system processes to stop.
Here we can outsmart it by uninstalling updates from Playstore. Take it easy, it won’t erase it anyway.
The method is as follows:
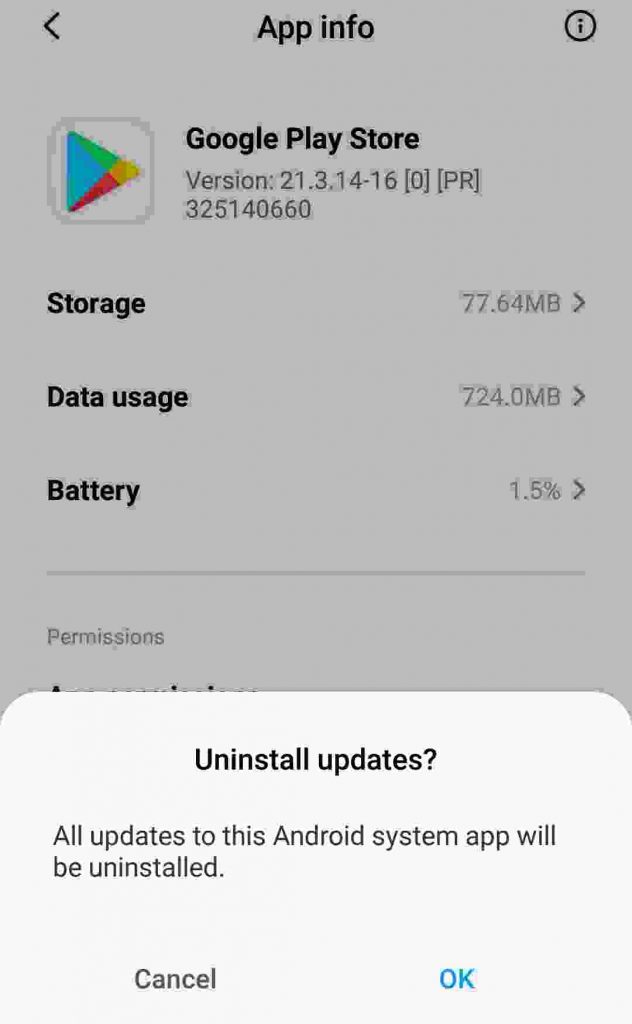
- Open Android Settings.
- Then enter the Application.
- Search for the Google Playstore app > Open.
- Then tap the Delete Update button.
Next, please open the Playstore. There you will see the display change to the old view.
- Go to Playstore settings (top left).
- Tap the Settings menu.
- Then in the column, Update Applications > Select Do Not Update Applications Automatically.
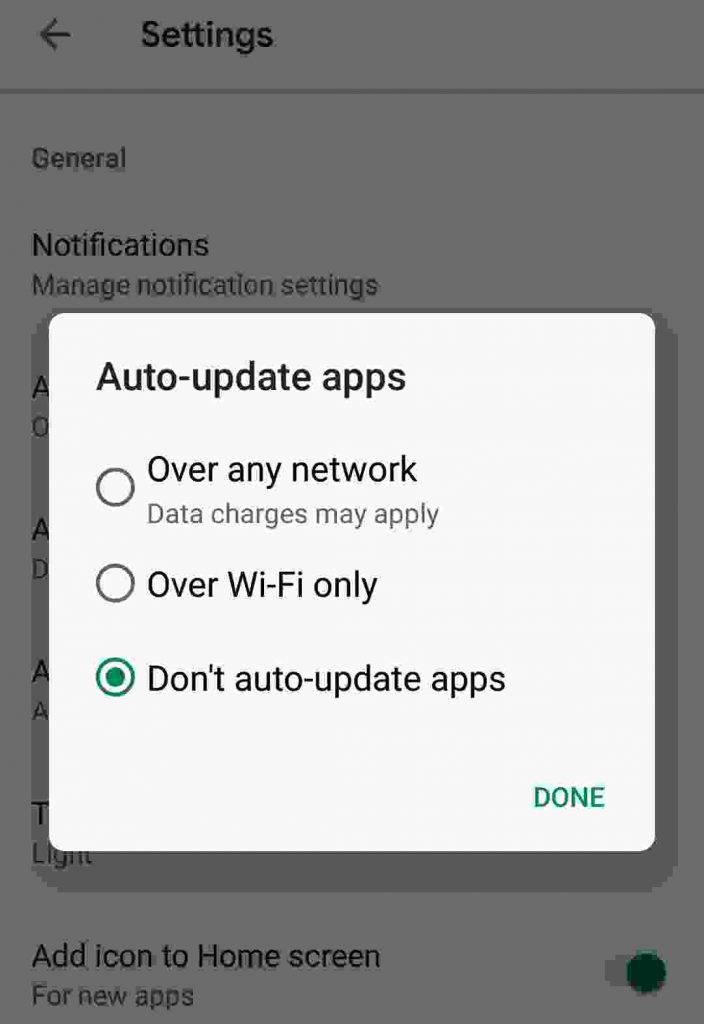
There are two update settings there. Set their second auto-update function to off.
6. Remove Root Access from Your Cellphone
There are indeed quite a number of benefits to the root. But it is also worth some of the root risks that may occur.
One of them is that it can cause the Android system to become unstable. This happens quite often and can lead to other errors. For example, the system UI issue has stopped which we are talking about here.
However, the method for removing root access varies. First, try to remember, what root application did you use?
Try to install the application again, then open it. Maybe there will be an option to unroot the cellphone.
7. Use a Junk Cleaner Application
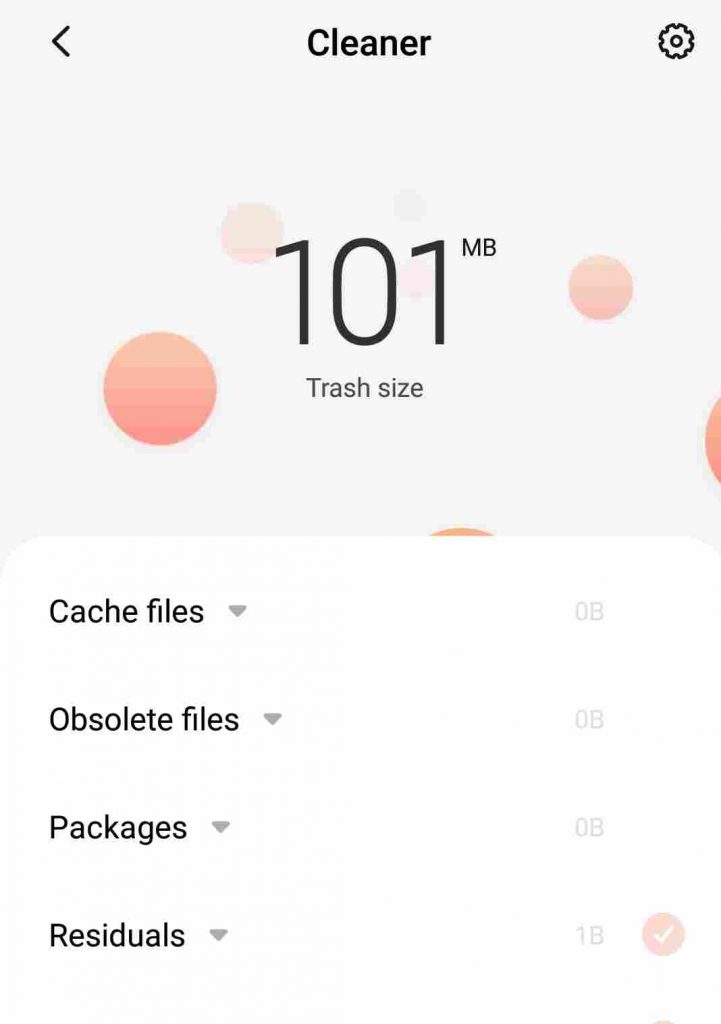
Junk cleaning application or so-called cleaner application. Its function is to optimize the system to make it more stable and lighter.
Although not straightforward, this cleaner application will also be of little help to fix errors on the system.
All you need to do is install the application in question. There are many, for example, Avast Cleaner, Clean Master, CCleaner, and others. Can be selected as you wish.
After that, you can open it, then hit the Optimize button and let the process work.
8. Perform Reset
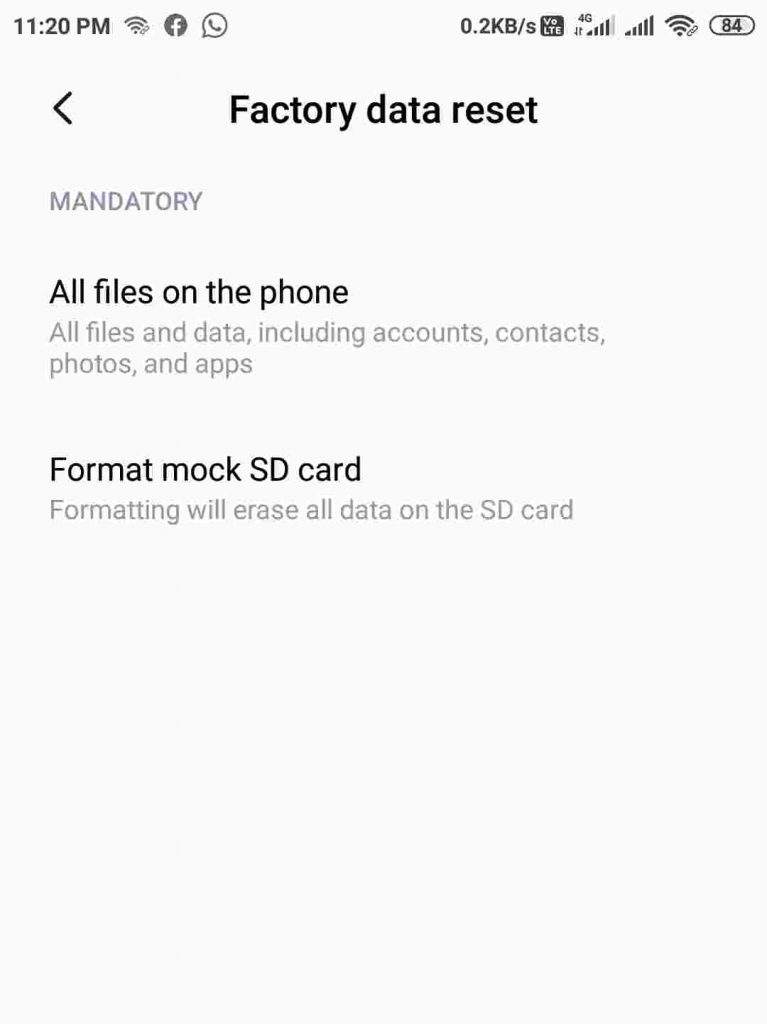
Doing a factory reset or what is commonly called a factory reset is something you can try when you encounter an Android system problem.
This includes when you encounter the message “Unfortunately the UI System Has Stopped”. This reset option is 80% effective to solve it.
The reset steps are like this:
- Open Android Settings.
- Then enter the Backup and Reset menu.
- Tap the Restore Factory Settings menu.
- Then follow the next reset guide.
But remember, don’t forget to backup your cellphone first, because this reset will erase all data in the internal memory.
Can try moving data to a computer or laptop. Whether it’s photos, videos, documents, WhatsApp chat history, and others, to keep it safe.
PS: This reset method can be used to solve system update problems, as noted above.
9. Re-flash the Android Phone
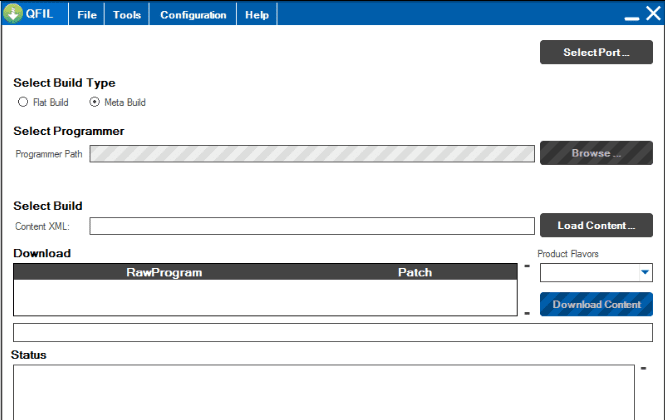
If the reset still doesn’t work, then most likely the cause is in the system right away.
How come? Can be.
For example, when it turns out that the system has a built-in bug that hasn’t been updated to fix, or maybe because you installed a custom ROM.
Flashing this Android phone can help to solve this problem. The way it works is to replace the old system with a new one using the help of a computer.
There are several ways flash can be done. However, my advice is better just search on Google according to your type of cellphone.
The reason is to minimize the occurrence of other damage. For example, a boot loop or maybe the cellphone is totally dead.
10. Take the Cellphone to the Service Center
Doing flashing remanufactured phone itself is complicated. In addition, you also need to know, this can void your phone warranty.
Another solution, you can take it to the Service Center. Just tell me if the cellphone you are using likes the message “UI System Stopped” appears. Usually the technicians there immediately understand what to do.
So, at this Service Center, the system will be checked again. Either by updating or by flashing again.
I think the cost is cheap. After all, this is not a damaged component. Especially if it’s still a warranty. Can be free, you know.
The Final Word
The message “Unfortunately System UI Has Stopped” is mostly caused due to unstable system problems, bugs, to full RAM.
Usually, these messages will appear continuously and can make users annoyed.
With the 10 ways above, to be honest that’s what I did to solve this problem. The result? Until now, my cellphone can return to normal.
In the future, it is advisable to always optimize the system so that it is always stable. I have explained the method a lot on this site. Please go to the Android category.
May be useful.


” Error")


