You are here because your webcam or Logitech webcam not working, am I right?
Well, In this article we will share the best method for how to fix the “Webcam or Logitech webcam not working” issue.
So, without wasting let’s get started…

Table of Contents
Basic Overview of a Webcam or Logitech Webcam
A webcam or Web Camera is a small digital camera that is connected to a computer, either directly or indirectly.
Generally, laptops and some personal computer screens (PCs) have built-in webcams.
For computers that do not have a built-in webcam, you can still use an external webcam that is connected to the computer via a USB port or wirelessly.
Webcams are widely used for video broadcasting on the web, video chat sessions with other people, and so on. If you like to record your computer screen while playing games.
You can also add your face to appear in one corner of the screen you want (facecam recorder) via webcam.
Currently, the webcam has become an integral part of the everyday use of computer devices.
If you have trouble with your webcam, this article will help you try to fix the problem. You can follow the steps described to explore one or more possible causes.
This fix is for a problematic webcam on Windows computers.
Possible Causes Why Your Logitech Webcam Doesn’t Work
There are many possible causes why your Logitech webcam may not work, as well as many symptoms you can have. The four most common symptoms are:
- The PC does not detect a webcam.
- The image is black.
- It works but it looks bad.
- When you open the application that uses the webcam, it gives you an error message.
The cause for which you could have these problems is variable, but it usually has to do with the fact that the hardware does not work correctly, you have outdated drivers, there are problems with the configuration, or your antivirus is blocking the device.
Next, we are going to try to find out why the device is not working properly and how to fix it.
Read Also:
How to Easily Fix “Logitech Webcam Not Working” Issue
The steps to follow to try to locate the problem usually depend on the version of the operating system you have installed.
Here we are going to focus on Windows, since it is the most used among normal users and especially among those who stream.
But these possible solutions are usually valid for most webcams and operating systems.
1. Ensure That the Webcam Is Not Disabled
One of the reasons the Logitech webcam has a problem, not working is because it is disabled.
Maybe, someone who has used your computer or laptop before has disabled the webcam or it has been a long time since the webcam has been off without you knowing it.
If so, you will need to re-enable the webcam in order to use it.
Reactivating the webcam on a Windows computer is not difficult, below are the steps
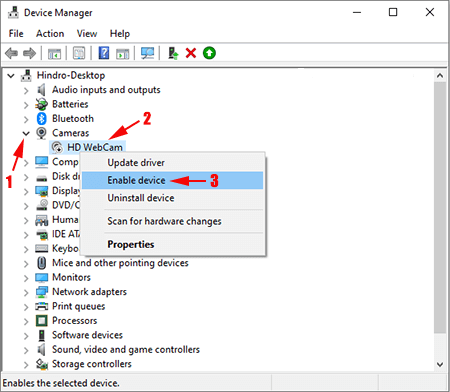
- You need to open Device Manager first.
- In the Device Manager window that appears, click the arrow on Cameras or Imaging Devices
- Then right-click the mouse right on the Webcam to display the shortcut menu
- Then select the Enable device.
2. Install, Rollback, or Update the Driver
Microsoft Windows has many features that partly work behind the scenes. One of the hidden features is a special service that monitors how apps and devices work.
Windows will automatically install the driver when a device is connected to ensure that the device can work or function properly.
But sometimes, the driver installation can fail so that the device can’t work or function properly.
If the device is an external webcam, you will need to download the latest version of the driver from the webcam manufacturer and install it manually into your computer.
If the webcam has a problem after installing an application or updating (updating) Microsoft Windows, the driver may become incompatible or corrupt.
If so, you can try to roll back the driver to a previous version or you can try updating the driver.
To update the webcam driver follow the steps below
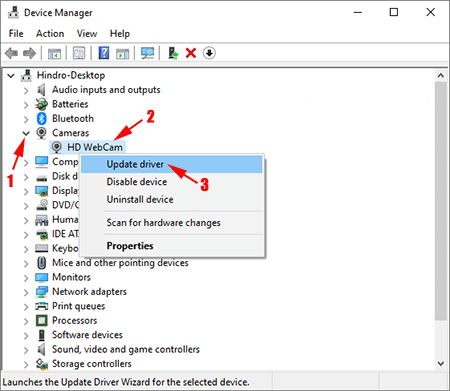
- First, open the Device Manager
- In the Device Manager window that appears, click the arrow on Cameras or Imaging Devices
- Then right-click the mouse right on the Webcam (2) to display the shortcut menu
- Then select an Update device.
3. Check the Webcam Configuration
You need to check the configuration of the camera or webcam settings in Microsoft Windows.
In Windows 10, configure camera or webcam settings in Windows Settings in the Privacy group.
Configuration of these settings includes permission to access the camera on a computer device and granting camera access permission to applications that want to use it.
To ensure that the access settings to the camera on a computer device are correct to follow the steps below
1. Click the Windows Start button
2. Select Settings (in the form of a gear icon)
3. In the Windows Settings window that opens
4. Select Privacy (Location, camera, microphone).
5. In the Settings – Privacy window that opens
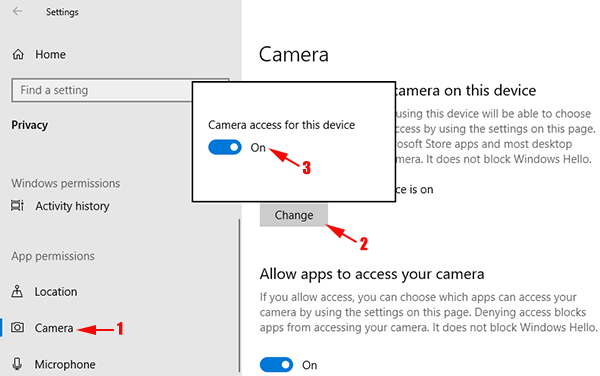
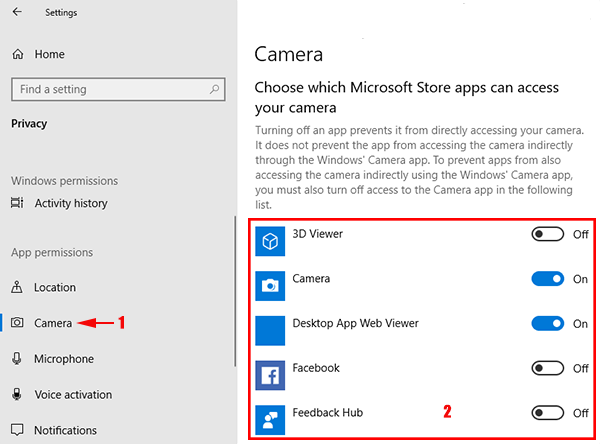
6. Click the Camera tab
7. In the area to the right, click the Change button
8. Make sure the value for Camera access for this device is On.
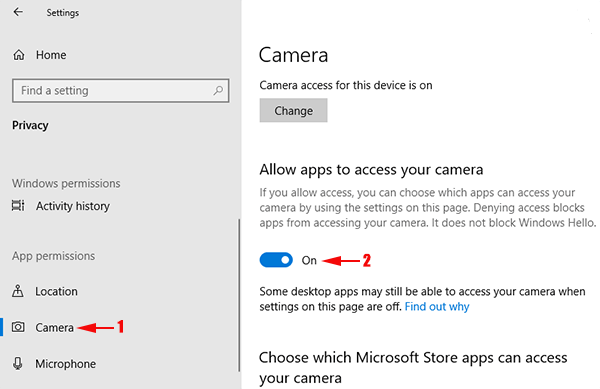
9. To ensure that the permission settings for access to the camera for the application have been granted, still, on the Camera tab, make sure the value for Allow apps to access your camera is On.
10. Next, still on the Camera tab (1), in the application list at the bottom, change the toggle button value to On for applications that are allowed to access the camera or webcam (2).
4. Check the Connection Between the Webcam and the Computer Again
If you believe that the problem is not with the software or drivers and your webcam is an external connection to the computer using a USB cable, you will need to double-check that the USB webcam cable matches or matches the USB port on your computer.
If necessary, unplug the USB cable and then plug it back into the USB port properly.
5. Check the Webcam Settings in the Using Application
The webcam not working or working could be caused by incorrect settings in the application that uses the webcam. Generally, webcam user applications will automatically detect the webcam device.
If your laptop is also connected to an external webcam because the built-in webcam has problems, the application may detect and use the problematic built-in webcam. You need to change so that the application uses an external webcam.
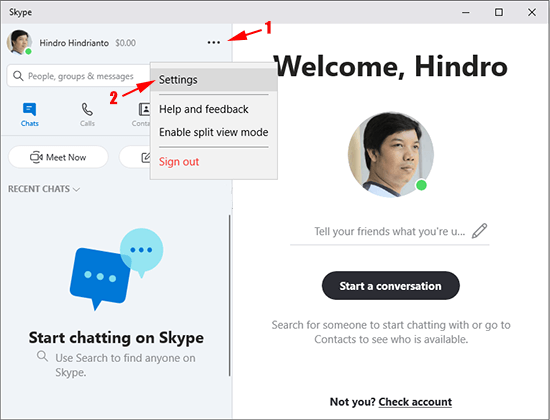
For example, in this article using the Skype application where you can specify or select the webcam you want to use when there is more than one webcam. Open or run the Skype app, click the More button, and then select Settings.
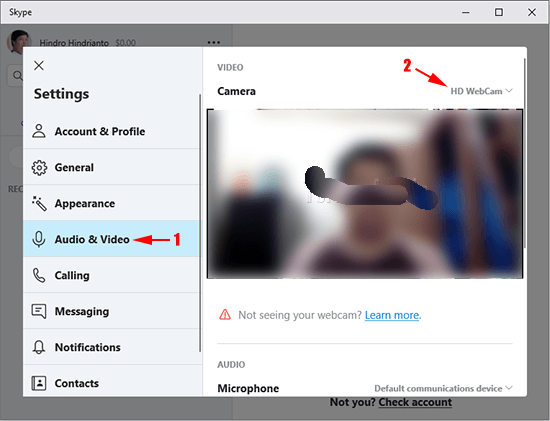
In the Settings window that appears, click the Audio & Video tab (1) and to the right, specify the webcam (2) used by the Skype application.
6. Take It to a Service Center
If the webcam is external, you can make sure beforehand that the external webcam is okay. To do this, you can try to attach the external webcam to another computer.
If the webcam is built-in or comes with a laptop or PC and the methods above do not solve, just take it to a service center for repair. If the warranty is still valid, you can get a free repair.
Conclusion:
We hope that now you are not facing the problem “webcam or Logitech webcam not working” issue.
If you still have any problems or any questions please feel free and let us know in the comment section. we will get in touch with you as soon as possible.


![How To Fix: Avast VPN Not Working Error On Windows [2025] Best Methods To Fix Avast VPN Not Working On Windows](https://techmaina.com/wp-content/uploads/2021/04/Best-Methods-To-Fix-Avast-VPN-Not-Working-On-Windows-218x150.png)


![How To Fix: Avast VPN Not Working Error On Windows [2025] Best Methods To Fix Avast VPN Not Working On Windows](https://techmaina.com/wp-content/uploads/2021/04/Best-Methods-To-Fix-Avast-VPN-Not-Working-On-Windows-100x70.png)

![Latest Free IPVanish Premium Accounts List [2025] Latest Free IPVanish Premium Accounts List](https://techmaina.com/wp-content/uploads/2021/09/Latest-Free-IPVanish-Premium-Accounts-List-100x70.png)
I have been using webcam Hd 720p daily. Yesterday, it stopped working. Is plugged into USB, does not recognize it. Unplugged. Restarted Computer. Nothing!! I desire to use the Logitech, not the laptop’s internal camera. What is the problem. Is it a hidden Window 10 update??
Your webcam Hd 720p is not working, not because of the hidden Window 10 update. Are you try all of the methods mentioned above? If you try all of the methods and still not working your webcam then it is better to change the webcam. As you wish to use a Logitech webcam, you can use it, it is a good webcam.