Fix Right Click Not Working: Can’t right-click on a laptop or computer. Usually, the cause is because there are bugs in certain drivers, especially if you are using Windows 10.
You could say that the right-click function is very important for you to use the computer. So like it or not, it must be resolved immediately.
If you are looking for a way, here I want to discuss it.
Table of Contents
How to Fix Desktop Right Click Not Working
For this problem myself, I have experienced it. So the menu that usually appears actually takes a long time to come out.
For here I am editing the registry settings. Here are the steps.
# 1. Open Regedit
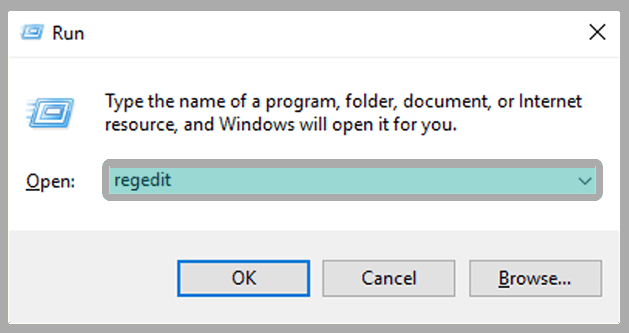
The first step, you can open Registry Editor (Regedit) on PC.
The method is quite easy. You can press Windows key + R until Windows Run appears, then type Regedit.
If so, click OK or press the Enter key, the Regedit settings will open.
# 2. Enter ContextMenuHandlers Settings
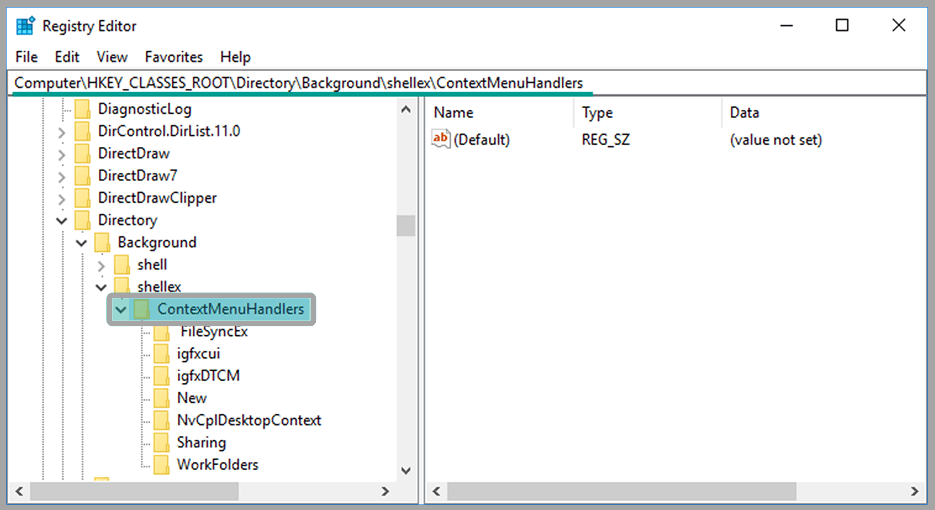
After entering the Registry Editor settings, now you need to locate the directory from the Menu (the name is here contextual menu).
You can open the HKEY_CLASSES_ROOT> Directory > Background > shellex> ContextMenuHandlers folder .
In it, there are several more folders, including VGA Configuration On Your Computer.
# 3. Delete Registry Appropriate VGA Used
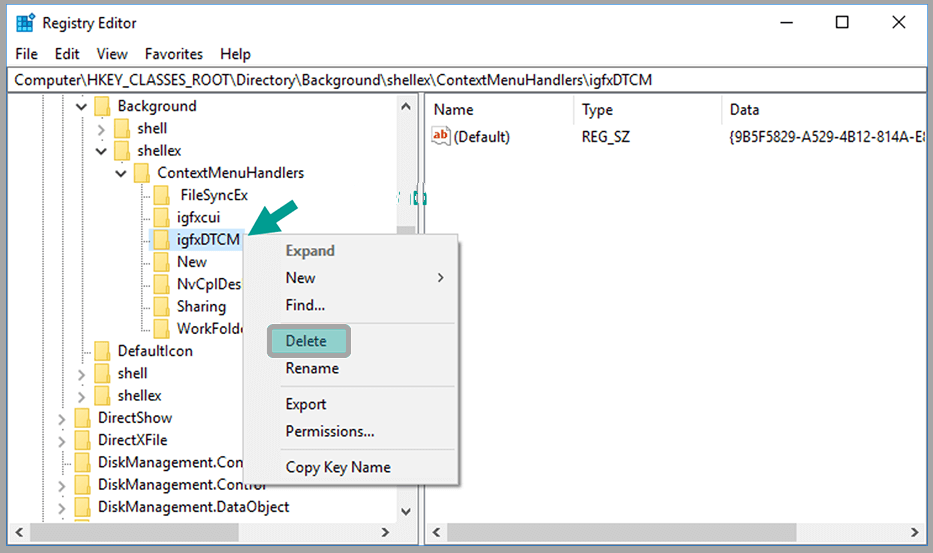
Then you can delete the registry according to the VGA used on the computer.
The trick is to simply right-click the folder from the VGA registry, then select Delete. However, each VGA has a different folder name, for example:
| VGA | Folder Name |
| Intel | Igfxcui and igfxDTCM (Remove both) |
| AMD | ACE |
| NVIDIA | NvCplDekstopContext |
# 4. Restart the Computer or Laptop
Once it has been deleted, you can close the Registry Editor settings. Then please restart the PC you are using.
After the PC starts up again, try checking your right-click to make sure the problem is resolved.
Other Ways If You Can’t
If you have tried the method above but it can’t be solved, then you can try several other methods.
Maybe your driver has a bug or it could be a faulty mouse or touchpad.
Here are some ways to solve not being able to right-click on the Windows 10 desktop:
# 1. VGA Driver Update
You can try Updating The VGA Driver used on the PC.
Regarding how to update the VGA driver, what I mean here is through the Device Manager.
For details, see the following steps:
- First press the Windows key, then type Device Manager and enter the menu.
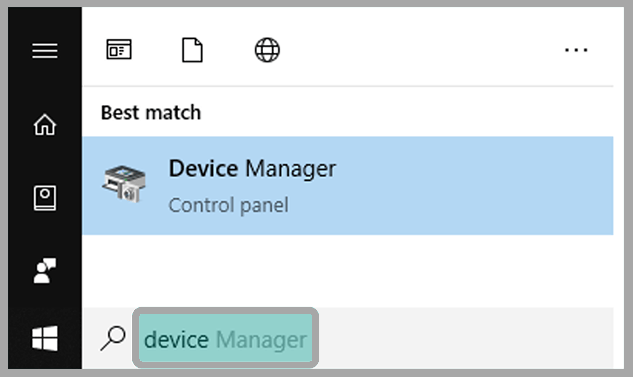
- After entering the Device Manager, you can click Display Adapters.
- Then right-click your VGA driver, then select the Update Driver menu.
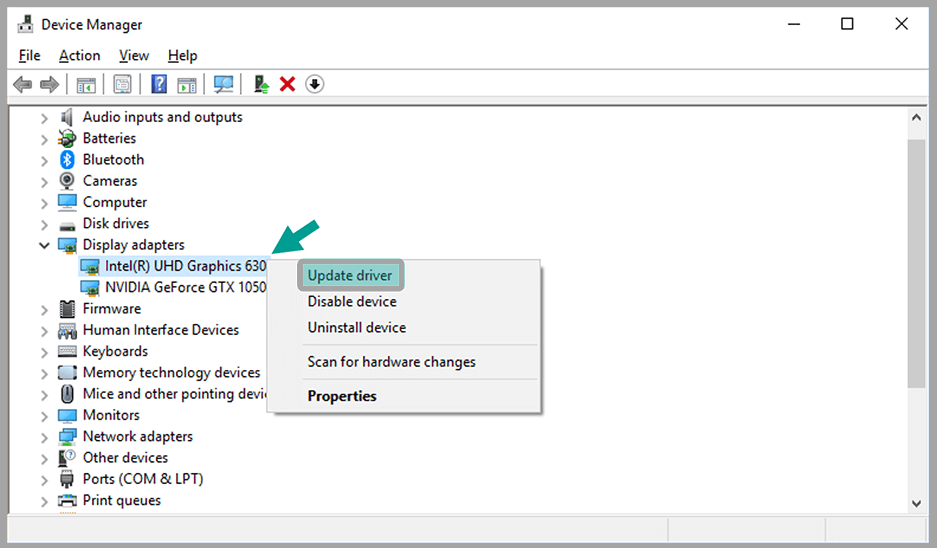
- Wait a few moments until the update process is successful.
- Done.
# 2. Disable Tab Mode
Then you can disable tablet mode. Like in Windows 8, Windows 10 also has tablet mode.
Please note, in this tablet mode right click on the mouse will automatically be disabled. Therefore, you should just return the mode to the original.
- First, you can click the Notifications icon on the bottom right of the taskbar.
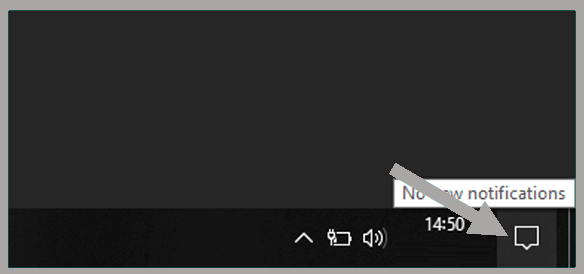
- Then click Tablet Mode to disable it.
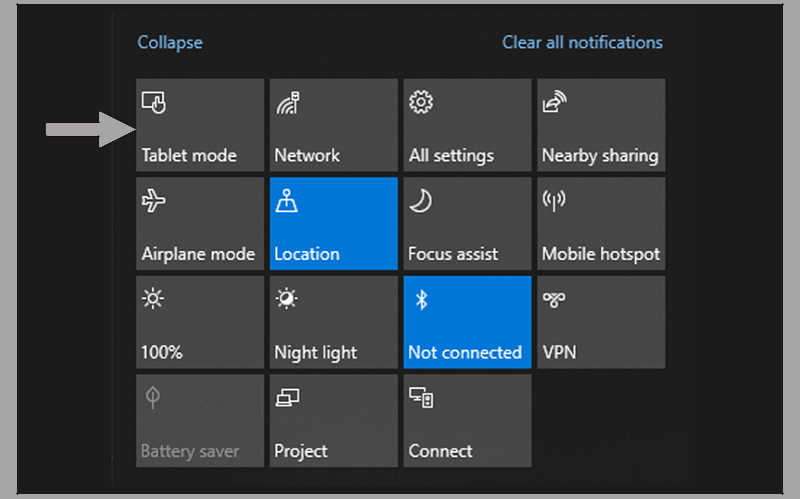
- Done.
# 3. Check The Mouse or Touchpad
If you have tried some of the methods above but still can’t, maybe the cause is the mouse or Touchpad is Damaged.
As an alternative, if you are using a computer try using another mouse. Meanwhile, if you use a laptop, try using the mouse, then right-click.
If the menu appears, it means that the cause is due to damage to your mouse or touchpad.
The Final Word
So, those are some ways to deal with desktop right-click not working or slow menu appearing.
Apart from checking the system on the computer, you should also check the mouse or touchpad to solve the problem.
May be useful.

![How To Fix: ALT GR Not Working On Windows 10 [2025] How To Fix ALT GR Not Working On Windows 10](https://techmaina.com/wp-content/uploads/2021/04/How-To-Fix-ALT-GR-Not-Working-On-Windows-10-218x150.png)
![Hard Drive Repair – How to Repair a Damaged Hard Drive [2025] Hard Drive Repair - How to Repair a Damaged Hard Drive](https://techmaina.com/wp-content/uploads/2020/12/Hard-Drive-Repair-How-to-Repair-a-Damaged-Hard-Drive.jpg)
![How to Check What Graphics Card You Have [2025] How to Check What Graphics Card You Have](https://techmaina.com/wp-content/uploads/2021/09/How-to-Check-What-Graphics-Card-You-Have-218x150.png)


![How To Fix: Avast VPN Not Working Error On Windows [2025] Best Methods To Fix Avast VPN Not Working On Windows](https://techmaina.com/wp-content/uploads/2021/04/Best-Methods-To-Fix-Avast-VPN-Not-Working-On-Windows-100x70.png)

![Latest Free IPVanish Premium Accounts List [2025] Latest Free IPVanish Premium Accounts List](https://techmaina.com/wp-content/uploads/2021/09/Latest-Free-IPVanish-Premium-Accounts-List-100x70.png)