How to Turn Off Firewall in Windows 10 – Since its release a few years ago, Windows 10 has now become the most popular version of Windows, beating previous versions.
Indeed, there are many advantages that this version of Windows has. One of them is better application and hardware compatibility.
Well, even though there are a variety of new features available in Windows, it doesn’t necessarily make Microsoft eliminate the old features, which already existed from previous versions of Windows.

Like Windows Firewall in between.
Table of Contents
Overview of Windows Firewall
Windows Firewall itself is a Windows feature that functions to block access to certain applications or software connections, with the aim of securing the PC or laptop used, so that it is not susceptible to virus attacks.
In other words, it can be concluded that this firewall has an important role in maintaining computer security.
Especially if your computer or laptop is always connected to the internet. Wow, if it’s like this, I think the firewall on your computer should always be on.
Even so, still, sometimes there are certain conditions that require us to turn off the Windows Firewall function, at least temporarily.
For example, when we want to run software that requires more connection access. Because the Firewall will indeed limit or even block connection access, so the software cannot run properly.
How to Turn Off Firewall in Windows 10
So, on this occasion, I would like to make a short article on how to turn off the Firewall feature in Windows 10.
This article is for those of you who may be wondering how to disable it.
Immediately, here’s the tutorial:
1. The First Way to Turn Off Windows Firewall
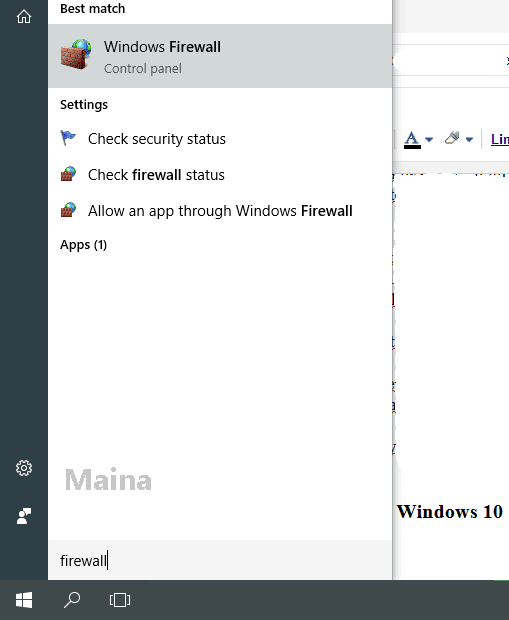
- Step 1. Open the search bar, type ” Firewall ” there, then open Windows Firewall.
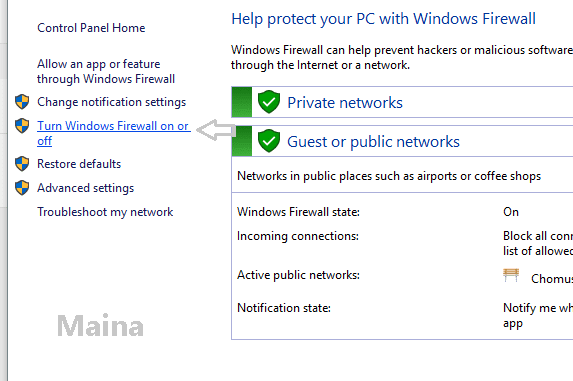
- Step 2. Next, please click the Turn Windows Firewall On or Off menu on the left.
- Step 3. Finally, just change the Private Network Settings and Public Network Settings to Off, then click OK to save the setting changes.
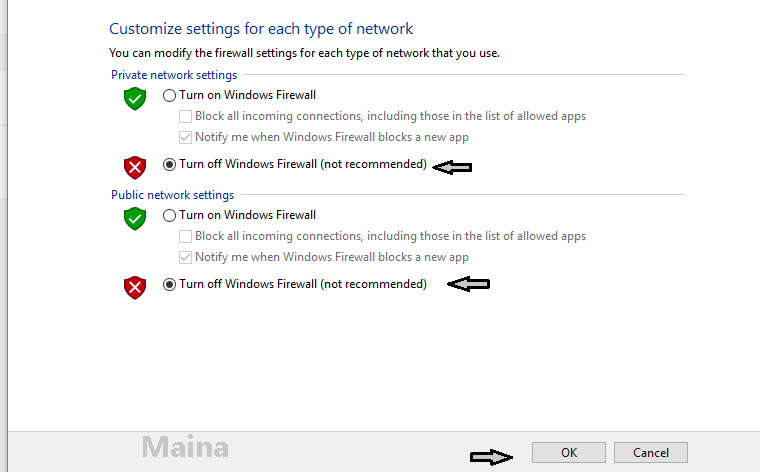
Done. That way, the Windows Firewall status on your computer or laptop has been successfully turned off.
Now, you can retest the software you want to run.
Read Also:
2. Second Way to Disable Windows Firewall
- Step 1. First, please open the search bar, then type in ” Firewall ” and open Windows Firewall which appears as a result.

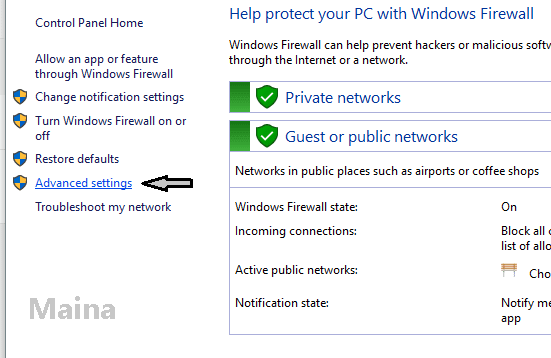
- Step 2. At this stage, we will select the Advanced Settings menu.
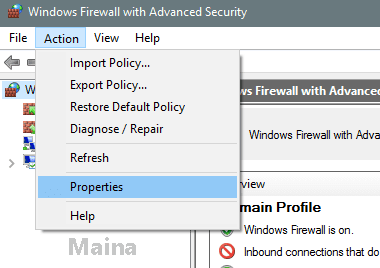
- Step 3. Click the Action tab at the top, then select Properties.
- Step 4. Change Firewall State to Off then click Apply to apply the changed settings.
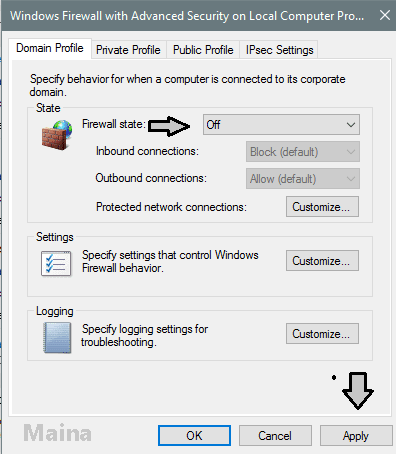
- Step 5. Go to the Private Profile and Public Profile tabs. Here, please do the same thing as in number 4. If everything is done, click OK to end it.
Done.
Conclusion
As we can see, even though both of them intend to disable the Windows Firewall function, the second method actually has longer steps.
So, what is the difference between the first method and the second method? Is it only meant as a variant of the means, or what?
So, basically, it’s the same. However, here I purposely completed the second method, because the second method is more advanced, and has more options than the first method.
That way, you can rearrange other options that can be changed as well, so you don’t have to turn off the Firewall completely.
Furthermore, to re-enable the Firewall, you only need to repeat the methods above again, then please change the setting option to On mode.
Then automatically, Windows Firewall on your computer will immediately turn on again.
I also suggest restarting your PC or laptop first, so that the Firewall can actually work perfectly.
The Final Word
That’s about how to turn off the Firewall in Windows 10. Easy isn’t it?
If you still have questions related to this discussion or have other things to say, you can send comments via the city provided.
Hope it is useful.

![How To Fix: ALT GR Not Working On Windows 10 [2025] How To Fix ALT GR Not Working On Windows 10](https://techmaina.com/wp-content/uploads/2021/04/How-To-Fix-ALT-GR-Not-Working-On-Windows-10-218x150.png)
![Hard Drive Repair – How to Repair a Damaged Hard Drive [2025] Hard Drive Repair - How to Repair a Damaged Hard Drive](https://techmaina.com/wp-content/uploads/2020/12/Hard-Drive-Repair-How-to-Repair-a-Damaged-Hard-Drive.jpg)
![How to Check What Graphics Card You Have [2025] How to Check What Graphics Card You Have](https://techmaina.com/wp-content/uploads/2021/09/How-to-Check-What-Graphics-Card-You-Have-218x150.png)


![How To Fix: Avast VPN Not Working Error On Windows [2025] Best Methods To Fix Avast VPN Not Working On Windows](https://techmaina.com/wp-content/uploads/2021/04/Best-Methods-To-Fix-Avast-VPN-Not-Working-On-Windows-100x70.png)

![Latest Free IPVanish Premium Accounts List [2025] Latest Free IPVanish Premium Accounts List](https://techmaina.com/wp-content/uploads/2021/09/Latest-Free-IPVanish-Premium-Accounts-List-100x70.png)