How to Turn Off Windows Defender or How do you turn off Windows Defender in windows?
For those who don’t know, Windows Defender itself is an antivirus application that is known to be very protective in protecting the system.
Even though it is known to be protective, it turns out that there are times when we have to disable this antivirus application. This is usually done because of a certain purpose.

Well, there are two easy ways you can do to turn off Windows Defender:
- First, how to temporarily turn off Windows Defender through the Windows 10 Security feature.
- Second, how to permanently disable Windows Defender via Registry Editor (Regedit).
Come on, we will immediately discuss:
Table of Contents
Why Do You Need To Disable Windows Defender?
As I mentioned above, Windows Defender is an application that can be said to be very effective in preventing viruses from entering into a computer system.
However, for some conditions, Windows Defender sometimes needs to be disabled too, you know. For example, when we want to install certain applications.
Why must it be deactivated first? The goal is that the installation process to be carried out can run smoothly.
Well, that’s just a case in point, huh.
How To Temporarily Turn Off Windows Defender Windows 10
For how to disable Windows Defender, it turns out to be very easy, you know.
But with a little note, when you turn off Windows Defender for a while, make sure your computer is not connected to the internet first. Because your computer doesn’t have anti-malware.
This is in order to anticipate so that the security of the device system is still maintained, hehe.
Here are the steps:
Step 1: First, first open the Start menu in Windows 10.
Step 2: Next, type the keyword ” Windows Security ” in the application search field.
Step 3: After that, find and click on the application with the name Windows Security.
Step 4: Wait a few moments, until the Windows Security main page opens.
Step 5: Select and click the Virus & threat protection feature.
Note: After you enter the Virus & threat protection feature, you can see the performance results of Windows Defender (in the form of a virus detection report).
Step 6: Next, select the Manage Settings menu.
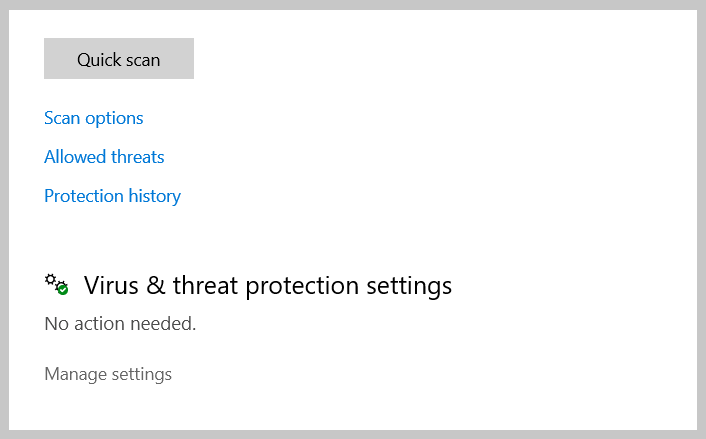
Step 7: Notice the toggle button on the Real-time protection feature. To turn off Windows Defender, change the Real-time protection setting to Off mode.
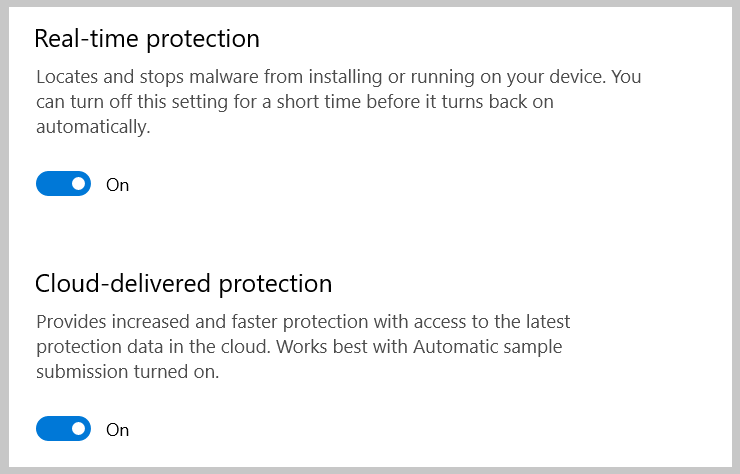
Before continuing, there are a few notes regarding the explanation of the function of the features in the Virus and Threat Protection Settings menu :
- Real-time protection functions to adjust the protection period of Windows Defender in fighting viruses or malware.
- On mode to turn on the protection feature all the time. The default Windows Defender setting itself is this on mode.
- Off mode to temporarily turn off Windows Defender real-time protection. Why did it just turn off temporarily? Because the Windows default system has set Windows Defender to always be active. So, after restarting the computer, the Windows Defender settings will return to on mode again.
- Cloud-delivered protection serves to send notifications to Microsoft regarding security problems on your computer.
Now, we continue the steps again, yes.
Step 8: After you change the setting mode in Virus & threat protection settings, you will see a User Account Control pop-up.
Here, a pop-up will appear. The contents of the pop-up are approximate as follows:
” Do you want to allow this app to make changes to your device ?”
Please just click YES.
Step 9: Done.
This method can be done in all versions of Windows Defender. Whether it’s an old version or the latest update.
Read Also:
How To Permanently Turn Off Windows Defender in Windows 10
The previous tutorial only temporarily disabled Windows Defender.
Then, is there another way to permanently disable it? If so, how?
Well, of course, there are ways too. However, for this method, it is quite advanced, namely by using registry editing.
Well, I will try to explain as easily as possible.
Note: Always make sure to create a registry backup file, before you change any settings in Registry Editor.
Step 1: Open Registry Editor (Regedit) application on your Windows 10.
Note:
There are two ways to open the Registry Editor application.
- First, through the application search menu.
- Click the Windows 10 icon on the taskbar.
- Type the keyword ” Regedit ” in the application search field.
- Next, press Enter.
- If a pop-up related to Registry Editor appears, select Yes.
- Wait a few moments until the main Registry Editor page opens.
- Second, through the keyboard short-cut.
- Press the shortcut Windows + R.
- Wait a few moments until the Run application appears.
- Type the word ” regedit ” in the Open field and click Ok.
- If a pop-up related to Registry Editor appears, select Yes.
- Wait a few moments until the main Registry Editor page opens.
Step 2: Enter the Windows Defender directory.
How:
- First, select and click the HKEY_LOCAL_MACHINE folder.
- Second, click the SOFTWARE folder.
- Third, click the Policies folder.
- Fourth, click Microsoft.
- Finally, click on Windows Defender.
Here: HKEY_LOCAL_MACHINE \ SOFTWARE \ Policies \ Microsoft \ Windows Defender.
Step 3: Look at the contents of the Windows Defender folder. Look for a file named DisableAntiSpyware.
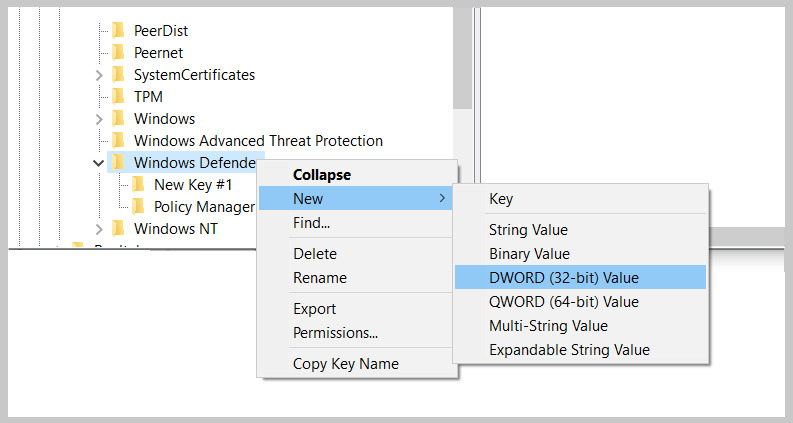
If you don’t have a file with that name, you can create your own:
- First, right-click on the Windows Defender folder.
- Second, select and click the New menu.
- Third, select and click DWORD (32-bit) Value.
- Finally, fill in the Value Name with the name DisableAntiSpyware and the Value data with the number 0. Then press Enter.
For the complete tutorial, pay attention to the image below:
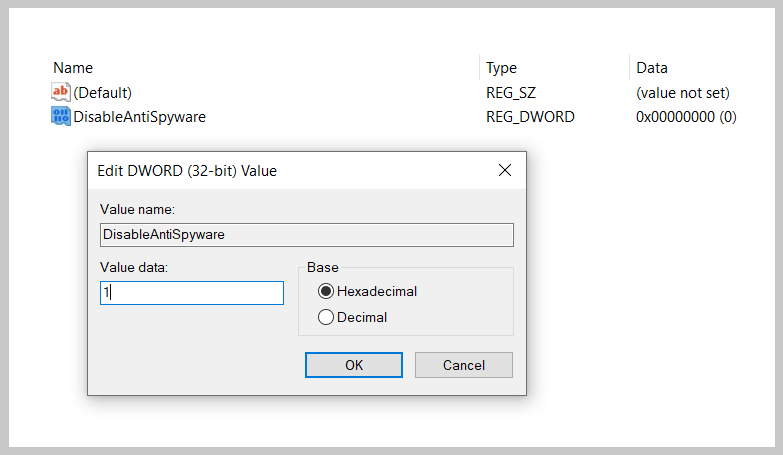
Step 4: Double click on the DisableAntiSpyware file that you just created. Next, change the Value data 0 to 1 and click Ok.
Note:
- Value data 1 indicates that the DisableAntiSpyware feature is active. In other words, you mean disabling Windows Defender.
- If you want to reactivate Windows Defender, fill in the value data with the number 0. Thus, the DisableAntiSpyware feature will become disabled. This means that you have re-enabled Windows Defender.
Step 5: Restart your computer and wait for the Windows system to finish processing the data.
Step 6: Done.
Addendum: How To Turn Off Windows Defender via Local Group Policy Editor (gpedit.msc)
This is an additional way besides the previous point, namely by using the Local Group Policy Editor feature.
This method is rarely known, but it can be an alternative step to disabling the Windows Defender antivirus.
This is how:
Step 1: Open the Start menu in Windows 10.
Step 2: Type the word ” gpedit.msc ” in the application search field.
Step 3: Select and click on the gpedit app to open the Local Group Policy Editor.
Step 4: Wait a few moments, until the Local Group Policy Editor application settings page appears.
Step 5: Go to the Windows Defender Antivirus folder.
- First, select it and click Computer Configuration.
- Second, click Administrative Templates.
- Third, click Windows Components.
- Finally, click on Windows Defender Antivirus.
Or:
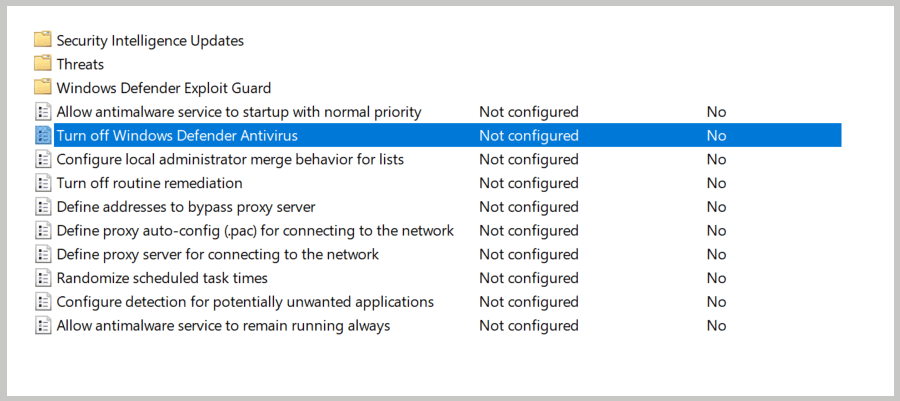
Computer Configuration> Administrative Templates> Windows Components> Windows Defender Antivirus.
Step 6: After entering the Windows Defender Antivirus folder, locate the file with the name Turn off Windows Defender Antivirus. Next, double-click on Turn off Windows Defender Antivirus.
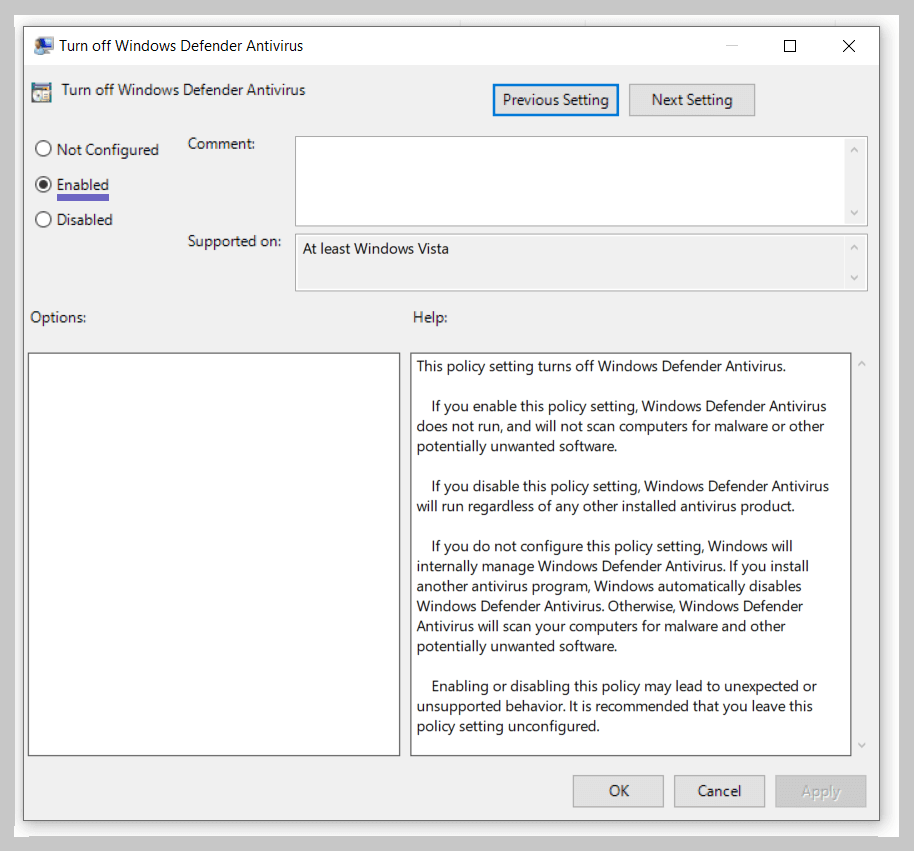
Step 7: Click the Enabled menu. Next, click Apply and end by clicking Ok.
Step 8: Restart your computer device.
Step 9: Done.
What Is Windows Defender?
From the beginning, we have discussed at length about Windows Defender.
But, maybe some of us still don’t really understand this one application.
So, for those of you who don’t really understand, you don’t need to worry. Here I will try to explain again.
So, in a nutshell, Windows Defender is the built-in antivirus software for Windows, which is known for its performance on Windows 10.
This antivirus has a way of working using real-time protection and browser integration features. So, this program will monitor every incoming file offline and online on your computer.
| Real-time protection | Serves to protect the computer directly and continuously (on the system). |
| Browser integration | Serves as protection when the computer is connected to the internet. |
Complete, right?
The Final Word
From the long discussion above, it can be concluded that there are three easy ways that I can share here, to turn off Windows Defender on Windows 10.
- First, through the Windows Security feature.
- Second, through the Registry Editor feature.
- Third, through the Local Group Policy Editor feature.
The first method applies to turn off Windows Defender temporarily, while the second method will turn it off permanently.
If someone is still confused, don’t hesitate to ask directly in the comments column below.
Hopefully, this article can be useful, yes!

![How To Fix: ALT GR Not Working On Windows 10 [2025] How To Fix ALT GR Not Working On Windows 10](https://techmaina.com/wp-content/uploads/2021/04/How-To-Fix-ALT-GR-Not-Working-On-Windows-10-218x150.png)
![Hard Drive Repair – How to Repair a Damaged Hard Drive [2025] Hard Drive Repair - How to Repair a Damaged Hard Drive](https://techmaina.com/wp-content/uploads/2020/12/Hard-Drive-Repair-How-to-Repair-a-Damaged-Hard-Drive.jpg)
![How to Check What Graphics Card You Have [2025] How to Check What Graphics Card You Have](https://techmaina.com/wp-content/uploads/2021/09/How-to-Check-What-Graphics-Card-You-Have-218x150.png)


![How To Fix: Avast VPN Not Working Error On Windows [2025] Best Methods To Fix Avast VPN Not Working On Windows](https://techmaina.com/wp-content/uploads/2021/04/Best-Methods-To-Fix-Avast-VPN-Not-Working-On-Windows-100x70.png)

![Latest Free IPVanish Premium Accounts List [2025] Latest Free IPVanish Premium Accounts List](https://techmaina.com/wp-content/uploads/2021/09/Latest-Free-IPVanish-Premium-Accounts-List-100x70.png)