In this article, I will discuss how to check VRAM on Windows 10. Regarding this, of course, you already know what is a bit much about VRAM.
Let me explain a little more, VRAM stands for Video Random Access Memory, which is a component installed on a video card.
Its function is the graphics processor between the CPU and the video card.
So all graphic output such as textures, buffers, and other things needed by the video card will be processed until it appears on the monitor screen.
That’s a little understanding of VRAM, so what is the impact on the display?

Okay, continue to the topic of discussion, maybe you want to check VRAM because this component is very important for smooth graphics, one of which the user knows is the game.
VRAM is an important aspect if you want to install a game into the system, you have to pay attention to the specifications between this game and VRAM so that later you don’t regret downloading the game for a long time after installing it instead it breaks, lags or is slow.
So a laptop or computer must have VRAM that meets the minimum specifications of a game.
Big games like PES, GTA V, Sniper Ghost Sooter, and others have the minimum VRAM specifications needed.
So you must know how much VRAM your laptop or computer has. Okay, just read the article carefully, it’s easy. There are various ways that I will provide.
So let’s start…
Table of Contents
What Is VRAM?
Video RAM (VRAM), also called “VEE-RAM” is a special RAM that works on the processing of your computer’s graphics card or GPU.
GPU is a chip on your computer graphics card (Vidio Card) which is responsible for displaying an image on your computer.
On your screen, the terms GPU and graphics card are often used interchangeably.
VRAM stores the information needed by the GPU, including game textures and lighting effects. This allows the GPU to quickly access info and output video to your monitor.
Read Also:
How to Check VRAM Using Windows 10 Built-in Tools
Here we show you how to know in Windows 10 without the use of third-party software how much video memory your graphics card has.
Method 1: Check VRAM Via Windows Settings
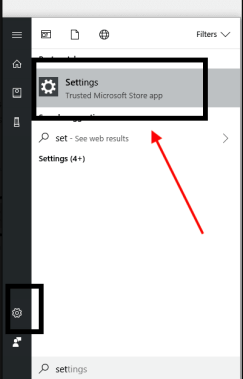
- First of all, you can open the Windows Settings section, via the Start Menu, by selecting the gear icon.
- Or type the keyword “settings” in the Windows 10 Start Menu search.
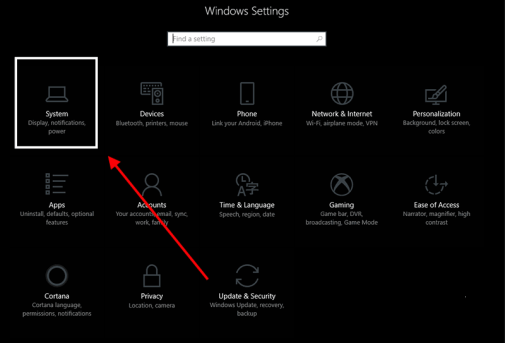
- In the Windows Settings section, select System.
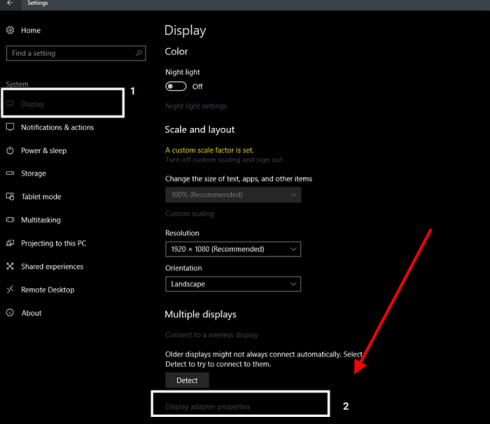
- Choose Display> Display adapter properties.
- After that, a popup window will appear Generic PnP Monitor and (name of your VGA / graphics card) Properties.
- For example, here I am using the Nvidia GeForce GTX 1050.
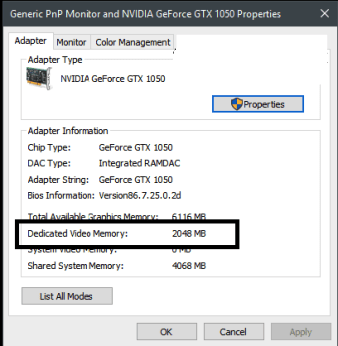
As shown in the image above, which means I use Dedicated Video Memory from Nvidia GeForce GTX 1050, amounting to 2048 Mb (2GB).
So the size of VRAM, which is used on the graphics card or VGA is 2 GB.
What is meant by Dedicated Video Memory, means that independently of the original size or amount, it does not use or eat RAM memory, which is on a computer (PC) or laptop.
Method 2: Know Your VRAM in Windows 10 with Dxdiag
This is another Windows tool – the DirectX Diagnostic Tool. Follow the next steps:
- Another way, you can check VRAM via Dxdiag.
- Press Windows key + R on the Keyboard.
- To run Run, type ” dxdiag”.
- Then select the OK or Enter button.
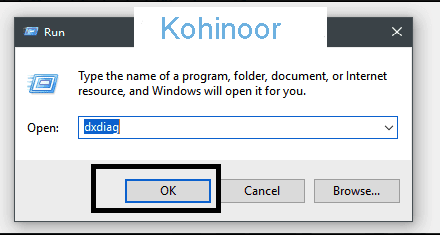
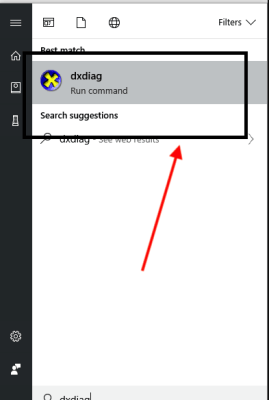
- Or you can type “dxdiag” in the Start Menu search.
- In the Dxdiag window (DirectX Diagnostic Tool), select Display then pay attention to the Display Memory (VRAM) section.
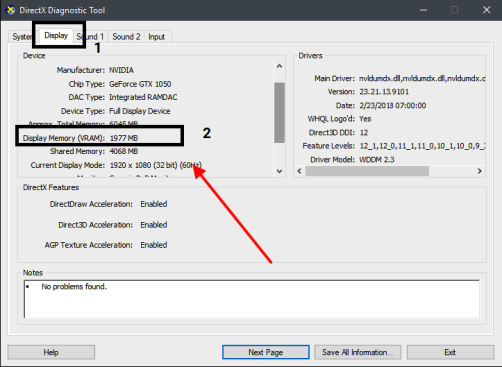
As shown in the picture above, the Display Memory (VRAM) of the Nvidia Geforce GTX 1050, amounted to 1977 Mb, which does not display accurately as before.
How to Know the VRAM Size Using Third-Party Programs Utilities
You can also find information about how much VRAM your video adapter has used various third-party applications and utilities for Windows 10.
1. AIDA64
First, you must download, install, and open the utility. Then follow these steps:
- Go to Screen.
- Select Windows Video.
- Select the graphics card.
- Find the Memory Size field and check its value.
2. HWiNFO
Again, download, install and open the program (It is only available in English). Then follow the steps below to check the dedicated VRAM of your graphics card. On the main screen of the program:
- Go to the “Video Adapter” section.
- Click on the name of your graphics card.
- On the right side of the screen, find the Video Memory section and check its corresponding value on the right:
3. CPU-Z
CPU-Z is one of my favorite utilities for finding information about CPU and RAM modules.
But it is also capable of detecting the specifications of your graphics card (It is only available in English).
Below are the steps you need to follow to see the amount of dedicated VRAM video memory):
- Open the program.
- Go to the Graphics tab.
- Find the Memory section in which the Size field should tell you how much-dedicated video memory you have.
FAQ:
How Much VRAM Do You Need to Play?
There is no concrete and correct answer to this, since each user has their needs and uses their equipment differently, although we can establish certain profiles and what are the graphic memory requirements necessary for them.
In Summary
Which method do you prefer to check the VRAM of your video adapter in Windows 10? And because?
I have noticed that some utilities show erroneous information about the memory size of some cards, this especially affects the Intel Graphics integrated video adapters.
Have you encountered the same problem? Let us know in the comments! Good luck!

![How To Fix: ALT GR Not Working On Windows 10 [2025] How To Fix ALT GR Not Working On Windows 10](https://techmaina.com/wp-content/uploads/2021/04/How-To-Fix-ALT-GR-Not-Working-On-Windows-10-218x150.png)
![Hard Drive Repair – How to Repair a Damaged Hard Drive [2025] Hard Drive Repair - How to Repair a Damaged Hard Drive](https://techmaina.com/wp-content/uploads/2020/12/Hard-Drive-Repair-How-to-Repair-a-Damaged-Hard-Drive.jpg)
![How to Check What Graphics Card You Have [2025] How to Check What Graphics Card You Have](https://techmaina.com/wp-content/uploads/2021/09/How-to-Check-What-Graphics-Card-You-Have-218x150.png)


![How To Fix: Avast VPN Not Working Error On Windows [2025] Best Methods To Fix Avast VPN Not Working On Windows](https://techmaina.com/wp-content/uploads/2021/04/Best-Methods-To-Fix-Avast-VPN-Not-Working-On-Windows-100x70.png)

![Latest Free IPVanish Premium Accounts List [2025] Latest Free IPVanish Premium Accounts List](https://techmaina.com/wp-content/uploads/2021/09/Latest-Free-IPVanish-Premium-Accounts-List-100x70.png)