In this article, we will share with you how to disable autorun in Windows 10 very easily.
Previously, what was AutoRun, anyway?
Broadly speaking, AutoRun (or other terms “Auto Play”) is used to run an application, on a device that is connected to a computer automatically.
For example:
- I put the DVD into the laptop.
- A notification appears (AutoRun).
- I run the AutoRun, then a program opens.
That’s more or less.
AutoRun itself is generally available on devices such as:
- Flashdisk.
- External hard drive.
- DVD.
While the features themselves are already active, be it on Windows 7, Windows 8, or Windows 10.
Table of Contents
How to Turn Off the AutoRun Function in Windows 10
In terms of benefits, you could say AutoRun is quite helpful. For example, when we insert the installer DVD, we don’t have to bother looking for the setup file anymore.
But for some conditions, AutoRun actually needs to be turned off. For example, if there is a virus on the flash so that the virus does not directly enter our computer system.
Well, for Windows 10, we can turn off AutoRun easily, you know. Here I will discuss it in full. It’s easy, guaranteed.
1. Via Windows 10 Settings
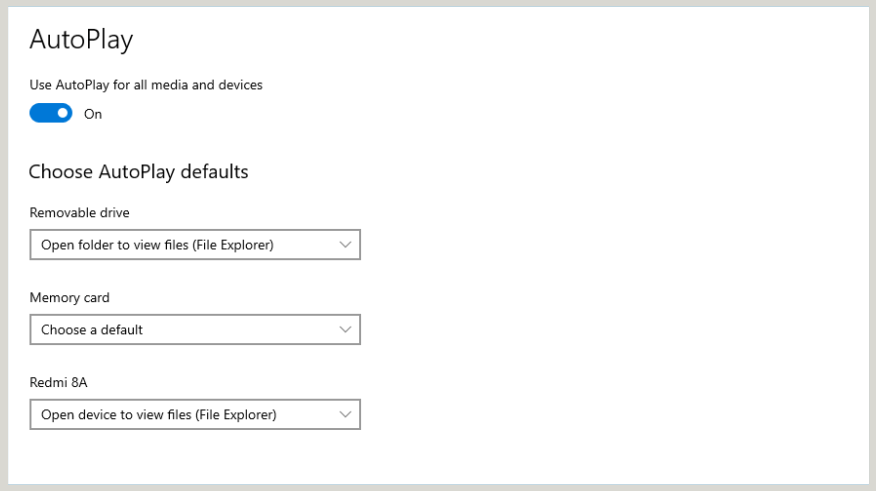
The first way is through Settings.
On this page, you can look for the AutoPlay setting to disable it. We can set it to the off position so that the AutoRun function does not turn on.
It’s like this:
- Open Settings via the Start menu.
- Then, please go to the Devices page.
- Check the left column, then click AutoPlay.
- Change the setting to the off position.
Finished.
This method is intended to turn off AutoPlay on all connected devices, yes. But if you want, you can also set it manually. There is a choice of options, really.
2. Via Control Panel
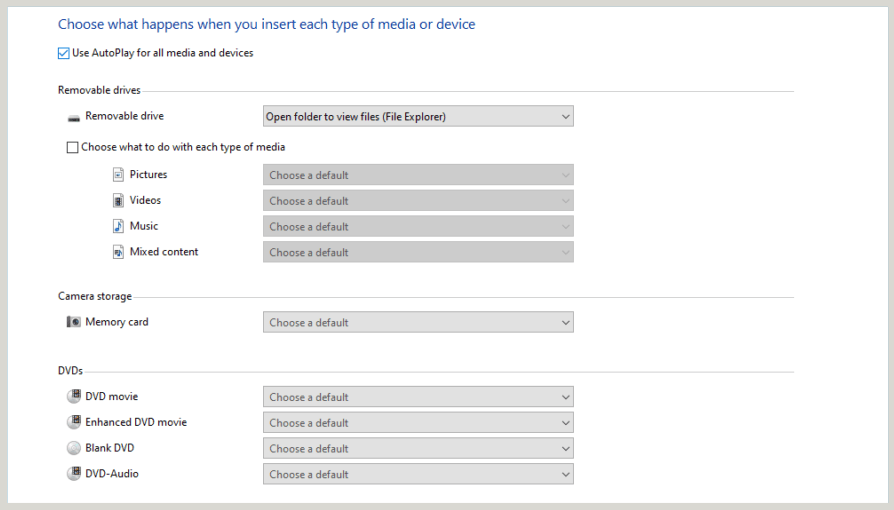
This method is more or less the same as before.
It’s just that, if you go through Settings, the AutoPlay setting may not be found on some versions of Windows 10.
Meanwhile, if you go through the Control Panel, it can be done in all versions.
Here’s how:
- In the Windows search field, type ” Control Panel “.
- Then, please open the Control Panel.
- Continue to open the Hardware and Sounds page, then enter AutoPlay.
- Uncheck Use AutoPlay for all media and devices.
Now, AutoRun has become disabled.
Just like through Settings, here we can also manually set the configuration. Try it.
3. Via Group Policy Editor
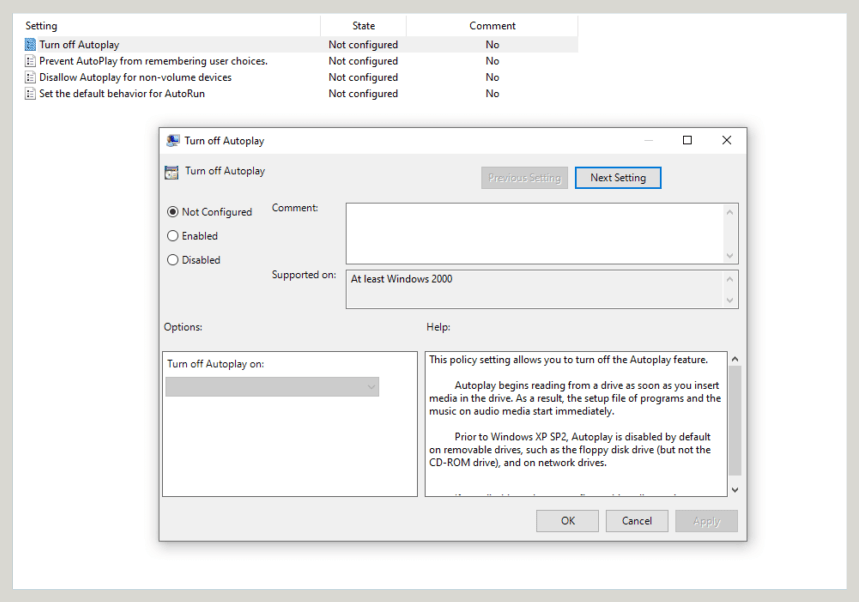
If this one might be somewhat complicated, yes. Via the Group Local Policy Editor in Windows 10.
But it’s guaranteed, really. If you want to try it, you can follow these steps:
- Click the Windows key + R.
- Type “ gpedit.msc ”, then click OK.
- Please go to Computer Configuration > Administrative Templates.
- Then go to the Windows Components > AutoPlay Policies page.
- Click on the Turn Off AutoPlay option, then set it to Enabled.
- Finally, just click Apply, then OK.
Try restarting the computer first. Now, AutoRun is disabled. It’s not as difficult as you think, is it?
4. Via Regedit
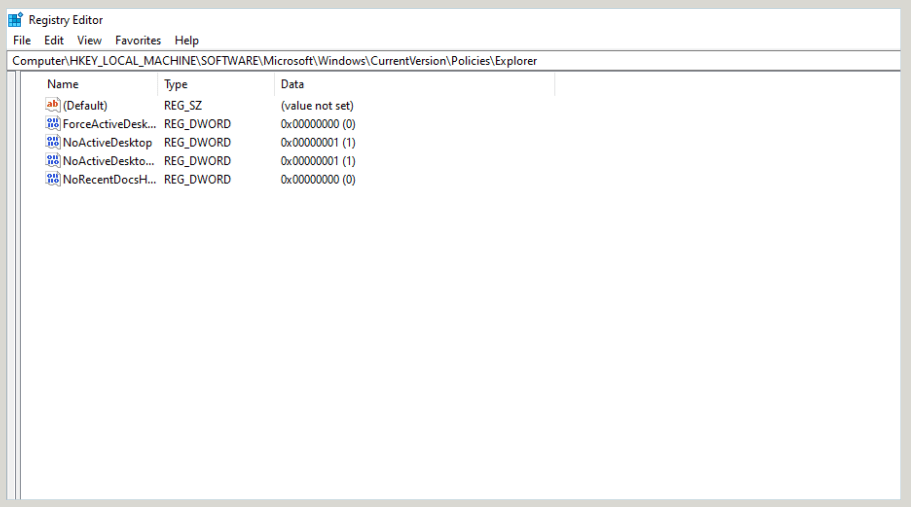
It’s more advanced than the previous one.
You can try it if it turns out that AutoPlay still appears, even though you have implemented the steps I described earlier.
The method is as follows:
- Type ” Regedit ” in the Windows search field, then open it.
- Go to HKEY_LOCAL_MACHINE > Software.
- Continue again go to Microsoft > Windows > CurrentVersion .
- Go back to Policies > Explorer.
- Next, right-click, select New, then create a DWORD (32-bit) Value.
- Name it ” NoDriveTypeAutoRun “.
- For Value , fill in 000000FF(255) .
- Finally, click OK to finish.
Then restart if you have.
The Final Word
That’s the discussion about how to turn off AutoRun in Windows 10.
For how to reactivate it, it’s more or less similar to the steps. Just repeat, anyway. As for regedit, just delete the value.
In closing, for those who want to ask questions, you can directly send your questions via the comments column below.
I hope it is useful.

![How To Fix: ALT GR Not Working On Windows 10 [2025] How To Fix ALT GR Not Working On Windows 10](https://techmaina.com/wp-content/uploads/2021/04/How-To-Fix-ALT-GR-Not-Working-On-Windows-10-218x150.png)
![Hard Drive Repair – How to Repair a Damaged Hard Drive [2025] Hard Drive Repair - How to Repair a Damaged Hard Drive](https://techmaina.com/wp-content/uploads/2020/12/Hard-Drive-Repair-How-to-Repair-a-Damaged-Hard-Drive.jpg)
![How to Check What Graphics Card You Have [2025] How to Check What Graphics Card You Have](https://techmaina.com/wp-content/uploads/2021/09/How-to-Check-What-Graphics-Card-You-Have-218x150.png)


![How To Fix: Avast VPN Not Working Error On Windows [2025] Best Methods To Fix Avast VPN Not Working On Windows](https://techmaina.com/wp-content/uploads/2021/04/Best-Methods-To-Fix-Avast-VPN-Not-Working-On-Windows-100x70.png)

![Latest Free IPVanish Premium Accounts List [2025] Latest Free IPVanish Premium Accounts List](https://techmaina.com/wp-content/uploads/2021/09/Latest-Free-IPVanish-Premium-Accounts-List-100x70.png)