In this article, we will share with you how to solve App Not Installed errors on android.
So, let’s get started…
When you just bought it, basically on an Android phone, there are several standard factory default applications, such as SMS applications, cameras, browsers, and others.
But as time goes by, of course, it will get boring if you only use the same application.
That’s why the Playstore is available which is a place where we can download other applications.
Well, installing applications from Playstore is very simple. We just need to find the desired application, then install it. Thus, the application can be used immediately.
It’s normal like that.
Unfortunately, sometimes there is one particular problem related to this, namely the appearance of a message that the application is not installed.
Table of Contents
Causes of Application Not Installed Error on Android
#1. Not Enough Memory:
We have to make sure that the cellphone still has enough storage capacity. Otherwise, the application will not be able to be installed.
In the Playstore, there is usually an additional ” insufficient storage space ” message.
#2. Installation Error:
Common on rooted phones. The application should be installed in a certain directory, but this is not. The effect will appear a message like ” incorrect Apk install location “.
#3. System Error:
The Android system may have an error. Especially when the phone is used for certain needs. The impact can vary, and some of them can cause errors in the application installation process.
#4. Unsupported Applications:
Both in terms of versions and systems that are not supported. This can happen sometimes.
For example, I installed an application that only supports up to Android Jelly Bean on Android Oreo. Usually, a “not compatible” message will appear.
#5. MOD App:
The problem of Apk being difficult to open on the Android OS also comes from crack applications, premium applications, or paid programs that are usually subscriptions.
Apk Mods often cannot be run due to errors from the Apk program or the game itself.
This is because there are some system settings that are broken or forced and are not very good in terms of patching the Apk bug.
As a result, the Apk is difficult to run and only causes the Android phone to lag or hang for a long time.
Must Read:
How to Fix App Not Installed Error on Android Phones
In the following, I will discuss some solutions that you can try if you are having problems not being able to install certain applications on your Android phone.
To be honest, I myself have also encountered this problem several times. By using the tips that I will share this time, this problem can always be solved, even today.
The solutions here can also be applied to all types of Android phones. For example Samsung, OPPO, Xiaomi, ASUS, Vivo, Lenovo, Huawei, and others.
Come on, take a look:
1. First Restart Smartphone
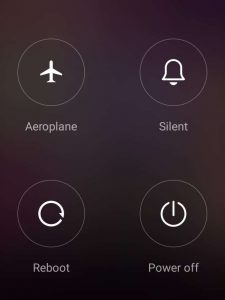
I’ve had problems with the app not being able to install, even on two phones. And this can I overcome only by way of rebooting the system alone, you know.
How come? Yes, can. Because through a reboot, all running applications will stop. More or less like refreshing (refreshing) the system again.
Surely you already know-how
- Press and hold the power button.
- Tap the Reboot or Restart button.
- Then wait for the system to reload.
If you can do it the easy way, why bother with everything, right?
2. Enable Unknown Resources
Uninstalled apps, especially if you installed them in APK form.
The solution can be to try activating the unknown sources feature first, or if in English ” Unknown Resources “.
The steps are this:
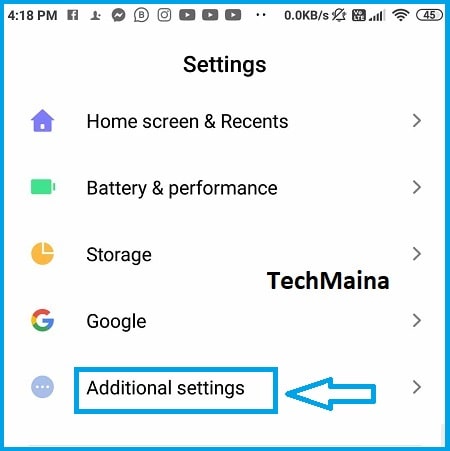
- Go to Android Settings.
- Go to the additional settings or some mobile it will show on the Security menu.
- Go to Privacy settings
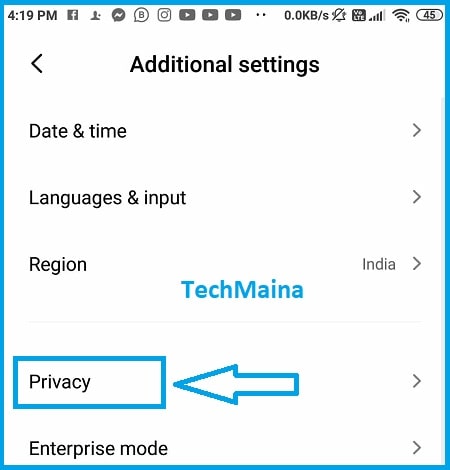
- Then, find and check the Unknown Resource setting.
- Then restart the Phone to refresh it.
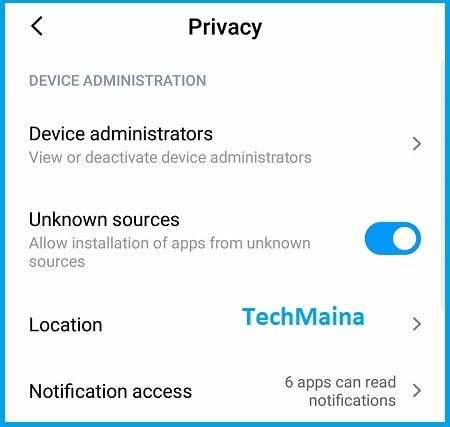
If so, try reinstalling the application earlier. If it’s normal, don’t forget to return the Unknown Resources setting to be disabled again, OK?
Read Also:
3. Give Internal Memory Permission
Most Android phones, if there is a newly installed application, it will go to the internal memory.
Well, in Android version 5.0 and above, there is a feature that can only make memory accessible when it has only received permission from the user.
Therefore, try to check or reset the permission settings. So that no problems arise during the process of installing the application.
Here’s how:
- Go to Android Settings.
- Open the Applications or APP menu.
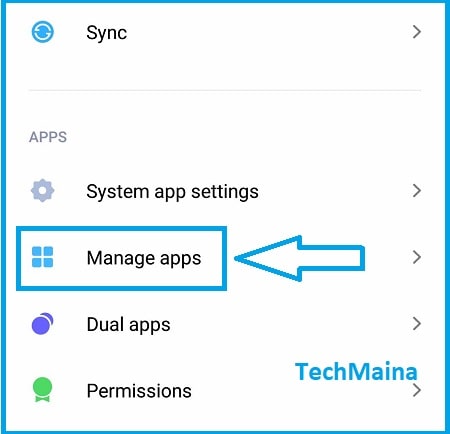
- Then find and open the Google Playstore app there.
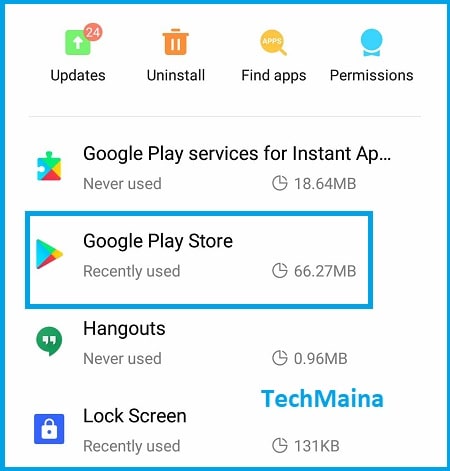
- Go to the Permissions menu.
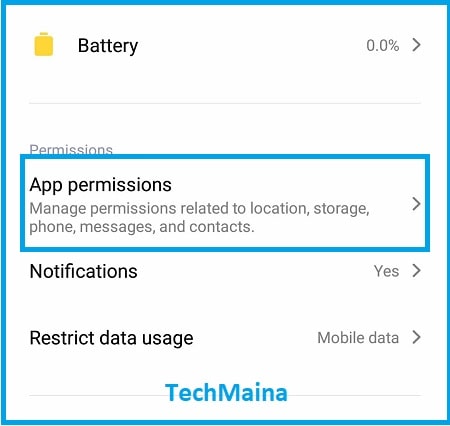
- Then enable Storage permission there.
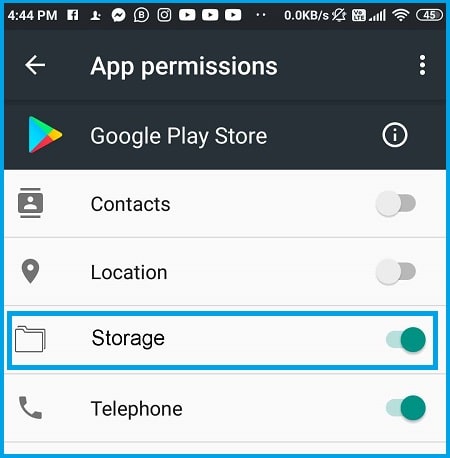
It’s for Google Playstore, yes. If you installed it as an APK, try checking the package installer settings:
- Go to Android Settings.
- Go to the Applications menu.
- Look for the Package Installer app.
- Go to the Permissions menu, then enable Storage permissions.
If so, restart the cellphone as usual, then try to install the application again.
4. Clear Google Playstore Cache
Deleting Cache found on Google storage PlayStore we can try to address applications that can not be installed on Android.
This method can be said to be very effective, especially if you encounter this problem while installing an application through the Playstore.
Here are the steps:
- Go to Android Settings.
- Open the Applications menu.

- Find and open the Playstore App.

- Then go to the Storage menu.
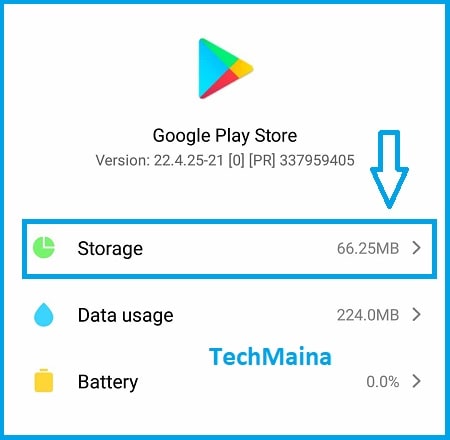
- Tap the Clear Cache button there.
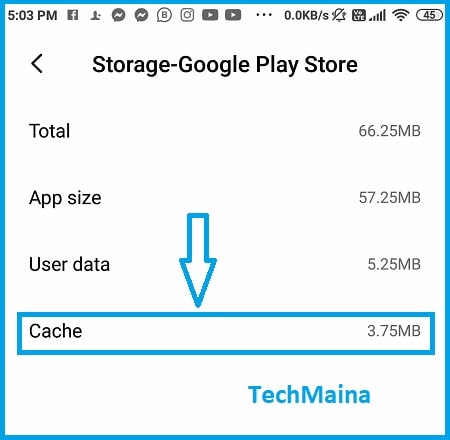
Apart from that, you can also try clicking Uninstall Updates. In my experience, this method is much more effective.
5. Check Internal Memory
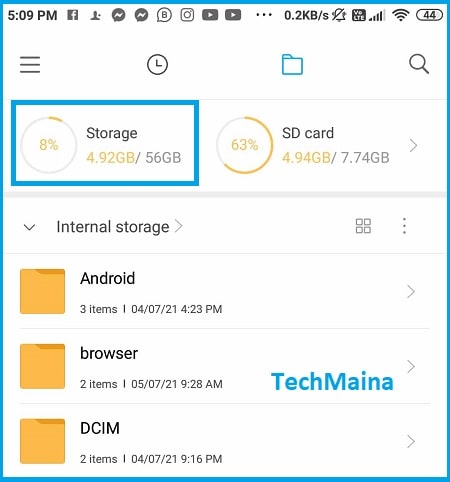
Application sizes vary. Some are only a few MB, and some are up to several GB.
In this regard, what we need to underline here is, we must ensure that there is sufficient storage according to the size of the application to be installed.
This even happens often, you know. There are many users who are not aware of their remaining storage space.
For how to check it, try opening the File Manager application. There are details of the internal memory capacity, how much has been used, and how much space is available.
As for the solution, you should immediately find and delete data that is no longer needed. For example, videos, documents, or photos that are not important.
6. Check App Compatibility (Version)

System compatibility will affect the running of the application function, whether the application can run normally or not.
For example, as I mentioned earlier. Installing an older version of the app on the latest version of Android (or vice versa).
The solution for this is to first check the version of the application and its compatibility. Please adjust or install the latest version.
7. Delete Rarely Used Apps
Applications that are rarely used, over time will make the memory full. Whether it’s RAM or internal memory, and this can certainly make the system disrupted.
One of the effects of this, eventually new applications become uninstallable.
The solution is very simple. Just find the unused application, then delete it.
- Go to Settings.
- Go to the Applications menu.

- Then look for applications that are rarely used.
- Then delete ( uninstall ) the application.
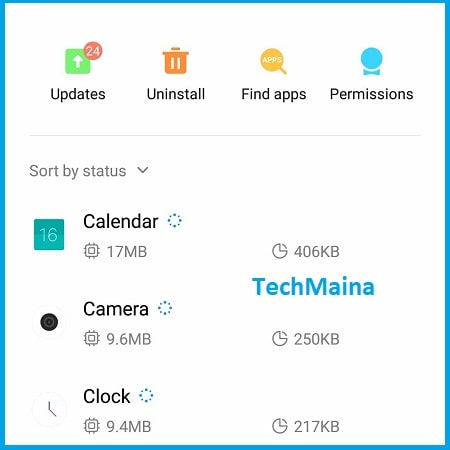
Just like before, don’t forget to restart the cellphone before reinstalling the desired application.
8. Reset Phone
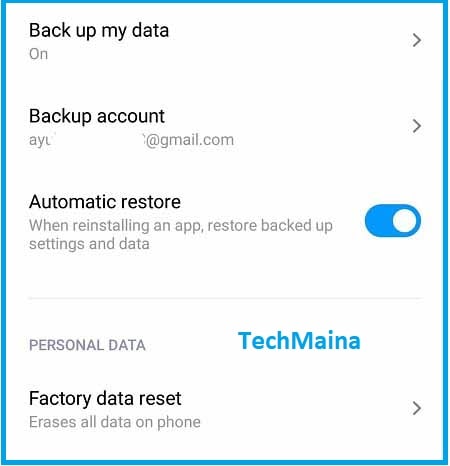
Is phone reset mandatory? The answer is no, really. But if you want suggestions for other solutions that are more or less effective, then this is worth a try.
Through the reset here, all data, settings, and other things on the phone will be lost. The term returns to the initial settings.
Likewise, with all types of errors that exist, it will disappear too.
For how to reset it itself like this:
- Go to Settings.
- Go to the Backup and Reset menu.
- Do a reset there.
PS: Don’t forget to save important data first so you don’t lose it. Suggest using Cloud Storage or move it to another device such as a laptop.
9. Install Custom ROM
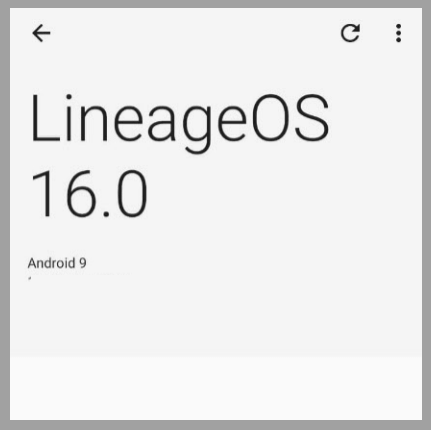
Custom ROMs are completely non-default Android systems. This is arguably the last solution.
Why? Because the installation process is difficult for beginners. But on the other hand, the app not installing issue should go away.
If discussed here, it may be a bit long. Try browsing for more details about what an Android Custom ROM is, and how to install it.
10. Clear the data
Another way to get rid of this annoying error is by clearing the package installer cache and data. Follow the steps below. Note: this option is available on some older phones.
- Go to settings.
- Go to applications.
- Then go to the package installer.
- Clear the data and cache.
- Run the application to verify the problem
The Final Word
That’s the discussion about how to solve the application that can’t be installed on Android. Well, all of them can be tried one by one, and don’t need to be in the order of points.
All of the above solutions are also universal. That is, the causes that I mentioned earlier can be resolved with these solutions.
May be useful.

![How To Restore Deleted Contacts on Android [2025] How To Restore Deleted Contacts on Android](https://techmaina.com/wp-content/uploads/2021/07/How-To-Restore-Deleted-Contacts-on-Android-218x150.png)


![How To Fix: Avast VPN Not Working Error On Windows [2025] Best Methods To Fix Avast VPN Not Working On Windows](https://techmaina.com/wp-content/uploads/2021/04/Best-Methods-To-Fix-Avast-VPN-Not-Working-On-Windows-100x70.png)

![Latest Free IPVanish Premium Accounts List [2025] Latest Free IPVanish Premium Accounts List](https://techmaina.com/wp-content/uploads/2021/09/Latest-Free-IPVanish-Premium-Accounts-List-100x70.png)