How to Remove ByteFence: When installing an application, sometimes certain other applications are suddenly installed without us wanting it.
This actually happens, when the installation process, you are less careful. Namely approving the installation of the application bundle or add-on.
Well, one application that is often encountered is ByteFence.
Table of Contents
Get to Know ByteFence Antivirus
ByteFence is a program that appears and is often seen on the Windows taskbar when the computer is active.
If you are curious about what ByteFence is, this application is not a virus. It’s an antivirus that is installed to help you maintain system protection. For example, to remove malware, adware, and others.
ByteFence is often included in the bundle for installing certain applications. So it is often active without realizing it.
Why Should Be ByteFence Removed From PC
Some people are used to having bytefence, but there are also some people who feel uncomfortable with bytefence.
Because bytefence always appears on the desktop screen and cannot be closed, of course, this is very annoying.
Bytefence as a free application makes some changes to the PC without the user’s permission or PC users which are certainly very annoying.
Such as adding add-ons to each browser, changing the appearance of search engines on the browser, a lot of software that enters the PC without the user’s permission.
When you are browsing on your internet explorer or others, bytefence will direct you so that you will feel very disturbed.
Bytefence also often displays pop-ups or notifications which are very annoying.
Read Also:
How to Remove ByteFence Or Disable Antivirus [2025]
Not a few people want to turn off the ByteFence antivirus, on the grounds that they already have another antivirus before. Like Windows Defender, Avast, and others.
So, here I want to discuss how. Exactly how to remove it thoroughly, using Iobit Uninstaller.
Here are the steps:
# 1. Install Iobit Uninstaller

The first step first installs the Iobit Uninstaller application via the official website.
To do this, please open a browser, then access the Iobit Uninstaller site in the search field. Once the page opens, download it there.
After downloading, install Iobit Uninstaller as usual.
Don’t forget to set the installation directory to drive C, and check the options that show shortcuts on the desktop and taskbar. So it’s easy to open the application later.
# 2. Look for the ByteFence App
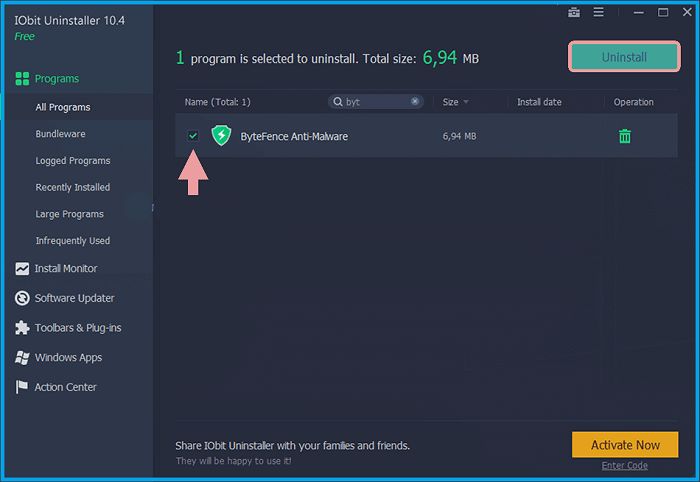
Open the Iobit Uninstaller application on the PC or laptop you are using. Then you will see several menus there.
Please click the All Programs column on the left, then type ByteFence at the top of the search field.
The ByteFence application will appear, select it by giving a checkmark.
# 3. Uninstall ByteFence Application
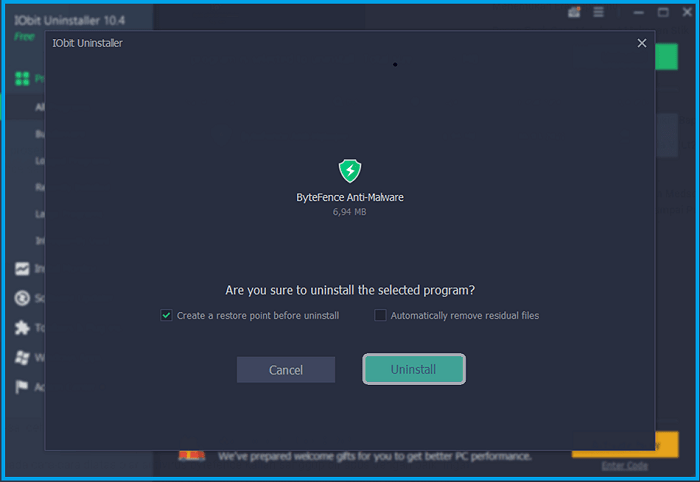
You will see a notification confirmation of deletion from ByteFence.
If you are sure you want to remove ByteFence, please immediately click the Uninstall button to remove the application.
Wait for a few minutes. Usually, between 1 or 2 minutes, the process is complete.
# 4. Check The Results
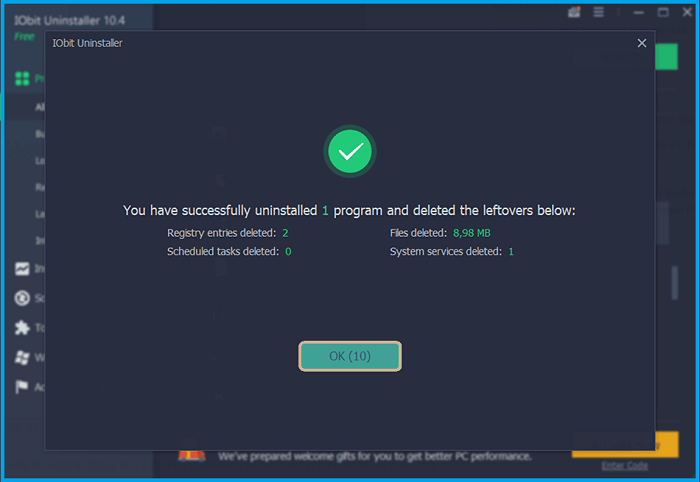
After the removal process, you will see a notification again to delete the registry and default files from ByteFence antivirus. In this step just click the Delete button.
Thus, all ByteFence data will be deleted.
If so, click OK then close Iobit Uninstaller. Don’t forget to restart your PC / laptop so that it takes effect.
Additional Things You Should Check
The previous steps are sufficient. Well, this is an additional point that you might be able to check too. That is:
# 1. Remove ByteFence Shortcut on Desktop
Sometimes the default ByteFence shortcut is still left on the desktop. Here you have to delete it manually. Just click Shift + Delete.
# 2. Change Browser Search Engine
Then for some versions of ByteFence, there are also those that have a search engine installed in the browser. For that here you need to check and replace the search engine.
The Final Word
Well, that’s a brief discussion on how to disable ByteFence antivirus, which is installed on a PC or laptop.
Here I use Iobit Uninstaller, arguing that the results are clean. Because if you go through the Control Panel, as usual, the default registry will still be there, and some of the default data will still be left behind.
I have also used this method to delete the Chromium application.
So, if you want to reuse ByteFence, of course, you can. Just install it again as usual.
May be useful.


![How To Fix: Avast VPN Not Working Error On Windows [2025] Best Methods To Fix Avast VPN Not Working On Windows](https://techmaina.com/wp-content/uploads/2021/04/Best-Methods-To-Fix-Avast-VPN-Not-Working-On-Windows-218x150.png)


![How To Fix: Avast VPN Not Working Error On Windows [2025] Best Methods To Fix Avast VPN Not Working On Windows](https://techmaina.com/wp-content/uploads/2021/04/Best-Methods-To-Fix-Avast-VPN-Not-Working-On-Windows-100x70.png)

![Latest Free IPVanish Premium Accounts List [2025] Latest Free IPVanish Premium Accounts List](https://techmaina.com/wp-content/uploads/2021/09/Latest-Free-IPVanish-Premium-Accounts-List-100x70.png)