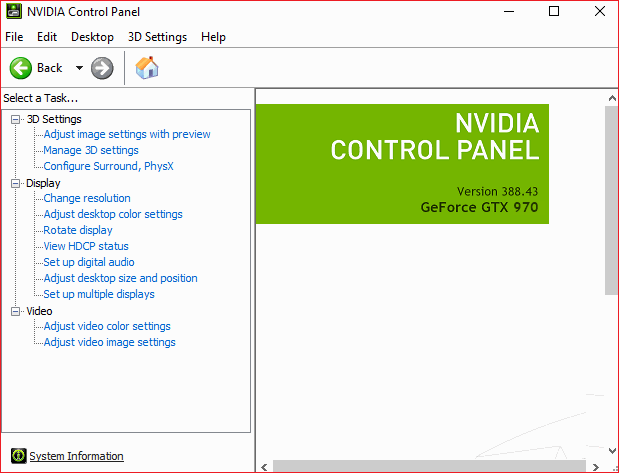
Fix NVIDIA Control Panel Missing in Windows 10: If you have an NVIDIA graphics card installed on your PC, you are probably already familiar with the NVIDIA Control Panel, which allows you to manage and configure your PC’s graphics parameters, such as 3D settings, PhysX settings, etc.
But what if you couldn’t access or open the NVIDIA Control Panel? In that case, you will not be able to change or configure the graphics card settings, which will cause incorrect graphics settings.

Table of Contents
What is NVIDIA And Nvidia Control Panel Missing
Nvidia is a company dedicated to making chipsets and integrated circuits, which have great technology and world fame.
Especially for its graphics cards, equipped with GPU processors, or PC graphics processing units.
But sometimes your control panel in Windows 10 doesn’t appear or closes when you open it. Read on so you can fix this problem, and open the NVIDIA control panel in Windows 10.
Why is the NVIDIA Control Panel Missing in Windows 10?
Users have reported that they cannot find the Nvidia Control Panel or that the NVIDIA Control Panel has completely disappeared from their system or control panel attempt.
The main cause of this problem seems to be Windows Update or Upgrade which makes the graphics drivers incompatible with the new update.
But the problem can also be due to the drivers being out of date or the NVIDIA Control Panel being corrupted.
How to Fix NVIDIA Control Panel Missing in Windows 10
If you cannot find the NVIDIA Control Panel in Windows 10, you will not be able to adjust the NVIDIA graphics preferences, which means that certain applications such as Adobe After Effects, premier pro, etc., and your favorite PC games will not work as expected due to this problem.
But don’t worry, you can easily unhide the NVIDIA Control Panel, and if this doesn’t work, you can always reinstall it to fix the problem.
So, without wasting any time, let’s see how to fix the missing NVIDIA Control Panel problem in Windows 10 with the help of the troubleshooting guide below.
Method 1: Easily Unmask the NVIDIA Control Panel
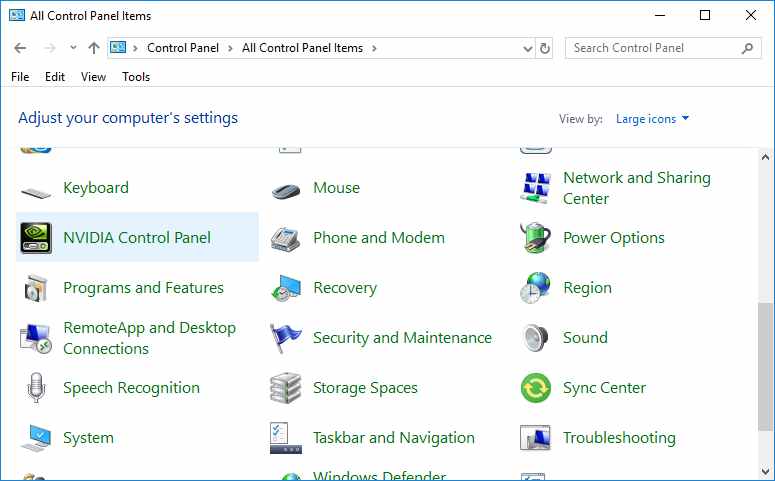
1. Press Windows key + R, then type control and hit Enter to open Control Panel.
2. Now from the View drop-down menu, select Large Icons, and then under Control Panel, select NVIDIA Control Panel.
3. Once the NVIDIA panel opens, click View or Desktop from the menu and click Add Desktop Context Menu to mark it.
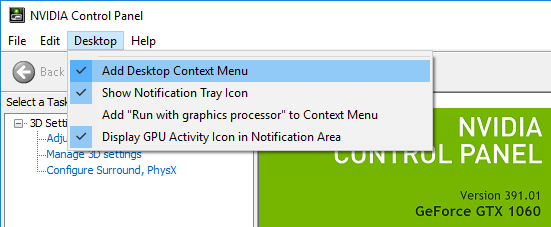
4. Right-click on your desktop and you will see the NVIDIA control panel reappear.
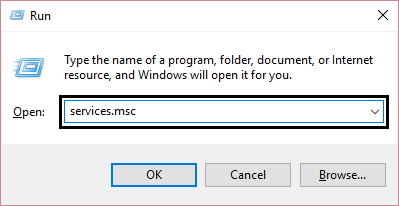
Method 2: Restart Multiple Nvidia Services
1. Press Windows key + R, then type services.msc and press Enter.
2. The following NVIDIA services are now found:
NVIDIA Displays Container LSNVIDIA Local System Container NVIDIA Network Services Container NVIDIA Telemetry Container

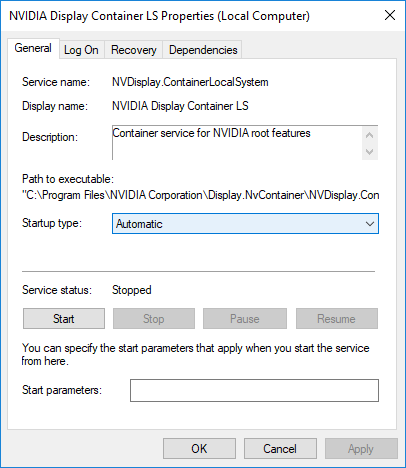
3. Right-click NVIDIA Display Container LS and select Properties.
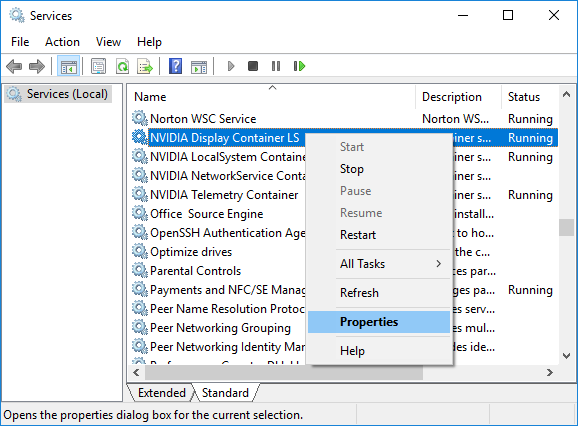
4. Click Stop and then select Automatic from the start type drop-down menu. 5. Wait a few minutes and then click Start again to start the particular service.
5. Repeat steps 3 and 4 for all other NVIDIA services.
See if you can fix NVIDIA Control Panel missing in Windows 10, if not then follow the next method.
Method 3: Update the Graphics Card Drivers
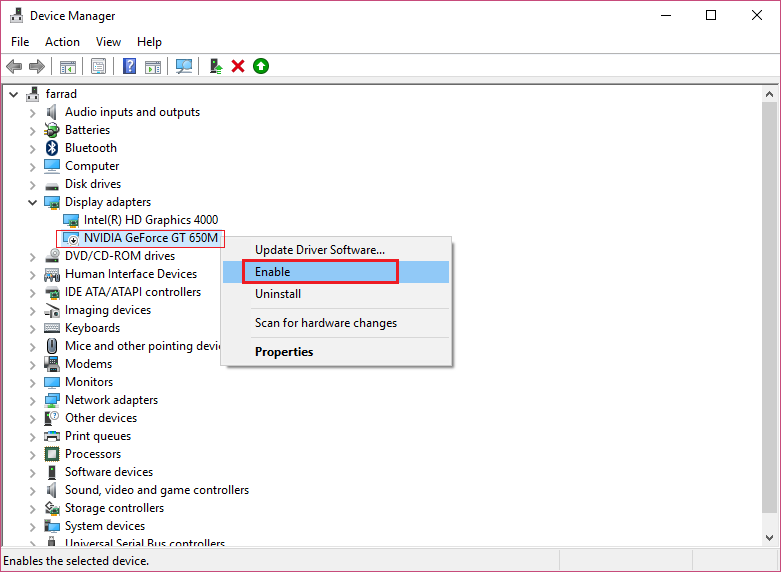
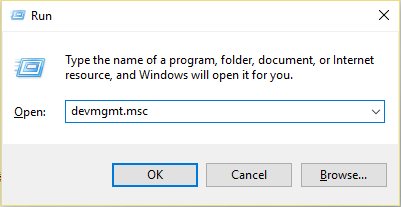
1. Press Windows key + R and type “devmgmt.msc” (without quotes) and press enter to open Device Manager.

2. Next, expand Display Adapters and right-click your Nvidia graphics card, and select Enable.
3. Once you have done this again, right-click on your graphics card and select “Update Driver Software”.
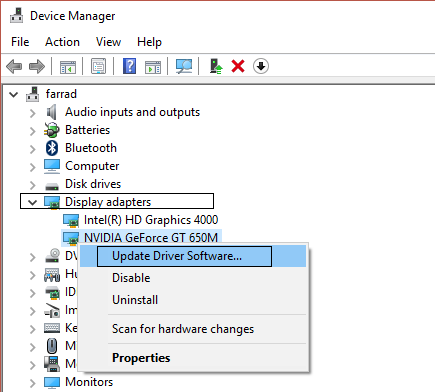
4. Select “Search automatically for updated driver software” and let the process finish.
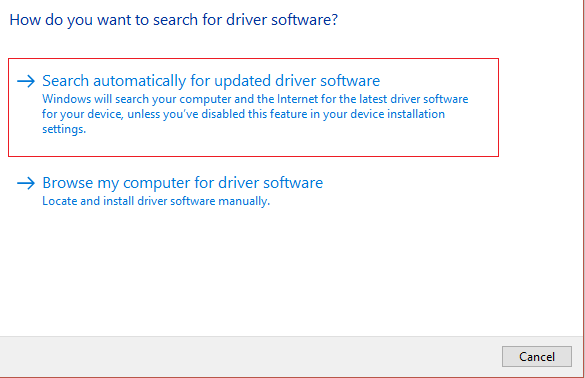
5. If the previous step was able to fix your problem, then fine, if not then continue.
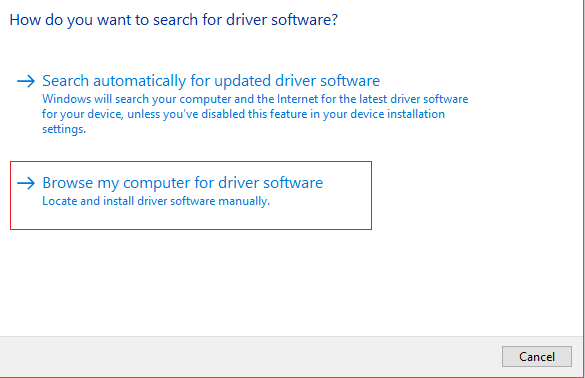
6. Again select “Update driver software”, but this time on the next screen select “Browse my computer for driver software”.
7. Now select “Let me choose from a list of device drivers on my computer.”
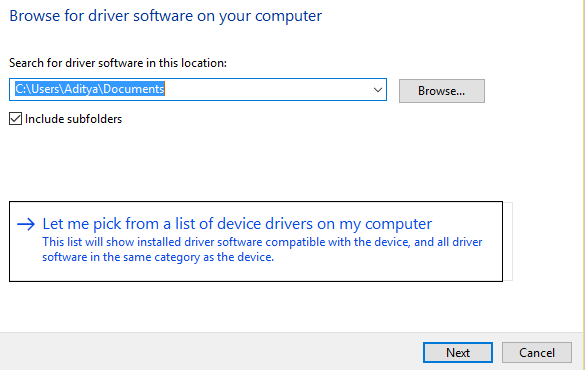
8. Finally, select the last driver in the list and click Next.
9. Let the above process finish and restart your PC to save the changes.
After updating the graphics drivers, you may be able to fix the NVIDIA Control Panel missing in Windows 10.
Method 4: Uninstall Nvidia Completely From Your System
Boot your PC into safe mode and follow the steps below:
1. Press Windows key + R, then type devmgmt.msc and press Enter.
2. Expand Display Adapters and then right-click your NVIDIA graphics card and select Uninstall.
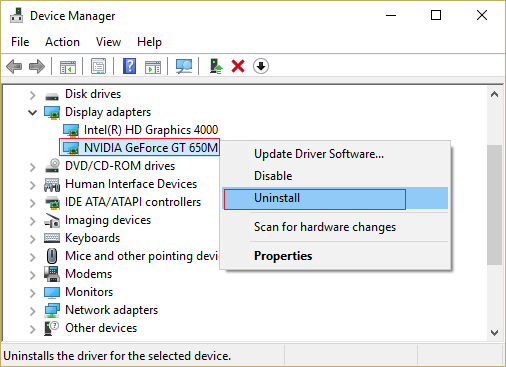
3. If you are prompted for confirmation, select Yes.
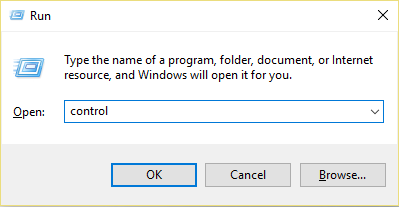
4. Press Windows key + R, then type control and press Enter to open the Control Panel.
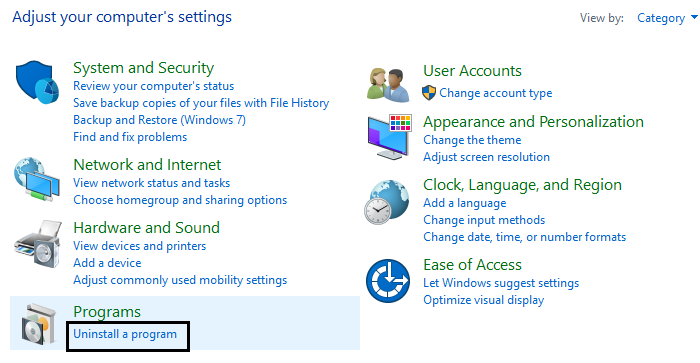
5. From the Control Panel click Uninstall a program.
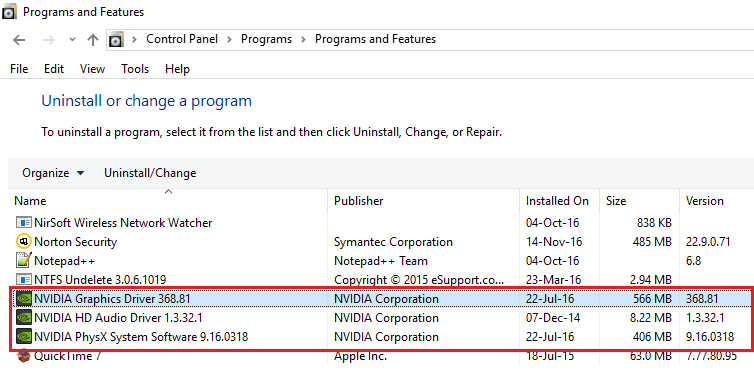
6. Next, uninstall everything Nvidia-related.
7. Restart the system to save the changes and download the configuration again.
8. Once you are sure that you have removed everything, try installing the drivers again and see if you can fix the NVIDIA missing control panel problem or not.
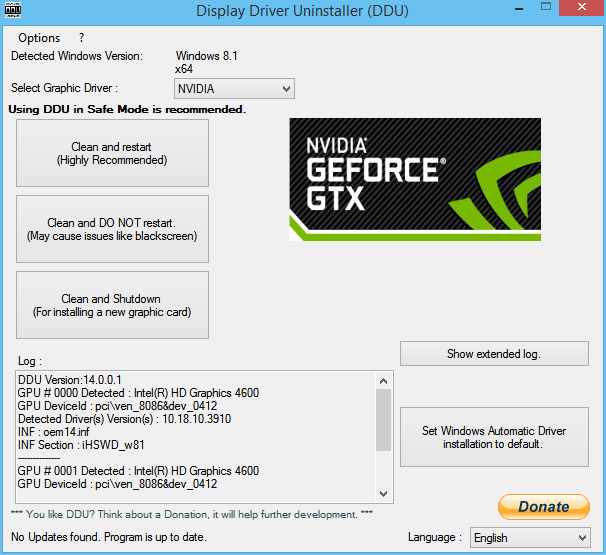
Method 5: Use the Display Driver Uninstaller
If nothing helps so far, then you could use the Display Driver Uninstaller to completely remove the graphics drivers.
Make sure to boot into safe mode and then uninstall the drivers. Then restart your PC and install the latest NVIDIA drivers from the manufacturer’s website.
Method 6: Update Your Drivers from the NIVIDA Website
1. Firstly, you should know what graphics hardware you have, that is, what Nvidia graphics card you have, don’t worry if you don’t know, it can be found easily.
2. Press Windows key + R and in the dialog box type dxdiag and hit enter.
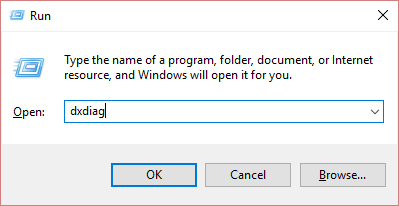
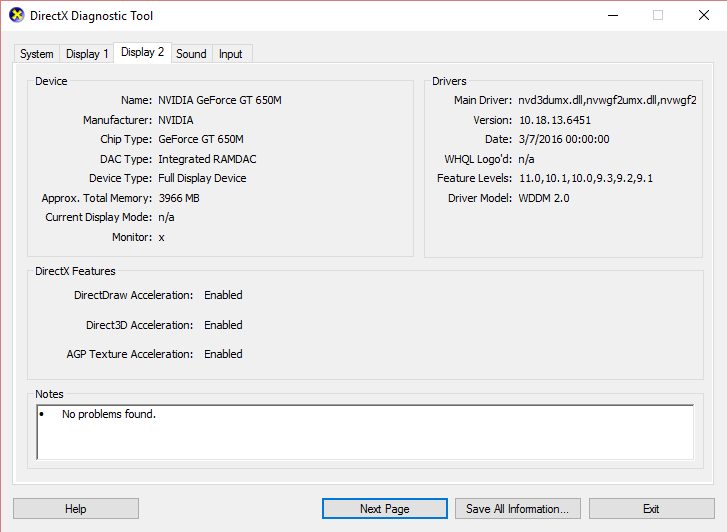
3. After that display tab search (there will be two display tabs, one for the integrated graphics card and one for Nvidia’s), click on the Display tab and find your graphics card.
4. Now go to the Nvidia driver download web page and enter the details of the product we just discovered.
5. Find your drivers after entering the information, click OK, and download the drivers.
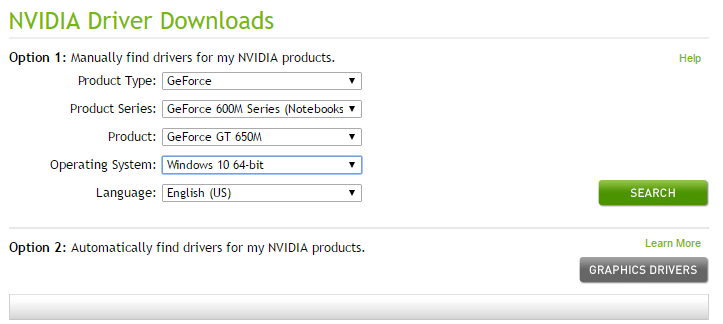
6. After a successful download, install the driver and you have successfully updated your Nvidia drivers manually.
This installation will take some time but after that, you will have successfully updated your driver.
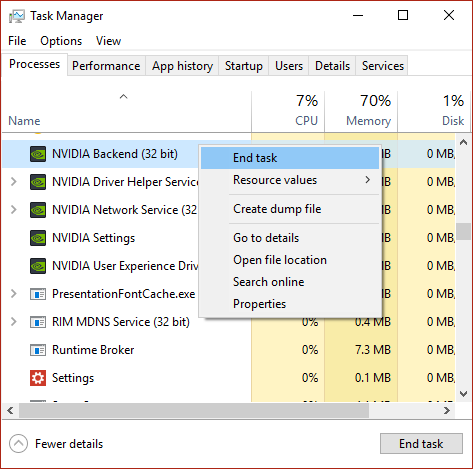
Method 7: Kill NVIDIA Processes
1. Press Ctrl + Shift + Esc to open Task Manager and then find any NVIDIA process running:
NVIDIA Backend (32 bit) NVIDIA Driver Help Service NVIDIA Network Service (32 bit) NVIDIA Configuration NVIDIA User Experience Driver Component
2. Right-click each of them one by one and select End of the task.
3. Now navigate to the following path:
C: N- Windows System 32N- File Repository File
4. Find the following files and right-click on them and select Delete:
nvdsp.infnv_lhnvoclock
5. Now navigate to the following directories:
C: N- Program Files N- NVIDIA Corporation.
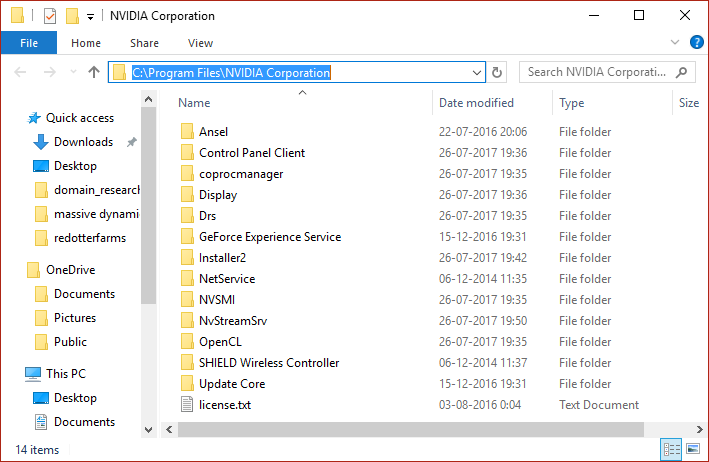
6. Delete any files in the above two folders and then restart your PC to save the changes.
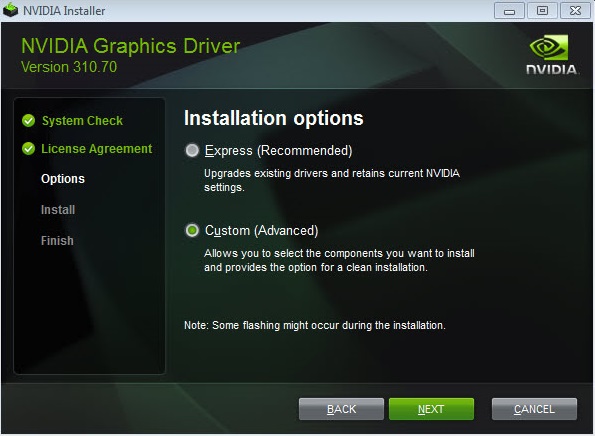
7. Run the NVIDIA installer again and this time select “Custom” and check “perform a clean install”.
8. This time you could complete the installation so this should have the solution of the NVIDIA Control Panel missing in Windows 10.
Method 8: Open NVIDIA Control Panel Manually
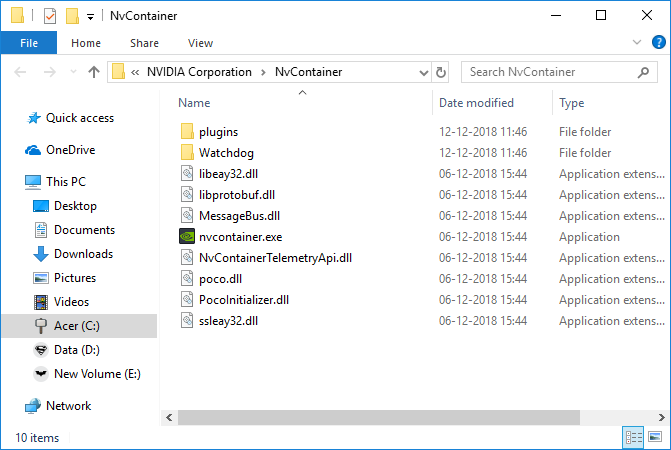
1. Press Ctrl + Shift + Esc together to open Task Manager and then find Nvidia Container on the list.
2. Right-click on the Nvidia container and select Open file location from the context menu.
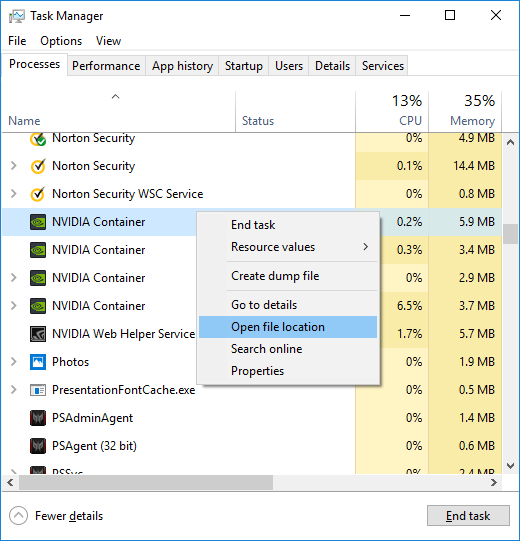
3. Once you click Open file location, you will be taken to this location:
C: N-Program Files N- NVIDIAN Corporation-Display.NvContainer
4. Make sure to click the back button to navigate to the NVIDIA Corporation folder:
C: N-Program Files N-NVIDIA Corporation
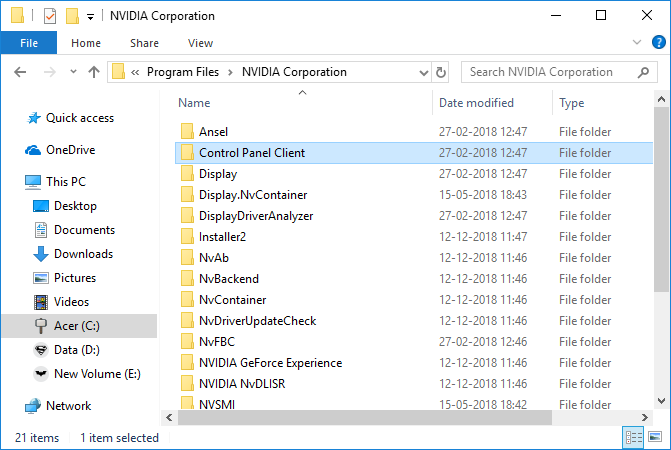
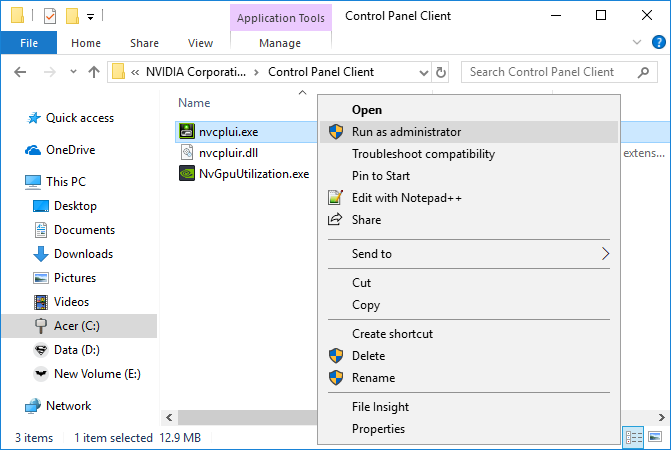
5. Double-click the client folder in the control panel and find nvcplui.exe.
6. Right-click nvcplui.exe and select Run as administrator.
See if you can fix the missing NVIDIA Control Panel in Windows 10, if not continue with the next method.
Method 9: Fix NVIDIA Control Panel Not Opening
1. Navigate to the following location:
C: N-Program Files N- NVIDIAN Corporation-Display.NvContainer
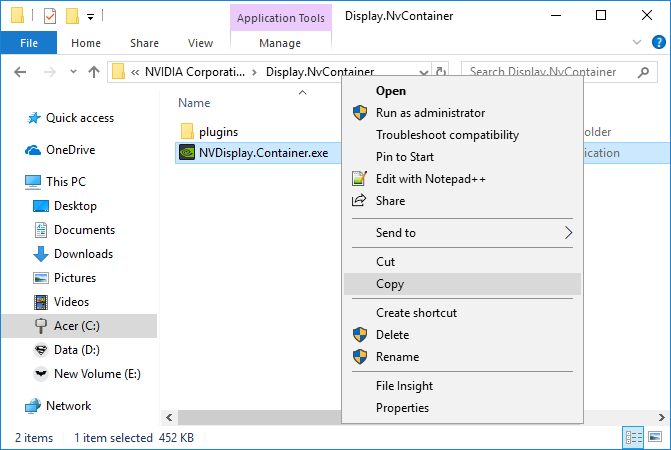
2. Right-click NVDisplay.Container.exe and select Copy.
3. Press Windows key + R, then type shell: startup and press Enter.
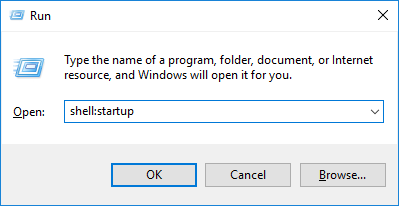
4. Once you hit Enter, you will be taken to the following location:
C: | Username. Application data.
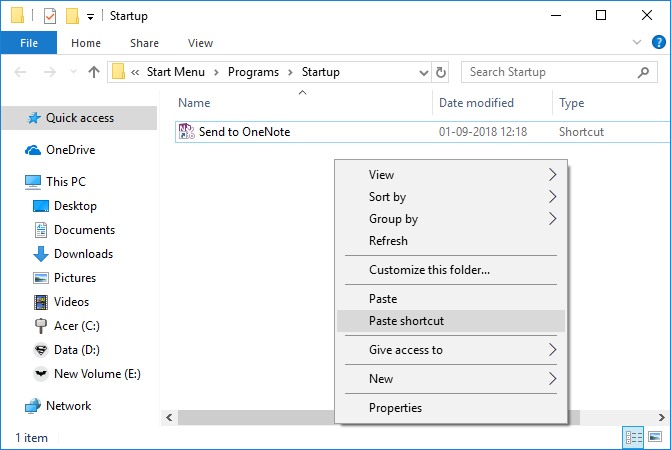
5. Right-click an empty area within the startup folder and select Paste Shortcut.
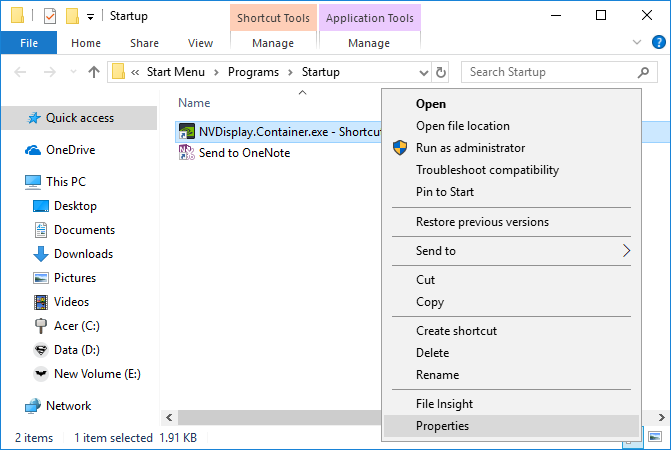
6. Now right-click on the NVDisplay.Container.exe shortcut and select Properties.
7. Switch to the shortcut tab, then click the Advanced button and check “Run as administrator”.

8. Similarly switch to the compatibility tab and then check “Run this program as an administrator” again.
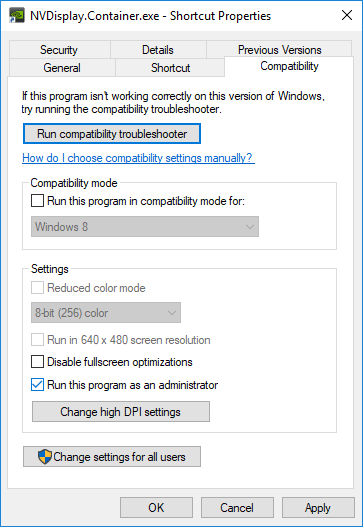
9. Click Apply and then OK to save the changes.
That’s it, you have successfully fixed the NVIDIA Control Panel Missing in Windows 10, but if you still have any questions about this tutorial, feel free to ask them in the comment section.
Conclusion
So that’s some ways to solve the missing NVIDIA Control Panel. We hope that one of the methods above can help you fix the missing NVIDIA Control Panel in Windows 10 and that way you can adjust, change, and optimize your graphics settings again quickly and easily.


